• Skip to main content
  • Skip to primary sidebar

Feast & Lore

Food stories featuring heritage recipes and new experiments.

  • Home
  • Recipes
  • About

Archives for November 2017

Spiced Pork Roast with Apple Onion Gravy

November 27, 2017 By Caroline Leave a Comment

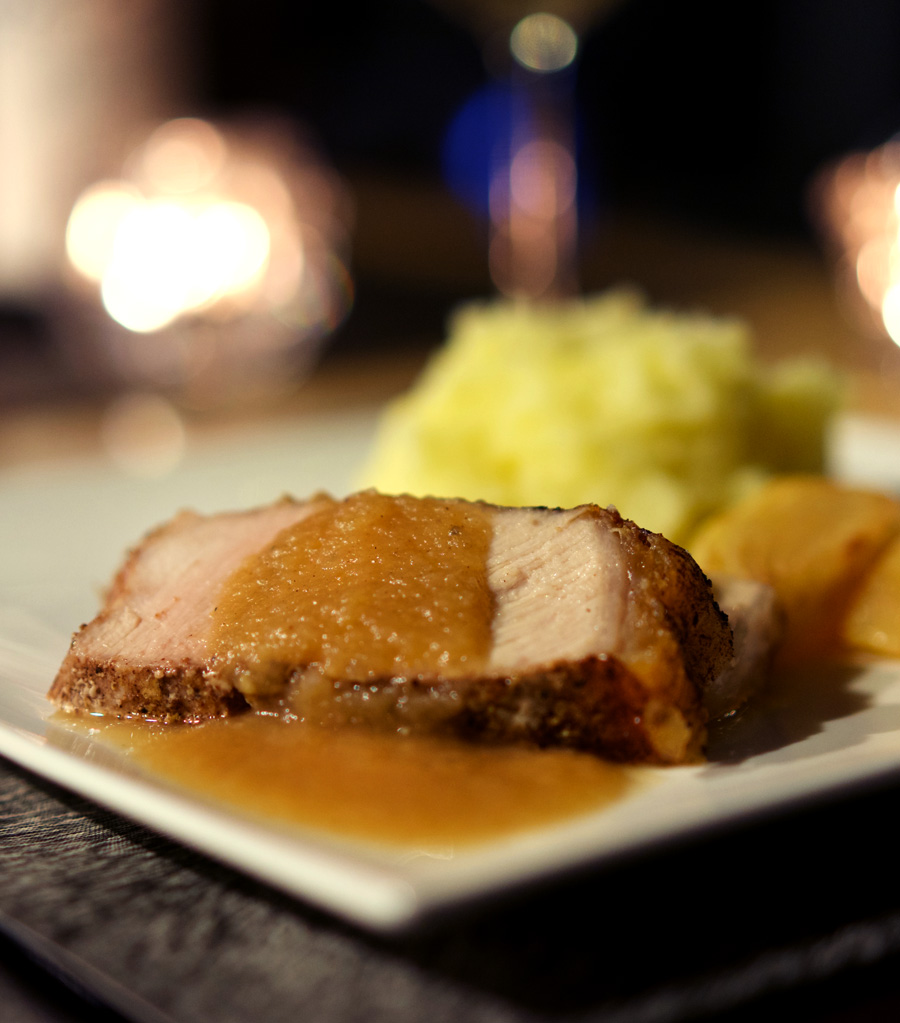
Savoury, spiced and sweet—this roast brings it all together for an elevated take on the classic applesauce and pork pairing. Roasted apples and onions come together with fresh apple cider, maple syrup and pan drippings for an unbelievably flavour-packed gravy. Cinnamon, ginger, lemon zest and spices add subtle complexity to round out the dish. Perfect to enjoy with crisp Riesling on a cool late autumn evening with candles flickering to brighten the dark evening.

Spiced Pork Roast with Apple Onion Gravy is plated with potatoes and roasted apple slices

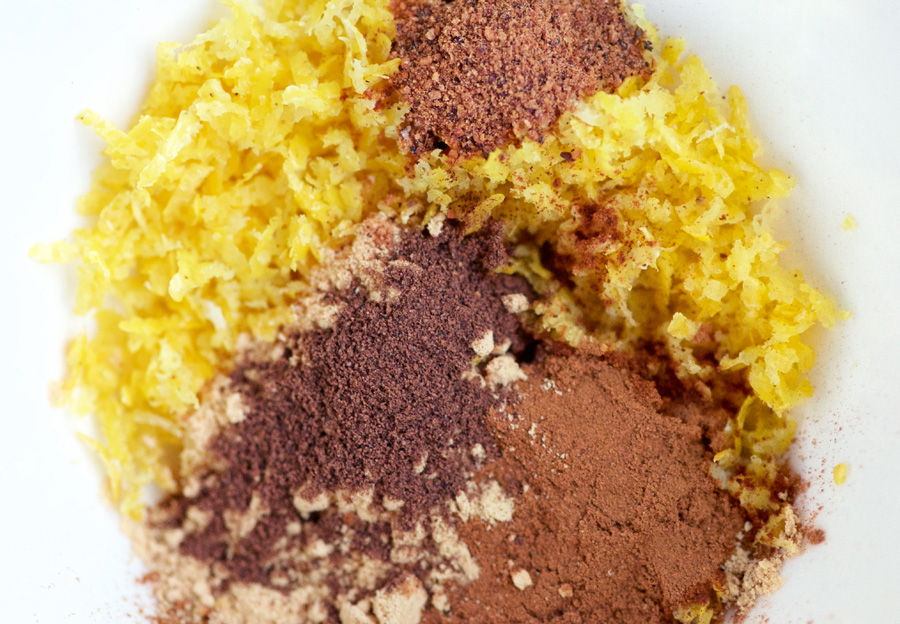
To start with, combine the spices and lemon zest together. Next you’ll split the mix between two bowls, as you’ll use half as a dry rub on the apples and onions, and the rest mixes up with olive oil to rub into to the pork roast.

Spices for the pork roast with lemon zest

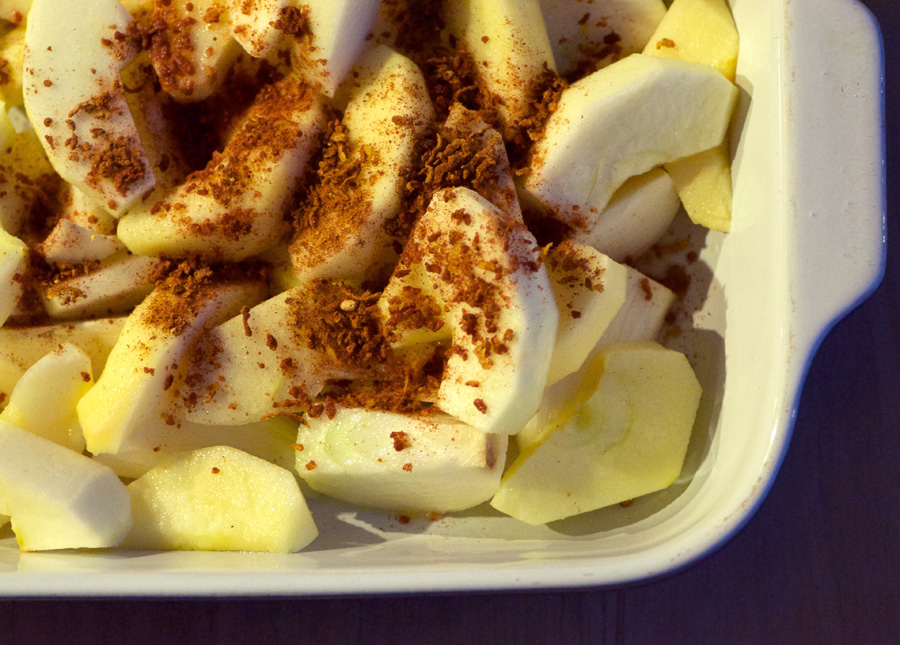
Toss the apples with the spice mixture in the roasting pan, and add water to the dish.

Apples and onions are tossed with spices

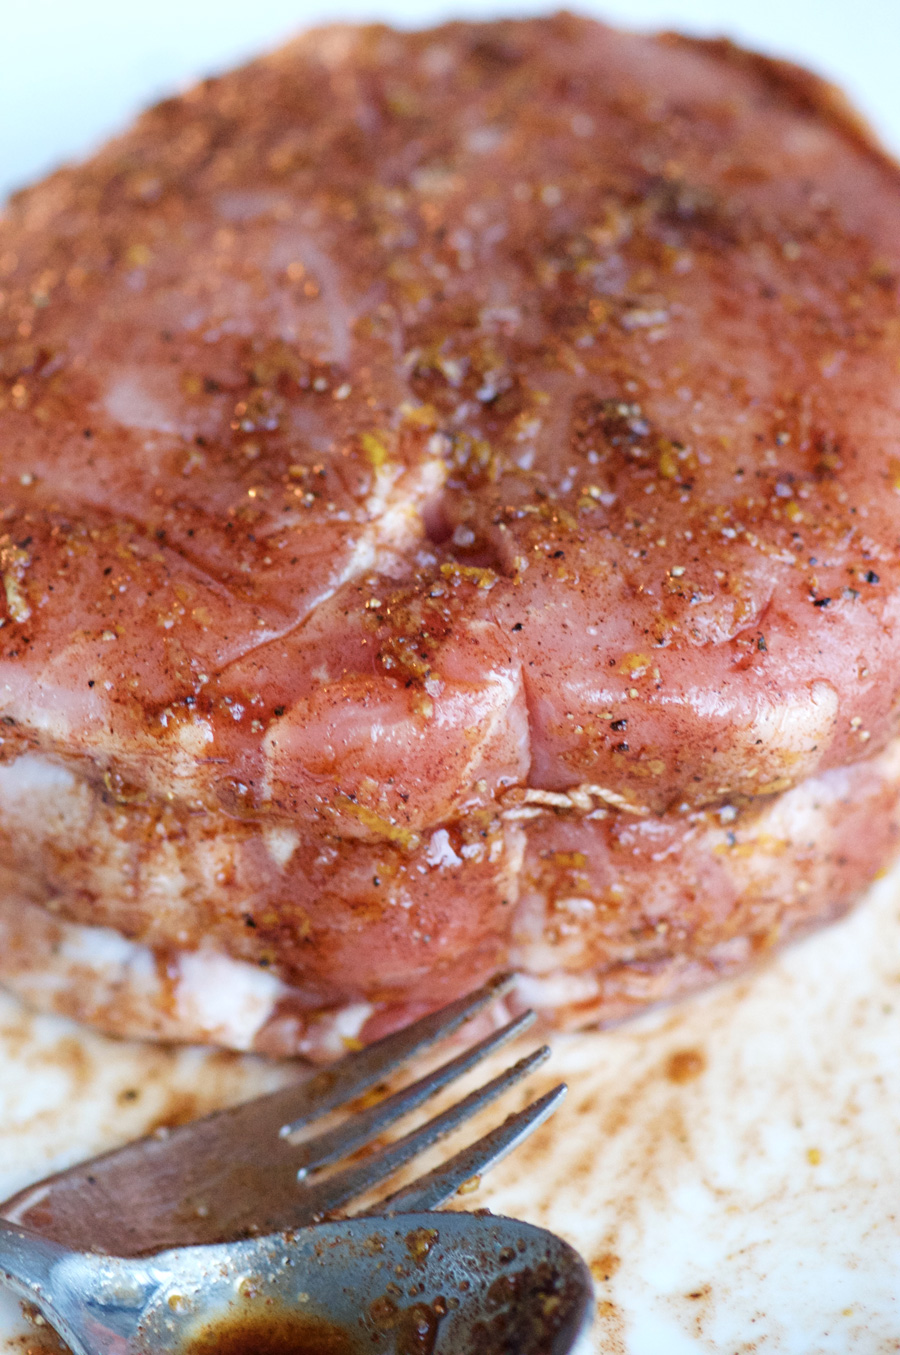
Rub the pork with the olive oil spice mixture, and allow to rest at room temperature for 45 minutes to an hour to allow the meat to come to room temperature before roasting.

The rub is applied generously to the pork roast

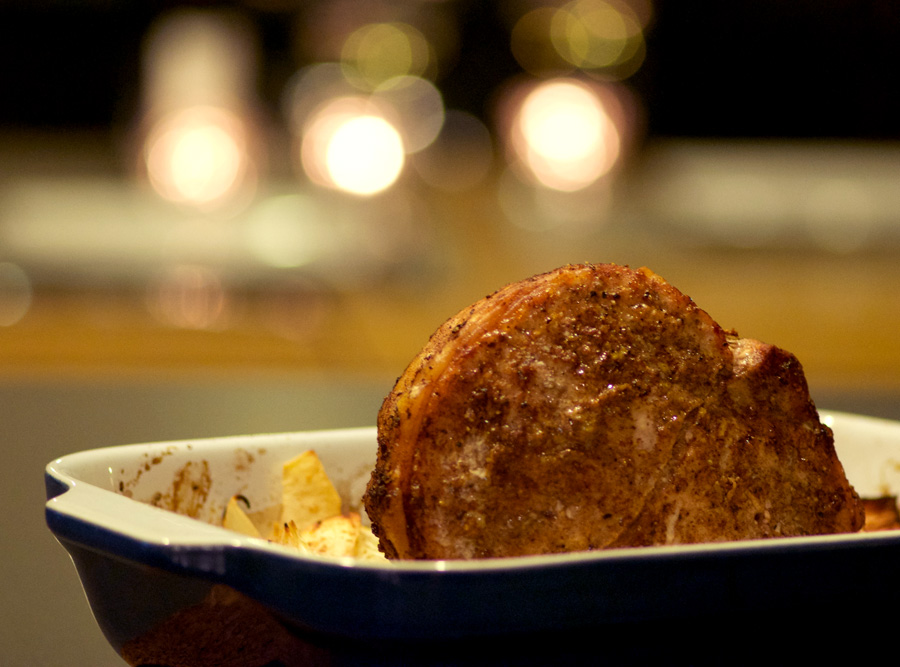
Stand the pork on top of the apple onion mixture, and roast until the internal temperature reaches 145°. Wrap in foil and allow to rest for 5–10 minutes, allowing the temperature to rise to about 150°. (There was a time when the recommended temperature for pork was 160°, but this is actually way overcooked and leaves the meat dry and tough. Here’s a link where you can learn more about why the new USDA guidelines list 145° as a safe minimum temperature for pork. See a little trace of pink? No need to worry, it’s a good thing!)

Spiced Pork Roast emerges from the oven

As the roast emerges from the oven the fragrances of spice and onion is soooo good! Remove most of the apples and onions (reserving just a few as garnish), top with the pan drippings,  and blend into a puree. Add the puree to a small pot you’ll have simmering with apple cider and maple syrup, and you have pure apple onion gravy magic.

Roasted apples and onions in the blender

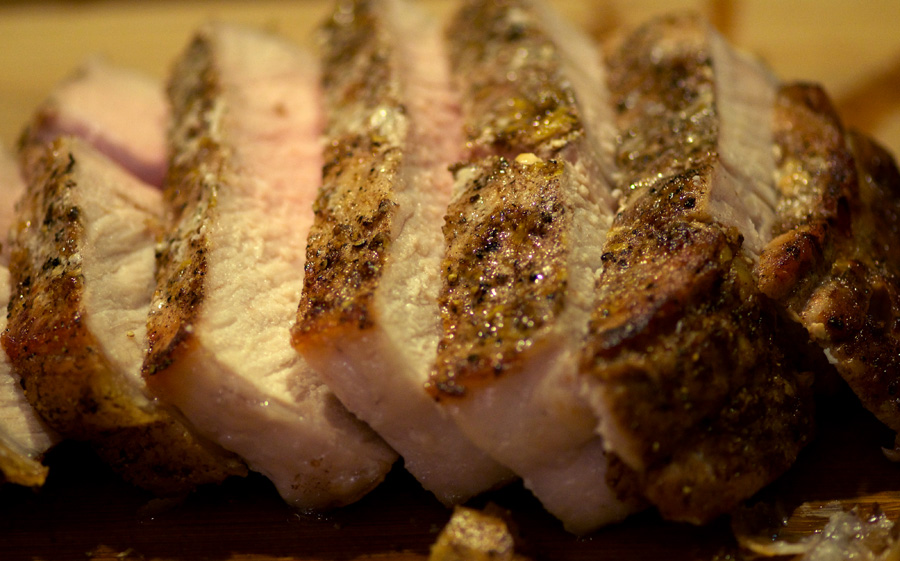
Slice up the perfectly cooked roast, juicy with just a faint trace of pink. Slather with apple onion gravy and enjoy with mashed potatoes, Brussels spouts or your favourite veg. Light some candles, uncork a bottle of Riesling, and turn one of those long, dark winter nights into cozy instead of cold.

Spiced pork roast, perfect medium, sliced

Spiced roast pork with apple and onion gravy
Print

Spiced Roast Pork with Apple Onion Gravy

The classic pairing of applesauce with pork is elevated with a zesty spice rub and apple-onion gravy that's so good, you'll want to just eat it straight up.

Course Main Course
Servings 4

Ingredients

  • zest of one lemon
  • 1 tsp ground cinnamon
  • 1/2 tsp ground ginger
  • 1/4 tsp ground allspice
  • 1/8 tsp ground nutmeg
  • 1 tbsp olive oil
  • 1.5 lb pork loin roast, centre cut (700 g)
  • salt
  • freshly ground pepper
  • 3 apples, peeled, cored and sliced into wedges
  • 2 onions
  • 1/4 cup fresh lemon juice
  • 1/2 cup fresh apple cider
  • 1/4 cup maple syrup

Instructions

  1. In a small bowl, combine lemon zest and spices. Take half of this spice mixture, move it into another bowl and add olive oil. Season pork with salt and pepper and rub with the oil spice mixture. Allow to rest for 45 minutes to one hour before roasting.

  2. Heat oven to 375°. In a roasting pan or deep baking dish, toss apple and onion wedges with lemon juice and the remaining spice mixture. Add 1/2 cup water, and place pork roast on top. Roast until internal temperature reaches 145°. Remove roast to cutting board and tent with foil, allowing to rest for 5–10 minutes. 

  3. While pork is roasting, combine apple cider and maple syrup into a small to medium saucepan and cook over medium high heat, bringing to a boil. Allow to simmer for a few minutes to reduce slightly. Remove from heat and set aside.

  4. Set aside a few apple and onion wedges for plating. In a mini-food processor or blender, blend the remaining roasted apples and onions along with the pan drippings until smooth. Add puree into the apple cider mixture and heat over medium-low heat to warm. Season with salt and pepper to taste.

  5. Slice pork roast and serve with apple onion gravy on the side, garnished with the reserved apple and onion wedges.

Spiced roast pork with apple onion gravy,

Filed Under: Main, Recipe Tagged With: apple, Gravy, lemon zest, Onion, Pork, Pork Roast

Lunch-Prep Acorn Squash Farro Salad

November 20, 2017 By Caroline 2 Comments

Most salads just don’t cut it for me when it comes to lunch. I still feel hungry and typically find myself rewarding my “healthy lunch” with cookies to fill the void in the afternoon, offsetting any healthy gains I thought I was making. Not to mention, leaky salad dressing making a mess of my containers (or worse, my backpack!) is not fun. Read on to learn how to meal prep this salad with all the flavour but none of the leaking. With hearty acorn squash, farro, pumpkin seeds and a few slices of aged goat cheese, this salad is satisfying and delicious. Oh, and pretty good for you, too!

Peppery arugula, sweet squash, faro and a cider dressing make a satisfying lunch you can take to work

The recipe does involve a few steps and isn’t the quickest to make, but the final product is so delicious and a great way to fuel your body for a healthy week. If you’re short on time, you could cut out the pumpkin seeds, but I absolutely LOVE them and find them totally worth the couple of extra steps. To begin, toss raw pumpkin seeds with lemon juice, salt and a bit of cayenne pepper. (I know, lemon juice seems weird when you want to roast the seeds and make them crunchy, right? But trust me it provides a lovely zing and makes them irresistible for snacking.)

Season raw pumpkin seeds and add lemon juice before roasting

Roast in the oven and the raw green seeds transform into golden brown, crispy snacks. Good thing there’s extra so you can munch on these while you make the rest of the salad 🙂

Raw pumpkin seeds are transformed into crunchy goodness

Next, prepare two baking sheets with parchment paper (or just use a light coating of olive oil on a baking sheet if you don’t have parchment—mainly I find the parchment helps speed up the cleanup afterwards). Place slices of acorn squash on top (with a light coating of olive oil, salt and pepper). Roast until golden and tender when pierced with a knife.

Roasted acorn squash slices fresh from the oven

Then, whip up the dressing. Apple cider, cider vinegar, Dijon mustard, olive oil, and seasoning blend together to create a tart dressing for the farro to offset the sweetness of the squash.

Cider Dijon Dressing is tossed with cooked faro, nice and tart to offset the sweet squash

While the squash is in the oven, cook the farro. Farro is a really healthy grain that’s great to add to your regular diet. It’s higher in fibre than many other whole grains—twice the amount found in quinoa, and three times the fibre of rice. Cook according to the package directions. I cook mine like pasta, using more water than needed and draining once cooked, which usually takes about 30 minutes. You’ll want to let it cool a bit before dividing it among four lunch containers, spreading it out to cover the bottoms. Then, spoon the dressing overtop and stir it into the grains. This is the secret to avoid leaking—the farro absorbs much of the dressing and also keeps it from making the arugula layer soggy.

Divide faro between four lunch containers

Next, layer the roasted squash. Finally, top with arugula and cheese slices.

Squash is layered onto faro, to be topped with arugula and goat cheese

To avoid the pumpkin seeds losing their crunch , I wrap them into four little plastic wrap bundles separately, and then add them onto the salad right before eating. If you are able to get a plate at your office, I like to remove the lid from the container, place the plate upside down onto the container and flip it, so that the lettuce is on the bottom of the plate and the grains are on top, and then stir it all together. You want to stir the layers just before eating to ensure the flavours of the dressing and farro interact with the arugula and squash. If you want to eat this right out of the container I suggest using one that’s a bit larger so you have room to stir everything up.

Don’t forget to sprinkle with the pumpkin seeds before eating like I do half the time! If you forget, no worries, they make a great snack on their own. Invest some time in yourself this week and stock your fridge with containers of Acorn Squash Farro Salad for lunches!

Lunch Prep Faro Squash Arugula Salad

Make-ahead salad with farro, squash and arugula wins lunch!
5 from 1 vote
Print

Lunch Prep Acorn Squash Farro Salad

A satisfying salad that won't leave you hungry, with instructions on how to prep this for lunches you can bring to work without any leaking or sogginess!

Course Lunch
Prep Time 15 minutes
Cook Time 1 hour
Total Time 1 hour 15 minutes
Servings 4

Ingredients

  • 1 cup raw pumpkin seeds
  • 1 tbsp fresh lemon juice
  • 1/4 tsp cayenne pepper
  • sea salt
  • 1 acorn squash, seeded and cut into 1/3" slices
  • 1 tbsp olive oil
  • 1 cup cooked farro, cooled
  • 6 oz arugula leaves, or arugula baby spinach mix
  • 6 oz aged goat cheese, sliced
  • 1/4 cup fresh apple cider
  • 2 tbsp cider vinegar
  • 1 tsp Dijon mustard
  • 1/2 tsp salt
  • freshly ground pepper
  • 1/4 cup olive oil

Instructions

  1. Preheat oven to 300°. Toss seeds with lemon juice, cayenne and sea salt to taste. Spread on a parchment lined baking sheet and bake for 12 minutes. Flip/stir the pumpkin seeds and bake another 10 minutes, until golden and crisp. Remove from oven and cool.

  2. Increase oven temperature to 400°. Line two baking sheets with parchment paper, and add acorn squash slices. Spray with a light coating of olive oil (if you don't have olive oil spray, toss with approx 1 tbsp olive oil) and season to taste with salt and pepper. Roast for 40 minutes, flipping halfway through, until golden at the edges and soft when pierced with a knife. Remove from oven and allow to cool.

  3. Cook Farro according to package directions, and allow to cool.

  4. Make dressing: combine apple cider, cider vinegar, Dijon, salt and pepper. Whisk in olive oil until blended. 

  5. Once the farro is cool enough, divide it among four lunch containers spreading the grains to fill the bottom. Spoon the dressing over the farro and stir to combine. Add acorn squash in a layer on top, dividing between the four containers. Finally top with arugula and goat cheese slices. Seal and store in the fridge up to four days.

  6. Wrap four bundles of roasted pumpkin seeds in plastic wrap to take with the packaged lunch containers. To serve, either stir up in the container and top with pumpkin seeds right before eating, or invert onto a plate, stir, toss pumpkin seeds on top and enjoy!

Acorn Farro Salad with Pumpkin Seeds

Note: recipe adapted from Roasted Acorn and Delicata Squash Salad on Epicurious.

Filed Under: Pleb Feasts, Recipe Tagged With: Acorn Squash, Arugula, Farro, lunch, Lunch Prep, Meal Prep, Pumpkin, Pumpkin Seeds, Salad

Meal-Prep Parmesan Turkey Meatballs

November 13, 2017 By Caroline 5 Comments

It’s a cold, dark November evening, you’ve come home after a long day at work, and your hunger is quickly turning you hangry. With some simple advance meal prep techniques, you could be coming home to spaghetti noodles, deep red tomato sauce and juicy, homemade meatballs less than 30 minutes from the time you walked in the door. Read on to find out how and get the full recipe.

Parmesan turkey meatballs ooze into bubbling tomato sauce

Meatballs offer a great intro to the world of advance meal prep. Spend about an hour in the kitchen one weekend afternoon, and you can make enough meatballs to keep your freezer stocked for six weeks or more. Making your own meatballs means you know exactly what went into them—allowing you to avoid unwanted sugar, salt, and fat that are most often found in store-bought varieties. These meatballs also provide an easy way add turkey into your regular meal rotation as an alternate to beef, chicken and pork.

Fresh ground turkey

This meatball recipe originated from Martha Stewart, here. In the Martha recipe, spaghetti squash replaces the pasta which can be a nice healthy option to add more vegetables, but roasting the squash does require closer to an hour. I also find it’s hard to avoid a liquid watery-ness on the plate with the squash noodles, so for my version, I’ve stuck with regular spaghetti pasta instead.

Breadcrumbs, garlic, parsley and Parmesan cheese are blended with the ground turkey to build texture and enhance the flavour. Egg and milk help the mixture hold together. While the Martha recipe advises to mix the liquid ingredients into the breadcrumb mix before adding to the turkey, I find it important to mix all the dry ingredients into the turkey before adding the eggs and milk, otherwise it can make the breadcrumbs soggy and the whole texture of the cooked meatballs goes from meaty and firm to mushy and blah. I like to season the mix with coarse salt and A LOT of freshly ground pepper, too.

Garlic, Parsley, Breadcrumbs and Parmesan flavour the meatballs

Once you’ve combined everything together into a consistent mixture, you’re ready to go into meal-prep assembly line mode! Figure out how many meatballs you want to cook up at a time. I go with seven meatballs per pack—which for us works out to enough for two dinners and leftovers for one lunch. Depending on the size of your family and how much you want for leftovers the next day, select the right number for you (or if you need a lot more than will fit onto a piece of plastic wrap, plan to grab two packs per meal and space them out accordingly). Next, spread out sheets of plastic wrap directly onto your counter. I usually put out 7–8 sheets, with each sheet approximately 16 – 18″ long. Now, start shaping your meatballs. Each one should be a ball about 1.5″ in width. Place each meatball directly onto a prepared sheet of plastic wrap, in a line, with a space of about 3/4″ between each ball.

Assembly line of turkey meatballs ready to be wrapped and frozen as meal prep

Once you’ve shaped all your meatballs, it’s time to wrap them up. Grab the long end of the plastic wrap and fold it over the meatballs, pressing down to stick it onto the other side the sheet so that the meatballs are covered. Starting at one end, gently hold a meatball with the plastic around it and push it towards the nearest meatball, allowing the excess plastic to bunch up between them so the actual meatballs don’t touch and are separated by plastic. Continue bunching and pressing the meatballs together until they are bunched closely together and form a log. Grab a second piece of plastic wrap and use it to wrap the bundle together, folding the ends in first and then rolling for a firm, secure plastic wrap sleeve.

Meatballs getting wrapped for the freezer as part of meal prep

Once all your logs/sleeves of meatballs are ready, you can pop them into the freezer. Pause to admire your handiwork—each bundle represents a evening where you can come home to a nice, easy meal that’s homemade and good for you, too 🙂

Meatballs are wrapped into logs ready for the freezer

To cook up a batch, grab a jar of your favourite spaghetti sauce and heat it to a gentle simmer. Grab a sleeve of meatballs from the freezer and throw into the microwave to defrost on very low power for about 30 seconds, just enough so that you can pull them apart. Unwrap them and drop the frozen meatballs straight into the bubbling sauce. Cover and simmer on medium-low for 25 – 30 minutes, until the meatballs are cooked through. (Stir the meatballs a few times while cooking and watch that the sauce bubbles don’t get too explosive, as tomato sauce likes to blow the lid!) Most recipes tell you to brown the meatballs before cooking in the sauce, but I honestly prefer the way they cook without that step. I find the meatballs are more tender and I love how the Parmesan starts to ooze into the tomato sauce as they simmer.

Cooking meatballs in bubbling tomato sauce

While the meatballs are cooking, boil up a large pot of salted water for the spaghetti noodles. At the 20 minute mark from when you dropped the meatballs into the sauce, add pasta to your boiling water and cook for 10 minutes or until al dente. Drain the noodles, plate, and top with meatballs and sauce. Top with a little (or a lot!) of additional grated Parmesan and a good dose of freshly ground pepper. Homemade comfort, yours in 30 minutes—enjoy!

Parmesan Turkey Meatballs piled high onto spaghetti noodles with tomato sauce

Parmesan Turkey Meatballs cut open on a bed of spaghetti noodles and tomato sauce

Meal Prep Parmesan Turkey Meatballs
Parmesan Turkey Meatballs piled high onto spaghetti noodles with tomato sauce
5 from 1 vote
Print

Meal-prep Parmesan Turkey Meatballs

Whip up a batch of these savoury, healthy meatballs on the weekend and enjoy comforting homemade dinners for weeks to come!

Course Main Course
Cuisine Italian
Prep Time 1 hour
Cook Time 30 minutes
Total Time 1 hour 30 minutes
Servings 45 meatballs

Ingredients

  • 950 g ground turkey (approx 2 lb)
  • 1 1/2 tsp coarse salt
  • lots freshly ground pepper
  • 1 cup breadcrumbs
  • 1 cup grated Parmesan cheese
  • 1/2 cup fresh parsley, chopped
  • 3 cloves fresh garlic, finely chopped
  • 2 eggs
  • 1/2 cup milk

Instructions

  1. Lay out plastic wrap sheets onto a table or counter, approximately 7 sheets, each about 18" long. 

  2. In a large bowl, add the ground turkey. Add salt, pepper, breadcrumbs, Parmesan, parsley and garlic; combine with a fork until loosely combined. Add milk and eggs and lightly incorporate with a fork. Using your hands, mix until it is fully combined and comes together into even consistency. 

  3. Shape into 1.5" balls, placing onto the prepared plastic sheet. Decide how many meatballs you want to cook up at one time and place that number of meatballs onto each sheet, spacing about 3/4" apart.

  4. Gathering plastic between each meatball, scrunch them together so there is no more empty space between them, shaping into a log. Wrap another sheet of plastic around each packet to form a sleeve to be placed into the freezer. Continue until all the meatballs are completed, and place everything into the freezer.

  5. When you are ready to cook some, remove a sleeve from the freezer and defrost slightly in the microwave if needed to be able to pull them apart (but they should still be frozen solid). Add a jar of spaghetti sauce to a pot and bring to a gentle simmer. Drop the frozen meatballs into the sauce and cook over medium low heat for 25 – 30 minutes, until cooked through. (Stirring a few times while they cook)

  6. Meanwhile, boil a large pot of salted water over high heat. When the meatballs have 10 minutes left to cook, add the spaghetti noodles and cook 10 minutes, until al dente. Drain pasta, plate and top with meatballs and sauce. Top with additional freshly ground pepper and Parmesan if desired. 

Filed Under: Main, Recipe Tagged With: freezer friendly, Italian, meal planning, meatballs, parmesan, pasta, spaghetti, Turkey

Barrel Aged Manhattan

November 5, 2017 By Caroline 6 Comments

Fragrances of bourbon, oak and vanilla waft up to your nose. The drink glows amber, with a delicate dewy sheen from the chill of ice from the cocktail shaker. A sip reveals rich oak and smokey flavours, faint sweetness and a soft burn, but it’s so smooth you can’t believe you’re drinking Bourbon. Small-batch barrel aging is the game changer for this cocktail, and once you’ve had one you’ll never go back to a regular Manhattan again. Get started now and you can warm up those cold January nights at home with a special glass of your very own creation.


Manhattan with cherries in cocktail glass

While it is possible to find small barrels in specialty stores, I find they are easy to buy online, and much cheaper, too. I purchased one from Mexico and it arrived in less than a week to my door in Toronto. A quick trip to my local LCBO and I had everything I needed to make up a new batch.

The makings of a great Manhattan

A new barrel takes a bit of prep, you want to shake out any excess chips that might be inside, then fill it up with water and position over a towel or baking sheet, to test for water-tightness. Sometimes a new barrel needs a bit of water to swell the wood to make it perfectly water-tight, though I’ve never had a new one leak. Once you’ve tested and are sure there are no leaks, you can empty the water (a good time to test the Spigot as well). Your barrel will likely come with directions on how to prepare it for use, so follow your manufacturers’ directions.

Another item you’ll need is a funnel, as the top hole is not very large and would be quite hard to pour into without spilling. Insert a funnel into the top hole, and pour in the Bourbon, Vermouth and bitters. Plug the top and that’s about it—now you just have to wait about 6–8 weeks, giving the barrel a 1/4 turn every week or so. I like to test the batch at around six weeks and depending on the flavour, I’ll either continue aging, or bottle the mix and start up a new batch. A new barrel gives off the most flavour, so as you continue using it, you’ll find you need to keep the mix in the barrel for longer to achieve the same depth of flavour, until it is too weak. Then it’s time to get a new barrel (I find they easily last a couple of years).

There is something special about barrel aging your own cocktail. It’s fun to take notes each time you fill a new barrel, making subtle changes each time, until you perfect the drink exactly to your liking. For me, the Manhattan isn’t complete until it’s topped with bourbon soaked cherries (a world apart from Maraschino!) Your own personally crafted and aged Manhattans are a wonderful treat to share with friends, too.

Top view of a barrel aged Manhattan drink

Elegant Barrel Aged Manhattan in gold rimmed cocktail glass with bourbon soaked cherries
3 from 1 vote
Print

Barrel Aged Manhattan

The smoothest, oaky-with-hints-of-vanilla-and-butterscotch Manhattan you can possibly imagine. There are great sources to buy your own barrels online, this recipe uses a 2 litre barrel.

Course Drinks
Cuisine American
Prep Time 10 minutes

Ingredients

  • 750 ml Bourbon (1 bottle) Four Roses brand
  • 375 ml Vermouth (1/2 bottle) Dolin brand
  • 12 ml Angostura bitters
  • 1 jar bourbon soaked cherries
  • 1 2 litre oak barrel

Instructions

  1. If using a new barrel, prepare it according to the manufacturer's direction. Generally you need to soak it in water for a few hours to ensure a good seal. Drain the water and the barrel is ready for action!

  2. Ensure barrel spout is closed. Place funnel into top hole of barrel. Add the Bourbon, Vermouth and bitters. Place the cork into the top of the barrel to seal. Allow 6–8 weeks for aging, giving the barrel a 1/4 turn each week. 

  3. Test a Manhattan: remove the cork from the top to allow the liquid to flow; get a cocktail shaker ready and fill straight from the barrel. Add ice, shake, and pour into cocktail glass. Test sample for depth of flavour and aroma. If desired, continue to age to bring out more oak flavour. If you are happy with the taste, pour into bottles. The barrel can now be used to make another batch—perhaps next time you'd like to adjust the bitters to suit your taste, or switch up the brands of Bourbon or Vermouth.

  4. Bourbon soaked cherries add the perfect finishing touch when you serve up a glass. Enjoy!

Filed Under: Drink, Recipe Tagged With: Barrel Aged, Barrel Aged Manhattan, Cocktail, Manhattan, Manhattan drink

Primary Sidebar

Welcome to my kitchen journal, a place where I will share my favourite heritage recipes honed over the years, as well as document new evolutions and experiments along the way. Great feasts become vehicles for fond memories—the best meals are the ones someone made with love, for you. Follow me to explore traditions, document stories and experience the joy of the feast. Read More…

  • Facebook
  • Instagram
  • Pinterest
  • Twitter
  • YouTube

Don’t miss a story!

Get email updates

Copyright © 2026