• Skip to content
  • Skip to primary sidebar

Feast & Lore

Food stories featuring heritage recipes and new experiments.

  • Home
  • Recipes
  • About

chicken

Hyderabadi Biryani

November 4, 2018 By Caroline 11 Comments

Hyderabadi Biryani showing chicken, colourful rice, mace and spices

This post has been over three years in the making! It all started when I travelled to Hyderabad, India for a business trip in 2015. I was a few months into a new role as Creative Director, and it was my first visit to India. I was super excited to meet my design team as well as the extended Canadian marketing team in the area. It was an amazing trip where I experienced streets full of energy and life, colours, spices and the warmth of the local people.

Hyderabad is known for Biryani and I enjoyed it several times during my visit. Most Biryanis were made with goat, and they were often served in the pot, brought right to the table. When you plunged the serving spoon into the Biryani pot, there were colourful layers—and at the bottom, tender, spicy meat.

On my last day, one of the designers gave me a parting gift—all of the spices one would need to make a Biryani! I asked if he had a recipe, but he didn’t and no one else I asked had one either. I wasn’t sure how I would replicate this dish at home, but was intrigued with the idea of trying to make this and share it with my friends and family.

Upon returning home, I was eager to try some local Biryanis in the Toronto area. However each time I was disappointed that they were more like a stir-fry and didn’t have the layering with tender meat like the ones I had in Hyderabad. I did some research, and learned that Biryani was believed to have originated in the kitchens of the Nizam of Hyderabad. I remembered I had visited the Nizam’s palace with one of the designers, it is so beautiful. A few photos are below:

Beautifully intricate details of white relief on yellow inside Chowmahalla palace


Outside admiring the beautiful architecture of Chowmahalla Palace

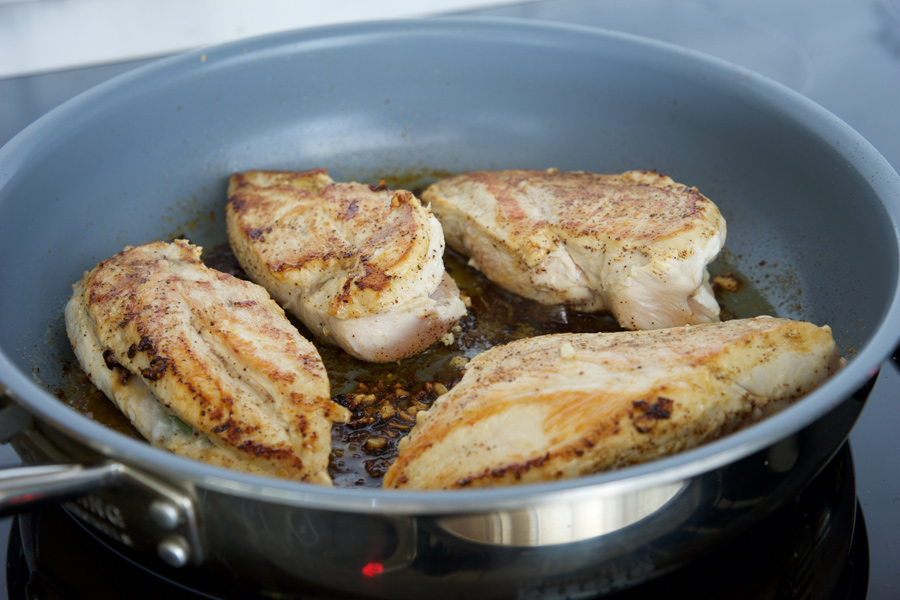
After experimenting with several recipes, I developed the method shown here. Chicken is easier to come by here rather than goat meat, so I went with bone-in chicken thighs as this cut would remain tender.

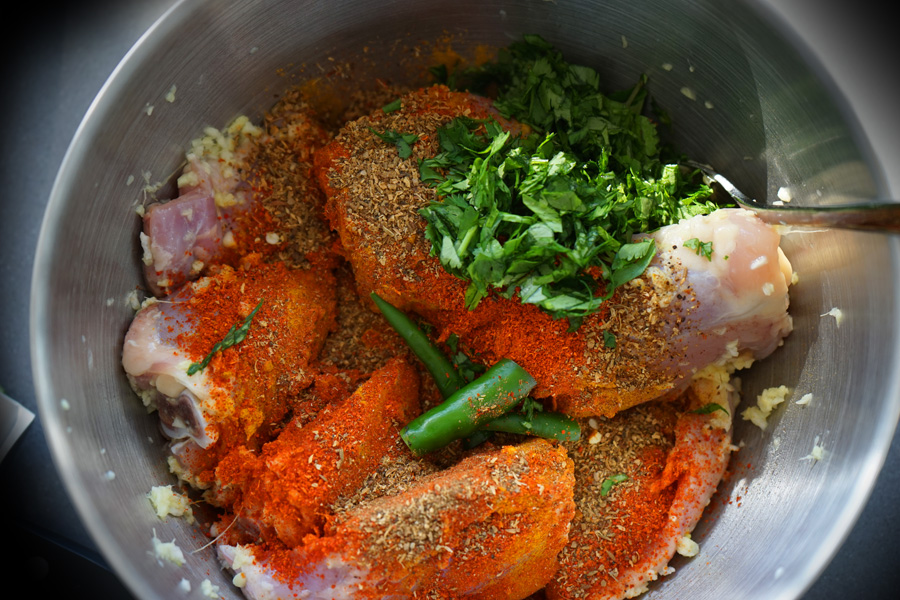
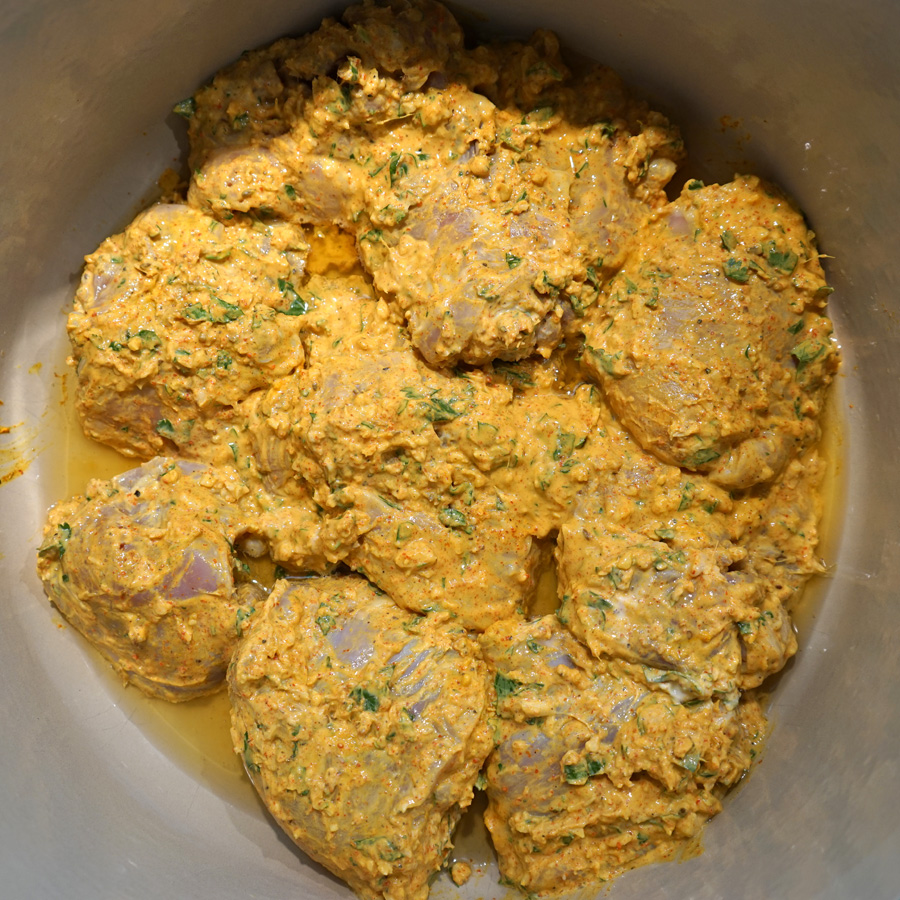
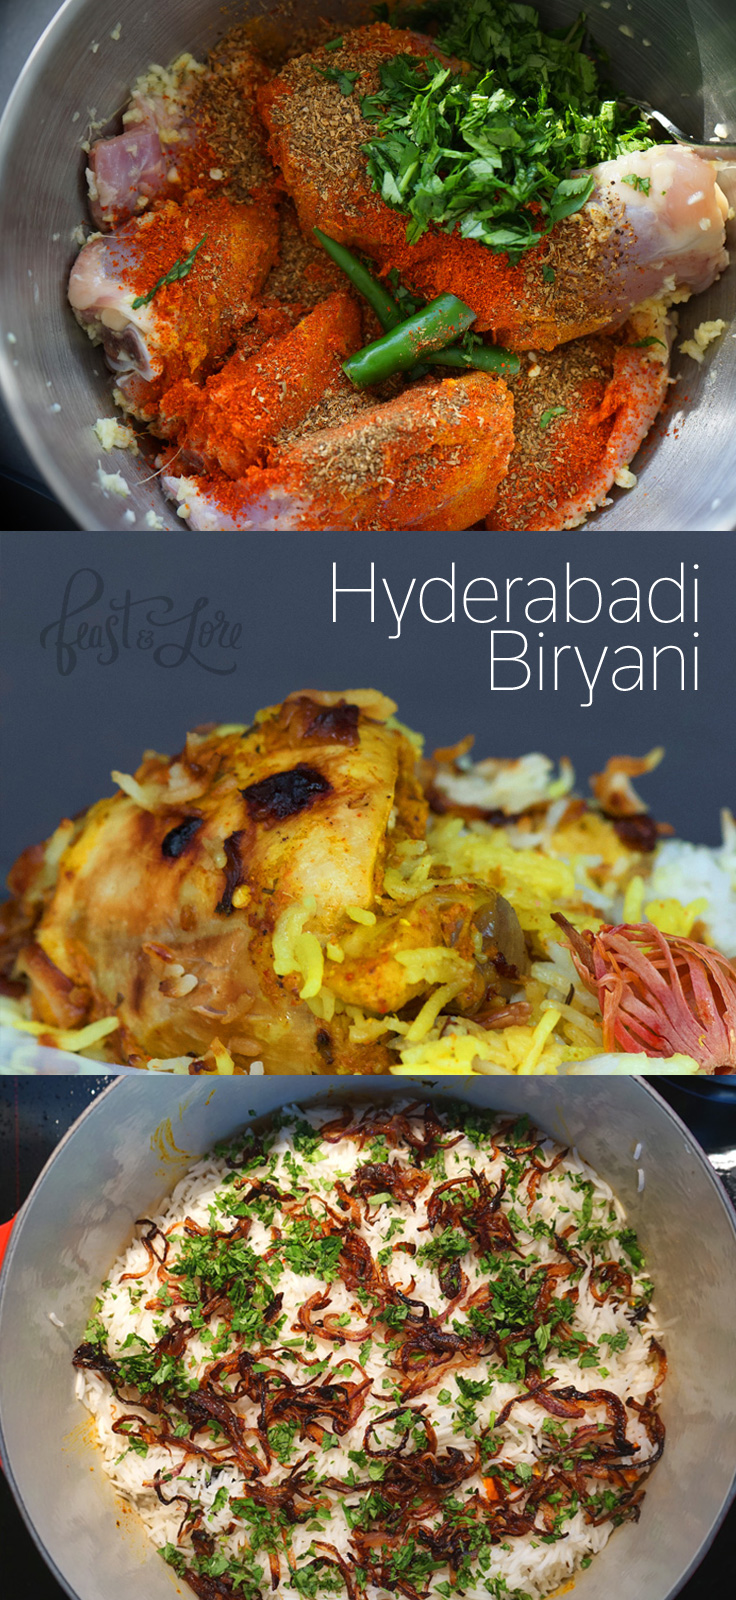
A key ingredient to locate was authentic red, spicy Indian Chili powder (not to be confused with Mexican/American Chili powder which is much darker in colour, contains ingredients other than pure chilies, and is much less hot). This recipe has been adjusted to use the spicy Indian Chili powder which is made from pure ground chilies. The heat is just a bit less than Cayenne pepper. Kashmiri Chili powder would also work well—if you find that type, you can probably use more as it is less hot than Chili powder. If you can only find the Mexican style Chili powder, you can mix about one part Cayenne Pepper to three parts Paprika to simulate Kashmiri Chili powder. Below you can see the brilliant colours coming together for the spicy chicken marinade.

Chicken and bright red and green spices layered in a bowl

Hyderabadi Biryani chicken marinade with yogurt and spices

Another key ingredient is Ghee—a type of clarified butter with a delicious nutty flavour. I’ve seen this around quite a few supermarkets, however it’s pretty easy to make yourself from regular butter (and less expensive). Google it, whip up a batch, and story any extra in a jar in the fridge. It pretty much lasts forever that way. Or just buy it—whatever works for you!

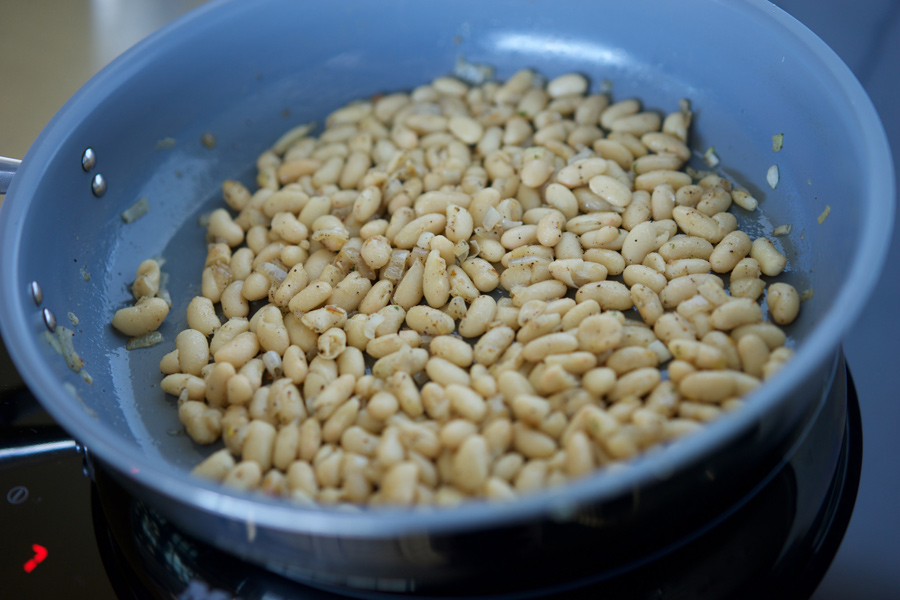
Once you’ve got the meat marinating, you’ll need to fry up the red onions and almonds in the Ghee. And when it comes time to start cooking the chicken, this is also cooked in Ghee at the bottom of the pot, as shown above.

Colourful layers make up a proper Hyderabadi Biryani

The trickiest part of making this dish is getting the perfect cook for the rice. You par-cook Basmati rice and then add it to the pot with the meat to finish it. The first few times I made it, I had a tendency to over-cook the rice and it wasn’t quite as firm a texture as I would have liked. After making some notes and adjusting the par-boil cooking time down a bit, it came out pretty perfect.

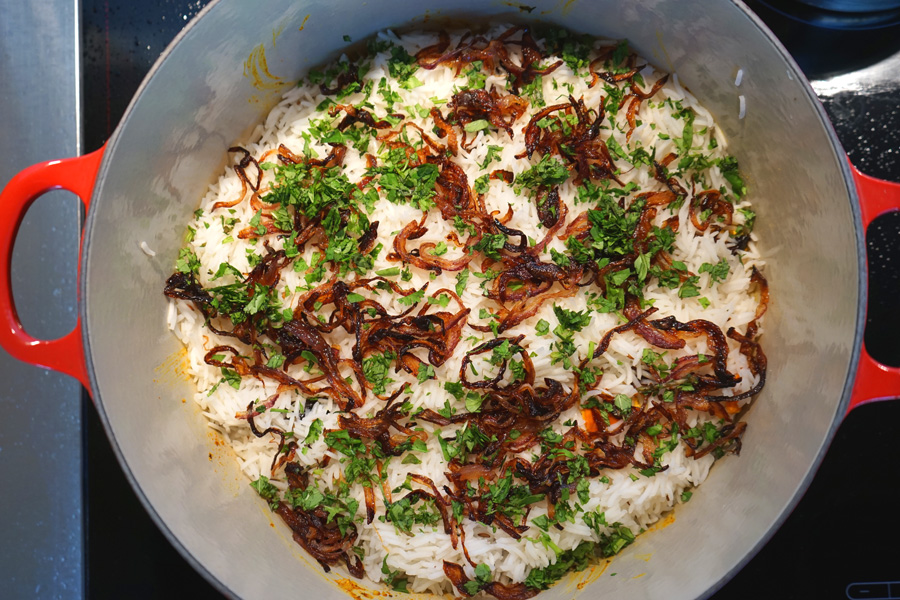
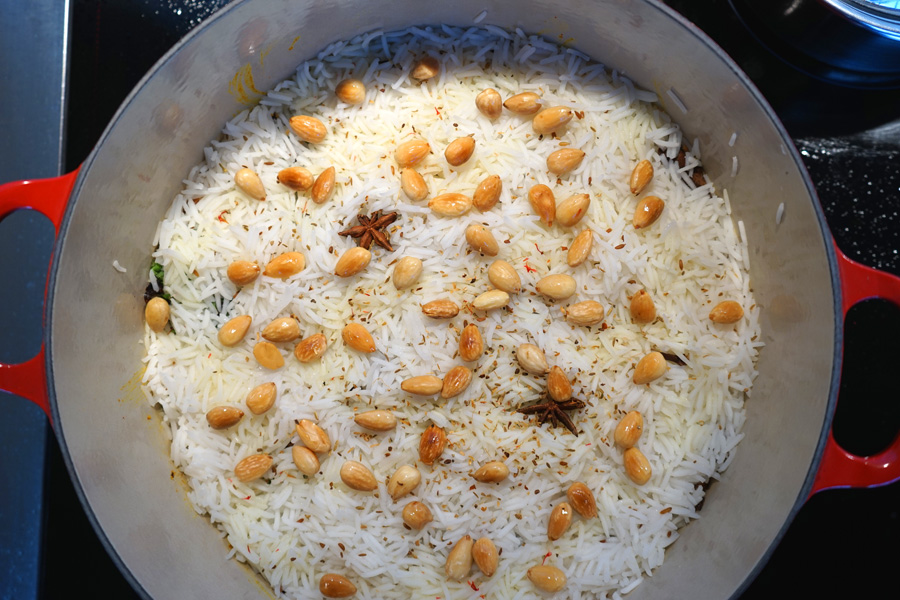
Above and below, you’ll see the layering happening: meat on the bottom, followed by fried onions and more ghee, then rice, followed by more fried onions and cilantro, followed by more rice, ending with fried almonds and a bit of mace.

Hyderabadi Biryani with top layer of almonds and ghee

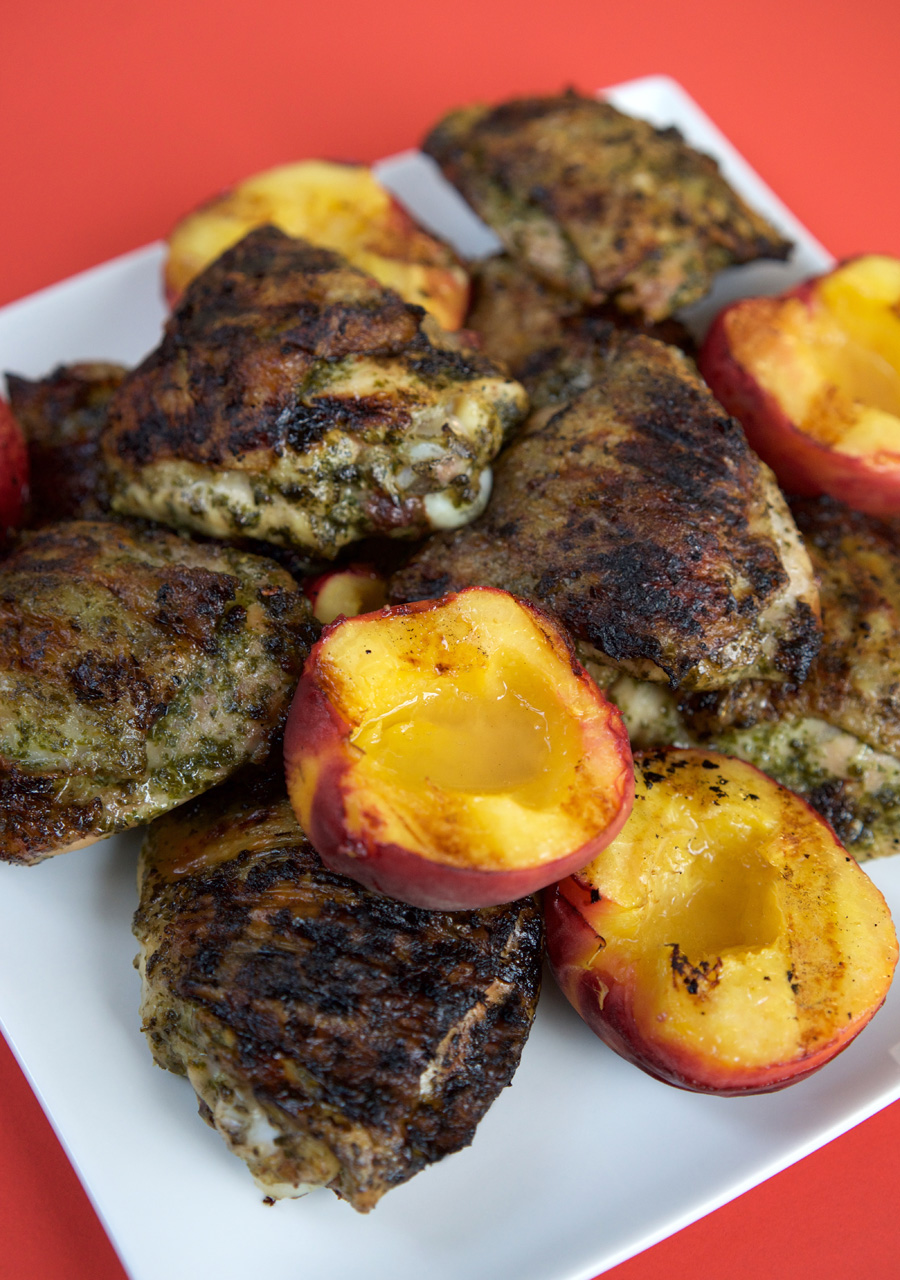
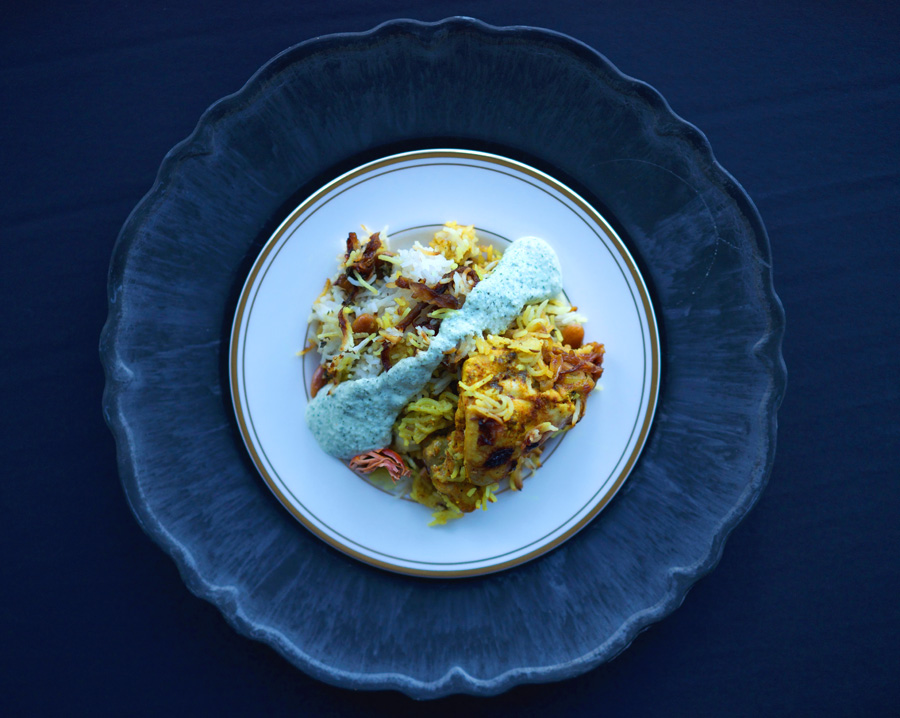
Finish the cooking with a tight-fitting lid and you are ready to serve up one awesome Biryani! I always accompany it with some home-made cucumber yogurt raita, which allows me to tolerate the spice factor of this dish.

Hyderabadi Biryani with chicken showing colours of saffron, golden shallots and bright mace

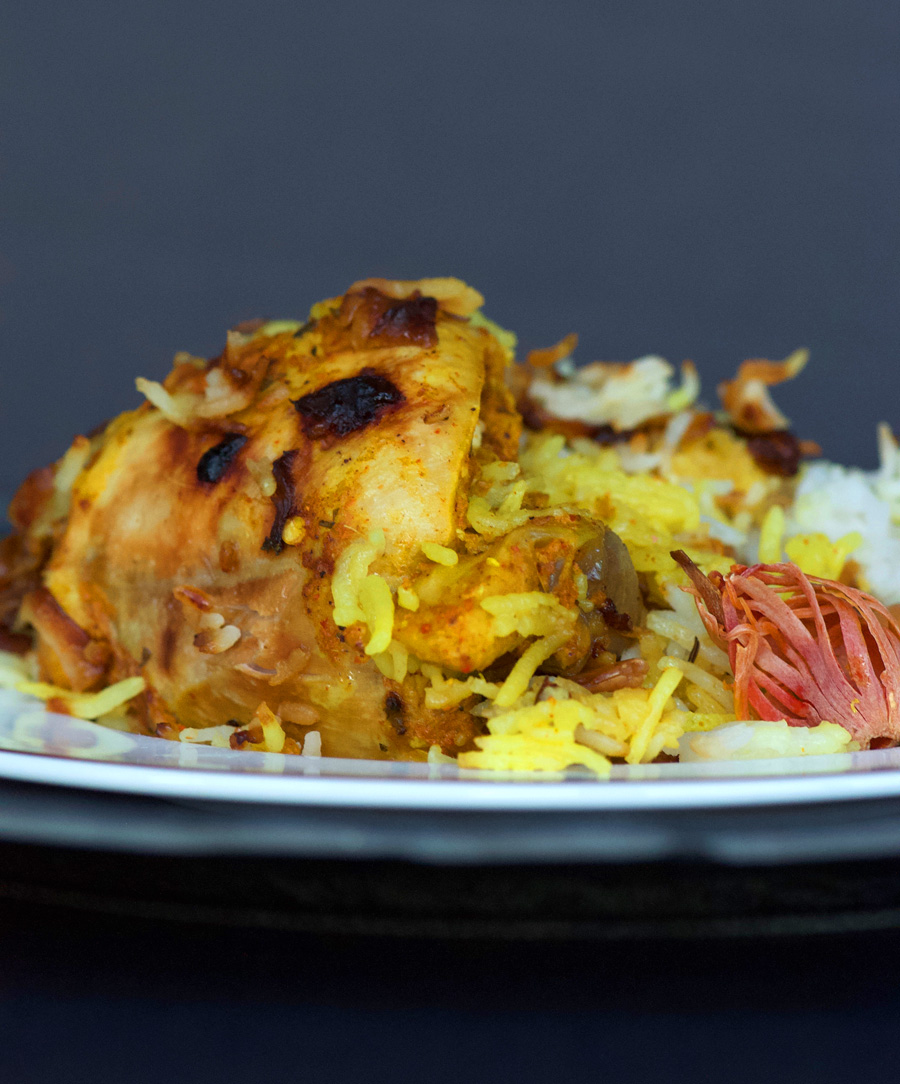
This Biryani has vibrant colours and flavours, I will always remember my visit to Hyderabad and the wonderful people I met every time I make this dish. Give it a try, and let me know how you find it!

Chicken Hyderabadi Biryani with raita on striking black place setting

Below are a few of my favourite photos from the trip. In particular, the top centre photo always makes me smile. While touring Golconda Fort, people kept gesturing to me with their camera. I thought they were asking me to take their photo for them. My more experienced travel companion pointed out that actually, they wanted a photo of us! I guess they don’t see very many North Americans out this way. At one point, four people were taking my photo at once. It was so bizarre, I held up my camera and captured them all taking their photos of us. It was like having our own paparazzi crew following us around, LOL!

Memories of Hyderabad, India showing spices, people, architecture and colours

Chicken and bright red and green spices layered in a bowl
4.5 from 2 votes
Print

Hyderabadi Biryani with Raita

Fragrant, layered rice with tender spicy chicken at the bottom, this recipe promises an authentic Biryani experience.

Course Main Course
Cuisine Indian
Prep Time 1 hour
Cook Time 45 minutes
Total Time 1 hour 45 minutes
Servings 6

Ingredients

For the chicken

  • 8 - 10 bone-in chicken thighs
  • 4 cloves garlic
  • 1.5 inch fresh ginger, peeled and sliced
  • 3/4 cup plain yogurt
  • 1/2 tbsp Indian Chili powder
  • 1/2 tbsp garam masala
  • 1/3 cup chopped fresh cilantro
  • 2 green chilies, sliced in half lengthwise and crosswise

For the onions and almonds

  • 2 red onions, thinly sliced
  • 3 tbsp ghee
  • 2 tbsp vegetable oil
  • 1/3 cup whole, peeled almonds

For the rice

  • 2 cups Basmati rice
  • 2 Bay leaves
  • 6–8 whole cloves
  • 2 medium pieces Cinnamon bark (cassia)
  • 1/2 tsp whole Jeera (Cumin seeds) or Caraway Seeds
  • 6 Cardamom pods
  • salt
  • 1/4 cup warm milk infused with Saffron
  • 1 tbsp Mace pieces

Instructions

  1. Place chicken thighs into a medium size bow, or into a large ziplock bag; set aside. In a small food processor, blend garlic and ginger into a paste. Add to bowl with chicken thighs along with the juice of 1/2 lemon. Stir well to combine and coat the chicken. Add spices, yogurt, half of the chopped cilantro and chilies. Stir to combine and marinate for a minimum of 30 minutes, or overnight in the fridge.

  2. Peel and thinly slice the onions. Melt Ghee in a large frying pan and bring to high heat; add about 2 tbsp vegetable oil and the onions. Fry until golden and crisp. Remove from pan with a slotted spoon to a small plate and reserve. Next, add the almonds to the pan and stir until golden on both sides. Remove and set aside on another small plate. Reserve the Ghee/oil mixture from the pot into a small heat-safe container.

  3. Rinse the rice, then place into a large bowl. Add water and soak rice for 30 minutes. 

  4. Add 3 tbsp reserved ghee to a large dutch oven, and heat to medium-high. Transfer marinated chicken to the pot, and cook for about 10 minutes. 

  5. Fill a medium pot of water set over high heat. Add Bay leaves, cloves, cinnamon, caraway, cardamon, salt, and the juice from 1/2 lemon. Bring to a boil. Drain the rice, and add it to the boiling water. (Cook it like pasta, draining excess water when it's ready). Start testing the rice at about 8 minutes—it's ready when it's possible to crush the rice, but it remains firm in the centre. You are aiming for it to be about 2/3 cooked. It shouldn't need to cook more than 10 minutes. 

  6. Drain the rice, and use a slotted spoon to transfer about half of the rice on top of the chicken mixture. Spread remaining fried onions and cilantro on top in an even layer. Transfer the remaining rice to the pot in an even layer. Sprinkle with a bit of rosewater, garam masala, fried almonds and mace pieces. Finish by spooning the saffron milk over everything. Cover the pot tightly, or place a damp towel between the pot and the lid to seal. Cook for five minutes on high. Lower heat to medium and cook for another 15 minutes, then reduce heat to low for 10 minutes. Finally, turn off heat and allow to rest for 10 minutes. Serve and enjoy with cooling raita!


4.5 from 2 votes
Print

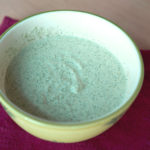
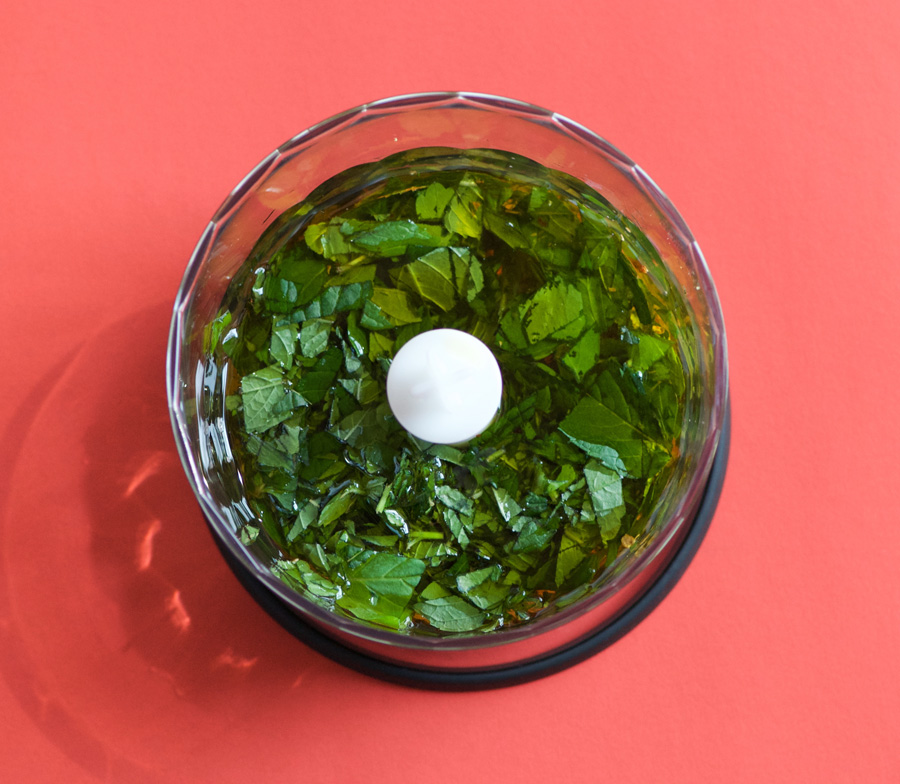
Cucumber-yogurt Raita

A wonderful cooling sauce, perfect with a spicy Hyderabadi Biryani.

Course Side Dish
Cuisine Indian

Ingredients

  • 1 large unpeeled seedless cucumber, coarsely grated
  • 1 cup plain greek yogurt
  • 1/4 cup packed chopped fresh mint
  • 1 tsp ground cumin
  • pinch cayenne pepper

Instructions

  1. Wrap cucumber in a kitchen towel and squeeze dry. Add yogurt, mint, cumin and a pinch of cayenne pepper into a small food processor. Add cucumber and blend until smooth. Season to taste with salt and pepper. Cover and refrigerate at least two hours for the flavours to meld—or overnight. Serve chilled.

/>

Filed Under: Main, Recipe Tagged With: almonds, Basmati, Biryani, chicken, ghee, Hyderabadi Biryani, India, red onions, rice, spice, spicy

Roast Garlic Herb Marinated Chicken Thighs

September 13, 2017 By Caroline Leave a Comment

Refuse to let go of summer—you can keep your BBQ going well into the fall (and sometimes early winter)! This bright green herb sauce with roasted garlic makes a wonderful marinade for chicken thighs. Make the marinade and coat the chicken the day before, for an easy dinner the next day that can be pulled together in time it takes to heat the grill and cook the chicken. Throw a couple of peaches (or figs would be great too) during the final 5 minutes or so of grilling for nice contrast to the garlicky, herbacious chicken.


Bright green pesto in a white bowl on a bright pink background

To roast the garlic, take a full head, and slice off the tops to expose the cloves. The cloves are at different levels so I cut the tops from each row/level separately rather than a straight cut across the top, to maximize the garlic. Drizzle or spray with a touch of olive oil, wrap in foil, and roast at 375° for about one hour, until the cloves are soft when pierced with a knife. Allow to cool, and pop out the cloves with a butter knife into your food processor or mini-chopper.

Fresh from the oven, a head of roasted garlic in crinkly foil

Clean and prep your herbs, no need to chop them as you’ll be putting them into a food processor to blend with the roasted garlic. Parsley and mint work well to offset the garlic and give the sauce it’s amazing green colour.


Parsley packed into a 2-cup pyrex

Add the remaining marinade ingredients into the food processor and blend until the herbs are finely chopped and the texture is smooth.

Pesto getting made in a mini-chopper

Next, loosen the skin on the chicken thighs and rub the marinade under the skin, and then all over the outside the chicken, before placing into a bowl. Cover and chill in the fridge for at least one hour—if you can do this the night before, even better.

Chicken thighs marinating in pesto in a green bowl on bright pink backgorund

Finally, remove the chicken about 30–45 minutes before grilling to take the chill off the meat for more even cooking. Heat the grill to about 400°, and brush with olive oil (or spray carefully with non-stick spray). Note: with all the olive oil in the marinade, the flames can really jump up when you put the chicken on the grill, so allow excess marinade to drip off into the bowl before placing the meat on the grill. Start the chicken thighs skin side down, and grill until the skin is nice and crispy, then turn down the heat and flip the chick over to finish cooking at a lower heat.

Grilled pesto chicken with peaches piled onto a plate

Plate with your peaches or figs, and serve!


Grilled pesto chicken with peaches piled onto a plate
Print

Roast Garlic Herb Marinated Chicken Thighs

Tender grilled chicken with an herbacious-garlic kick and crispy skin. The marinade can be made in advance to make this a quick weeknight dinner you can get on the table in 30 minutes.

Course Main Course
Cuisine American
Prep Time 1 hour
Cook Time 30 minutes
Total Time 1 hour 30 minutes
Servings 4

Ingredients

Marinade

  • 1 head roasted garlic cut top off garlic head, roast at 375°, wrapped in foil, for 1 hour until tender
  • 2 cups packed parsley
  • 3/4 cup packed mint leaves
  • 3/4 cup olive oil
  • 1 tbsp fresh lemon juice
  • 1 tsp crushed red pepper flakes
  • 1/2 tsp salt

Chicken Thighs

  • 8 chicken thighs with bones and skin
  • salt
  • freshly ground pepper
  • 4 peaches, split into halves, pits removed
  • olive oil

Instructions

  1. Squeeze cooled garlic cloves out of the head into a small chopper or food processor. Add remaining ingredients. Blend until herbs are finely chopped and a sauce forms. 

  2. Loosen skin from chicken thighs, and spoon herb sauce under the skin. Rub more sauce all over the outside of the thigh, and transfer to a bowl. Repeat with remaining meat. Cover and transfer to a fridge for a minimum of one hour, or overnight.

  3. Remove chicken from fridge and allow to rest at room temperature for 30 minutes. Heat a BBQ to 400°. Spritz grill with olive oil or cooking spray, then carefully add meat, skin side down, to the hot grill (all that olive oil can create big flames, so shake off excess oil/sauce before placing on the grill). Grill for approximately 10 minutes until the skin is well crisped and dark in colour.

  4. Reduce heat to 300° and flip chicken pieces skin-side up, positioning them in indirect heat (turn a zone in the BBQ way down or off, placing chicken into that zone). Cook over lower heat for another 20 minutes or so, until the meat is cooked through. (Temperature should be 165°—I press down on the chicken with my tongs to get a sense of the firmness to see how cooked they are. Firmer meat means more cooked).

  5. During the last seven or so minutes, mist the peach halves with olive oil and place on the grill, starting skin side up. Get some nice grill lines, then filp and finish cooking the peaches until juices are flowing and the fruit has softened.

  6. Serve the chicken and peaches together on a platter. 

Filed Under: Main, Recipe Tagged With: chicken, chicken thighs, Garlic, Grill, herbs, marinade, marinate, parsley, Peach, pesto, sauce, summer

Garlic Lime Chicken with Mango Salsa and White Bean Quesadillas

June 18, 2017 By Caroline Leave a Comment

Mango Salsa with Garlic Lime Chicken with Quesadillas


This summer inspired feast is the perfect thing to tuck into on a patio with an ice cold beer (or a white wine sangria). Juicy mango forms the base of a salsa that is the perfect accompaniment to seared chicken. Even on its own, the chicken is lively with fresh garlic, lime juice and cumin. Quesadillas grilled with cheese, spinach and a white bean puree round out the plate. It also makes for great leftovers, holding up well for a day or two after it’s made.

There are multiple recipes outlined to bring together for the final ensemble, but everything is quite easy and the whole thing can pulled together in about 60 minutes. Not to mention any of the three recipes are great on their own or paired with other dishes—for example the mango salsa would also make for a mean topping on fish tacos. But back to this recipe grouping—our plan of attack: start by cutting and prepping all of the ingredients, sauté and blitz the beans into a puree, and then while the chicken is cooking, stir together the mango salsa and assemble and sear the quesadillas. Let’s get started.

Once you’ve cut and prepped everything, create the quesadilla bean puree filling. Cook the beans with olive oil, spices and shallots until the beans soften and the shallots are slightly golden.

White kidney (Canellini) beans are cooked in a skillet with olive oil and shallots.

Remove from heat, and add to a mini-blender with lime juice. Puree until smooth.

Prep the quesadillas: start with one whole wheat wrap, spread it with the bean puree, add baby spinach and top with cheese.

Quesadilla is assembled starting with a base of flatbread with puree, spinach, then cheese and topped off with another flatbread.

Next, prep the chicken. You’ll want to remove the tenders, and then slice each breast open like a book to stuff with limes, fresh garlic, salt and pepper. Then close them back up to seal the limes and garlic inside.

Add chicken to a large saute pan with olive oil. Add additional garlic to the pan, pouring half of the lime juice on top, and sprinkle with cumin. Flip the chicken half-way through, pour the remaining lime juice over, and sear well.

To finish cooking, I like to turn the heat down to a low setting (2–3 on my induction cooktop) and cover the pan with foil (or a lid if you have one). I find this slow finish makes for a juicy and tender final product.

Finally, mix the ingredients for the mango salsa and cook the quesadillas.

Ingredients for mango salsa in a green bowl

Bring it all together and dinner is served!

shot from above, chicken with mango salsa, with quesadillas on the side


Don’t forget to save some for lunch tomorrow…

Print

Garlic Lime Chicken

Course Main Course
Cuisine American
Prep Time 15 minutes
Cook Time 20 minutes
Total Time 35 minutes
Servings 4

Ingredients

  • 4 boneless skinless chicken breasts tenders removed
  • 2 tbsp garlic finely chopped
  • 1 lime cut into 8 slices
  • 1 lime juiced
  • 2 tsp olive oil
  • 1/4 tsp cumin

Instructions

  1. Remove tenders from chicken breasts, and slice each breast starting from the thickest point, cutting partway through until you are able to open the breast like a book. Season with salt and pepper to taste

  2. Sprinkle half of the garlic over the opened chicken breasts. Place 2 lime wedges at the centre, and fold back the chicken to close the "book". 

  3. In a large skillet over medium-high heat, melt the olive oil. Place the chicken into the pan, add remaining garlic, pour half of the lime juice over top, and sprinkle with cumin. 

  4. Cook for 6–8 minutes, then flip chicken over. Pour the remaining lime juice over top. Cook until a nice golden sear develops on the second side, about 2–3 minutes. Then turn the heat to medium-low, and top with a lid (or use foil if you don't have a lid for your skillet) until chicken is cooked through, about 4–6 additional minutes.

  5. Serve with mango salsa spooned over top.


Colourful mango salsa tops seared chicken with tangy lime and savoury garlic
Print

Mango Salsa


Course Side Dish
Cuisine American
Prep Time 15 minutes
Total Time 15 minutes
Servings 4

Ingredients

  • 2 ripe mangos peeled and chopped into 1/4" dice
  • 1/2 fresh pinapple peeled and chopped into 1/4" dice
  • 1/4 cup chopped jalapeno peppers more if you like it spicy, seeded for less spicy
  • 2 shallots sliced
  • 1/4 cup fresh cilantro roughly chopped
  • 2 garlic cloves crushed
  • 1/4 cup lime juice freshly squeezed
  • 1/4 cup fresh orange or pinapple juice

Instructions

  1. In a small bowl, combine lime and orange juice, crushed garlic, salt and pepper to taste. Allow to rest while you prep and combine the remaining 5 ingredients into a large bowl.

  2. Remove garlic from juices and discard. Pour juices over the salsa mixture and serve.


Print

White Bean Spinach Quesadillas


Course Side Dish
Cuisine American
Prep Time 15 minutes
Cook Time 10 minutes
Total Time 25 minutes
Servings 4

Ingredients

  • 2 tbsp olive oil
  • 2 shallots chopped
  • 19 oz white kidney beans ((Cannellini beans) drained and rinsed
  • pinch nutmeg
  • salt
  • pepper
  • 1 lime juiced
  • 8 whole wheat tortillas, 7"
  • 8 oz baby spinach
  • 1 cup grated cheese Cheddar-Mozzarella mix works well

Instructions

  1. Heat 1 1/2 tbsp olive oil in a medium skillet on medium-high heat. Add shallots and cook until softened, about 2–3 minutes. Add white beans, nutmeg and salt & pepper to taste, and continue to cook for 5–8 minutes until beans soften.

  2. Transfer bean mixture to a mini-food processor, add juice of 1 lime, and pulse until it forms a puree.

  3. Build the quesadillas: starting with one tortilla, spread 1/4 of the bean mixture on top. Add a handful of baby spinach, and top with cheese. Top with another tortilla. Repeat to build four.

  4. Heat a medium skillet over medium-high heat. Add a teaspoon of olive oil—when heated and shimmering, add one quesadilla. Cook until the tortilla crisps up and the filling starts to melt, then flip. Cook until the bottom is golden and the filling is nice and melty.

  5. Slice and serve!

Filed Under: Main, Recipe, Side Tagged With: Cannellini, Cheese, chicken, Cilantro, Garlic, Lime, Mango, Quesadilla, Salsa, White bean

Creamy Chicken Mushroom Tetrazzini

May 20, 2017 By Caroline Leave a Comment

Chicken Tetrazzini piled on a plate ready to be served.

Chicken Tetrazzini

This is one of those dishes that you really can’t go wrong with. I’ve been making variations of this since I first found the Bake Turkey Tetrazzini recipe in the Milk Calendar in 1994…yes, it’s been a regular in my rotation for over 20 years! I’ve made lots of tweaks over the years. I prefer chicken poached with celery, onion and a few spices. I keep the poaching water and use it for the pasta, too, to impart a bit more flavour.


chopped mushrooms closeup

Chicken being poached in water with celery, clove, onion and bay leaf

Chicken is gently poached with a few flavour enhancers

Drying out the meat is easily done with boneless, skinless chicken breasts. I’ve tried several methods, and I like poaching the chicken best, as it cooks gently and the end product is perfectly cooked chicken, juicy with subtle celery flavour.

Mushrooms, celery, garlic and onion sizzle in the pan

Cream sauce engulfs celery and mushrooms

The cream sauce will thicken as it works its way up to a simmer.

The texture is firmer once pasta and chicken is added to the sauce.

The combined filling comes together and the pasta soaks up the creamy sauce.

Filling lines the casserole dish

Breadcrumbs, Parmesan and butter form a coarse meal texture when combined.

Combine breadcrumb mixture in a small bowl

Deep golden breadcrumbs top the casserole as it emerges from the oven

The casserole with golden topping, fresh from the oven, smells amazing!

A crowd pleaser for adults and kids alike, this is a timeless classic to be savoured again and again.

Chicken Tetrazzini piled on a plate ready to be served.
Print

Creamy Chicken Mushroom Tetrazzini

Crisp topping, creamy sauce, savoury mushrooms, chicken, peas and pasta that will satisfy your cravings for a warm and homey dinner. 

Course Main Course
Cuisine American
Prep Time 45 minutes
Cook Time 30 minutes
Total Time 1 hour 15 minutes
Servings 6 people

Ingredients

Filling

  • 3 stalks celery 2 stalks snapped in half, 1 stalk chopped into 1/4" pieces
  • 1 bay leaf
  • 1 whole clove
  • 2 boneless, skinless chicken breasts
  • 1/2 lb egg noodles (240 g)
  • 3 tbsp butter
  • 2 onions 1 quartered, 1 chopped
  • 2 cloves garlic finely chopped
  • 1/2 lb cremini mushrooms (225 g) chopped
  • 3 tbsp flour
  • 3 cups milk
  • 1 tsp salt
  • 1/4 tsp white pepper
  • 1/4 tsp nutmeg
  • 1 tbsp Maggi
  • 4 oz cream cheese (1/2 of a 227g container)
  • 1 cup frozen peas

Topping

  • 1/2 cup fine breadcrumbs
  • 1/2 cup grated Parmesan cheese
  • 3 tbsp butter

Instructions

Filling

  1. In a medium to large pot, bring water to a boil. Add 2 broken celery sticks, Bay leaf, clove and one small onion, quartered (you can leave the onion skin on!). Add chicken breasts and keep at a low simmer until cooked through, about 20 minutes. Remove chicken and cut into 1/2" pieces, reserve.

  2. Remove onion pieces, celery and Bay leaf; top up the water and return to a boil. Add egg noodles. Cook according to the package instructions, leaving them a bit more to the al dente side (undercook by 1 min so the bite is just slightly chewy). Drain into a colander and reserve. Add a pat of butter and stir, to prevent the noodles sticking.

  3. Melt 3 tbsp butter in a large skillet on medium-high heat. Add onion and cook for 3–4 minutes until softened. Add garlic, celery and mushrooms. Cook until vegetables are tender and most of liquid has evapourated. 

  4. Sprinkle with flour and cook 1–2 minutes, stirring once or twice. Add milk, salt, pepper, nutmeg and Maggi; cook gently, stirring on medium heat until small bubbles start to form. 

  5. Add cream cheese in pieces to the skillet. Cook until cream cheese has melted and incorporated into the sauce. 

  6. Add reserved chicken and frozen peas, Stir to combine.

Topping

  1. Combine Parmesan and breadcrumbs in a small bowl. Melt butter and add; stir to combine. Set aside until ready to assemble.

Casserole

  1. Preheat oven to 350°

  2. Butter an 11x8" casserole dish (I prefer the slightly smaller size for deeper serving pieces and denser breadcrumbs on top, but a 9x13" dish will work, too). Add filling. Top with breadcrumb topping. Bake uncovered in a 350° oven for 30 minutes until top is browned and the saucy is bubbling deliciously. Serve.

Recipe Notes

You can make the casserole, breadcrumb topping and all, throw it in the freezer, and it hold up really well. Great to have on hand for one of those weeknights where you get home late for work and don't have the energy to make something!

Filed Under: Main, Recipe Tagged With: casserole, chicken, comfort food, egg noodles, peas, tetrazzini

Primary Sidebar

Welcome to my kitchen journal, a place where I will share my favourite heritage recipes honed over the years, as well as document new evolutions and experiments along the way. Great feasts become vehicles for fond memories—the best meals are the ones someone made with love, for you. Follow me to explore traditions, document stories and experience the joy of the feast. Read More…

  • Facebook
  • Instagram
  • Pinterest
  • Twitter
  • YouTube

Don’t miss a story!

Get email updates

Copyright © 2025