• Skip to content
  • Skip to primary sidebar

Feast & Lore

Food stories featuring heritage recipes and new experiments.

  • Home
  • Recipes
  • About

dumplings

Beef Bone-broth with Cream of Wheat Dumplings

March 18, 2018 By Caroline 7 Comments

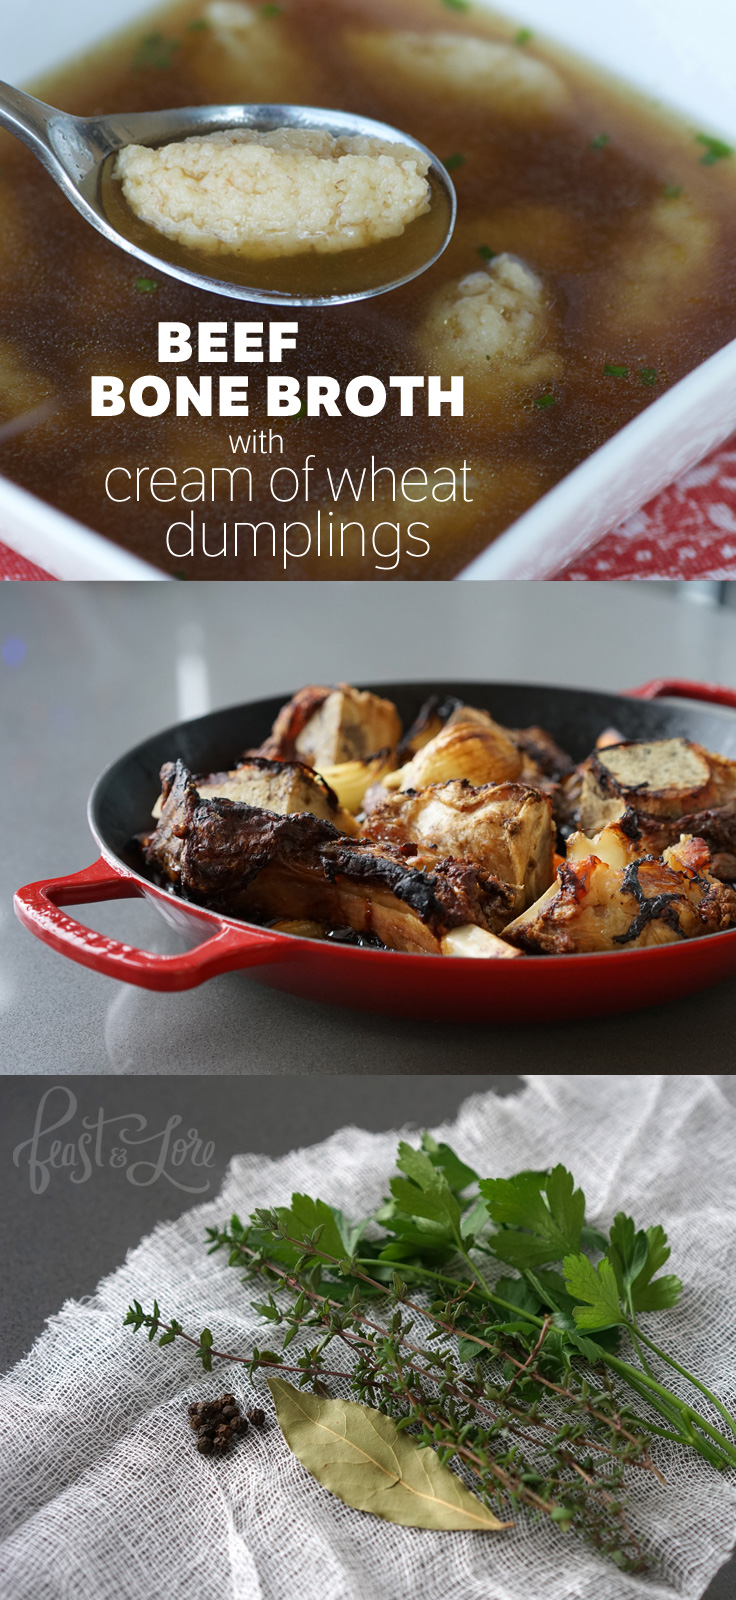
Rich and savoury beef broth with fluffy cream of wheat dumplings add up to pure comfort in a bowl. This recipe packs a two-for-one punch: make the broth recipe, use part of it for the dumpling soup, and then freeze the rest to use later as your very own personal stash of beef stock. It will do wonders for pan sauce, add body to gravy and is so much better than using canned broth.

Beef Bone Broth Soup with Cream-of-Wheat Dumpings

There is something very satisfying about taking a cheap bag of bones from the butcher shop and turning them into a delicious, healthy broth. Making bone-broth changed me. Now I look at bones from roasts, steaks, etc as possible additions to my next bone broth—I simply carve off most of the meat (leaving a bit on helps flavour the broth) and freeze the bones, saving them up until my next batch.

While bone broth has been trending these days as a source of collagen and minerals, Grandmothers everywhere have been making it for decades, and for good reason. The nice thing is you really don’t have to worry too much about exact measurements when it comes to making homemade broth. Work with as many bones as you can fit into your stock pot, top with water, add a few veggies and flavourings and let it all simmer for hours.

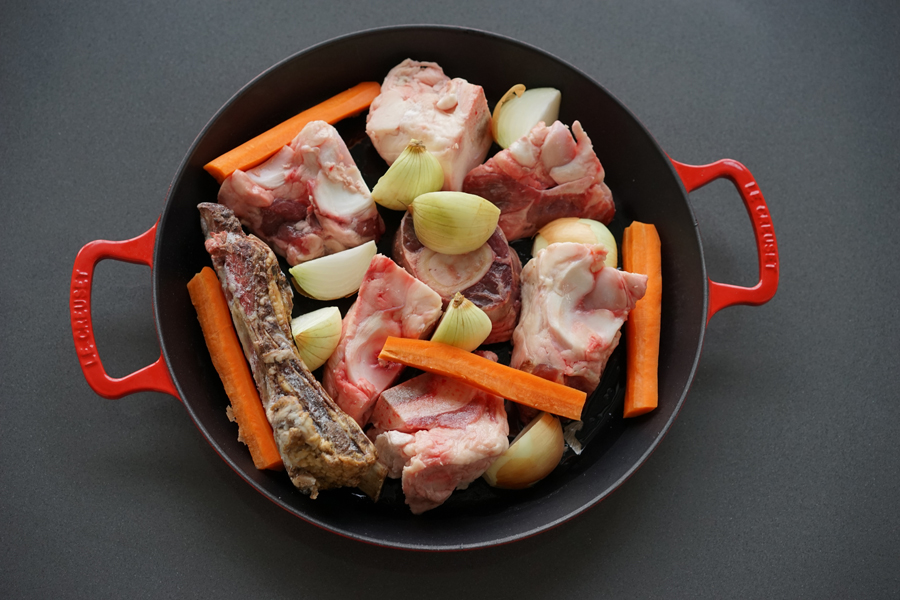
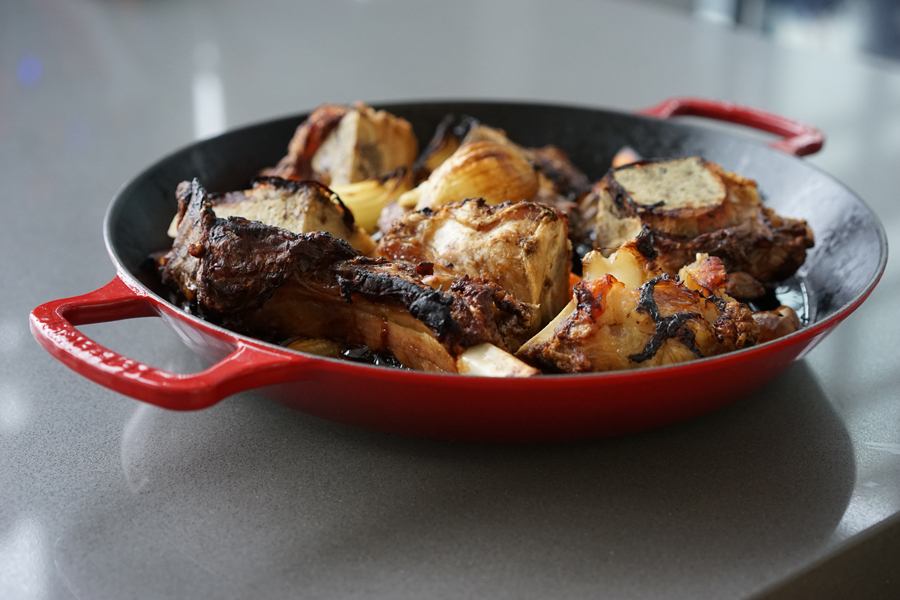
To extract maximum flavour from the bones, roast them in the oven first. This will provide crisp, darkened bits of flavouring to enhance your broth. I add the carrots and onions to bring out their sweetness as well. The roasting pan will emerge an hour later, crackling, sizzling and full of lots of browned bits.


Beef bones in a roasting pan with a few veggies

Beef bones roasted for bone-broth

While the bones are roasting, grab a few herbs (don’t overdo it, you don’t want to overly flavour the stock but just add a few subtle notes). Wrap them in a cheesecloth bundle and tie with kitchen twine, so they won’t fall apart during the hours of simmering to follow. This little package is also known as a “bouquet garni.”

Prep a bundle of herbs in cheesecloth to flavour broth

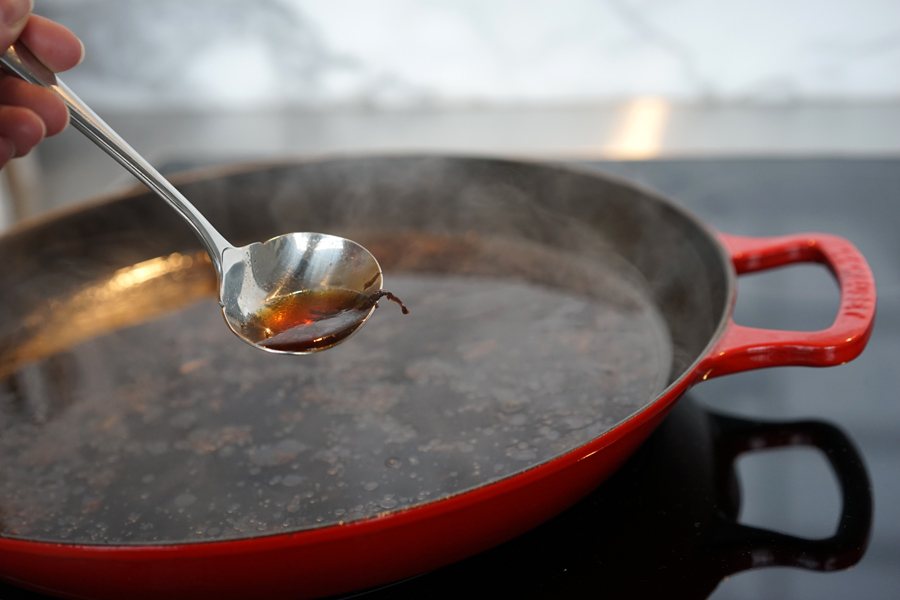
Once you’ve roasted the bones, remove them from the roasting pan and place them in a large stockpot. Add water to the roasting pan and scrape up the browned bits at the bottom of the pan (this process is similar to the early steps of making gravy). The water will take on a lovely deep golden hue as you pull up all the flavour from the roasted bones and veggies. Once you’ve scraped it all up, transfer the water and any browned bits to the stockpot. Add the bouquet garni, celery, and top with water to fully cover the bones.

Deglazing Extracts Flavour from Bone-Broth

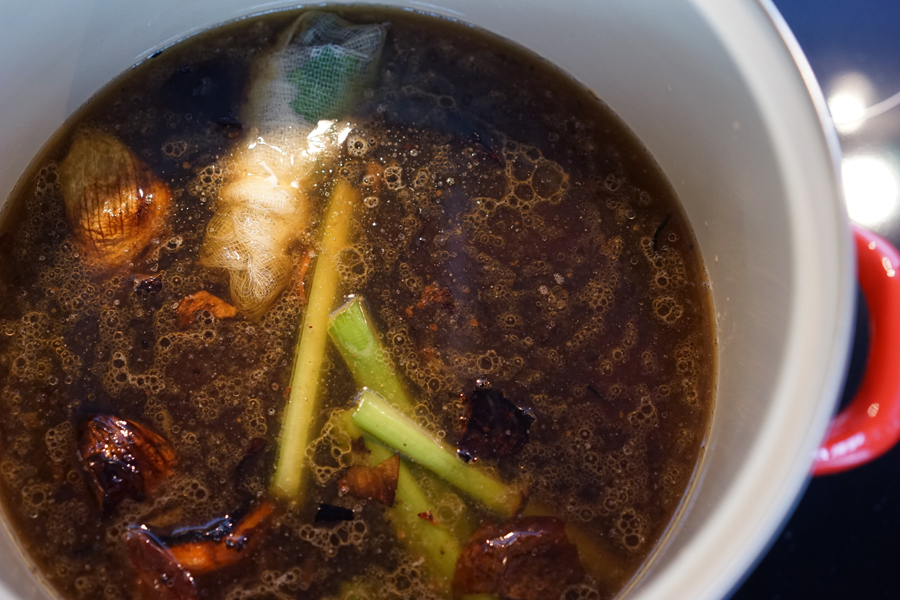
At this point, you can pretty much walk away, simmering the pot for hours, checking on it every hour or so to stir things up a bit. I simmer my broth uncovered to condense the flavours. It saves space in the freezer and I just add water back in as needed when I’m ready to cook with it.

Everything in the stockpot

Once done (five hours should be plenty of time but you can simmer a bit longer if you like) remove the bones and meat from the pot. (if you have a dog, they will go crazy for the soup meat (which you should remove from the bone before giving to them so they don’t choke on any bone pieces). Otherwise, it tends to be pretty flavourless after all that cooking and can be discarded.) Strain the stock into a separate container to remove any small bones or pieces so you are left with simply the pure, clear broth. Ideally, allow this to cool and place in the fridge overnight. This step will cause the fat to solidify at the top of the broth so you can easily lift it out in one piece and discard it. Otherwise, if you don’t want to wait, skim the fat from the top by hand before adding to any recipes.

With the fat skimmed off of the broth, one trick to freeze it is to use an ice-cube tray to freeze into 1-2 tablespoon cubes. You can freeze these in a ziplock baggie to drop into sauces, gravies etc. You can also use larger ziplock containers depending on how you plan to use it later. Remember to add a label with what it is and the date you made it!

Now, on to the Cream of Wheat Dumplings! These are based on a classic style of dumpling originating in Austria, known as Griessnockerl. Traditionally, I believe these were made with Semolina flour, however I use Cream of Wheat which is more readily available and makes for a nice, fluffy dumpling.

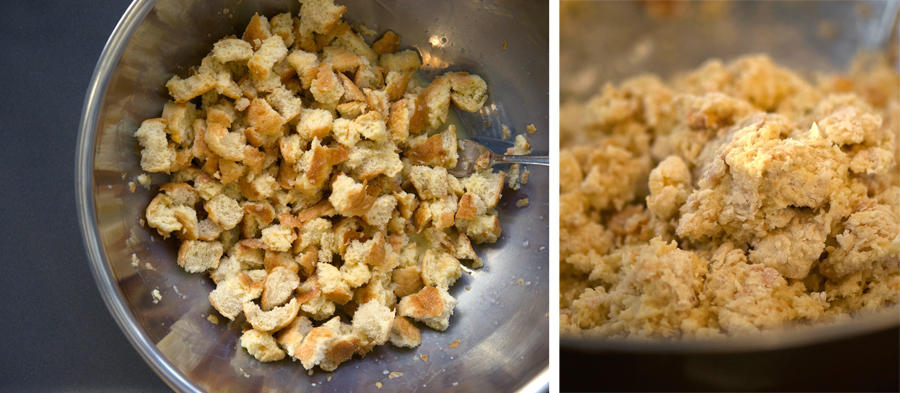
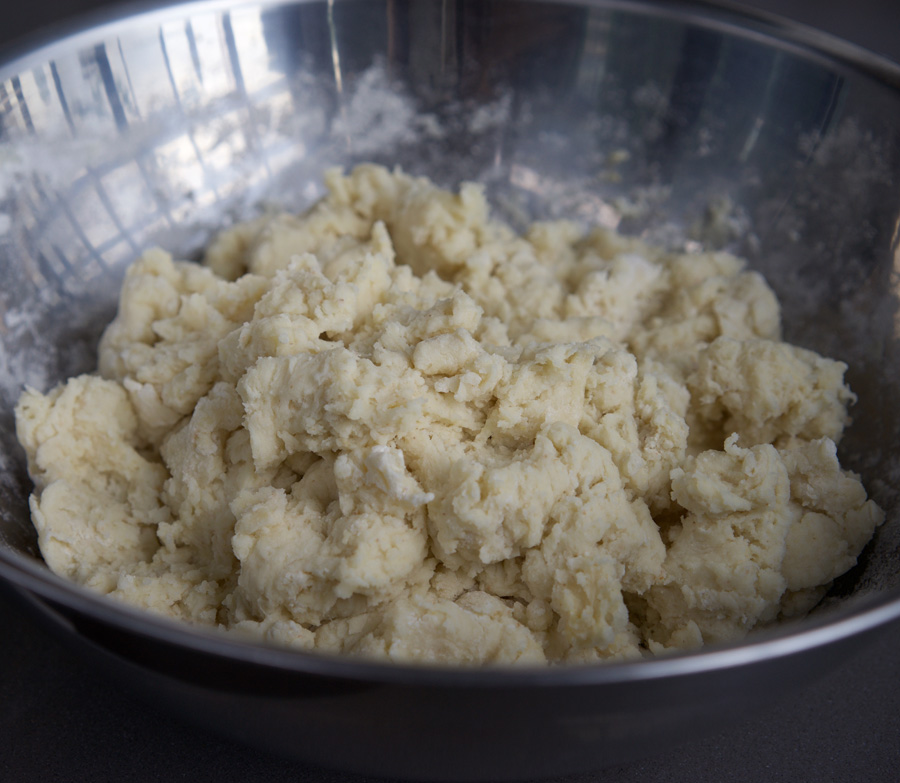
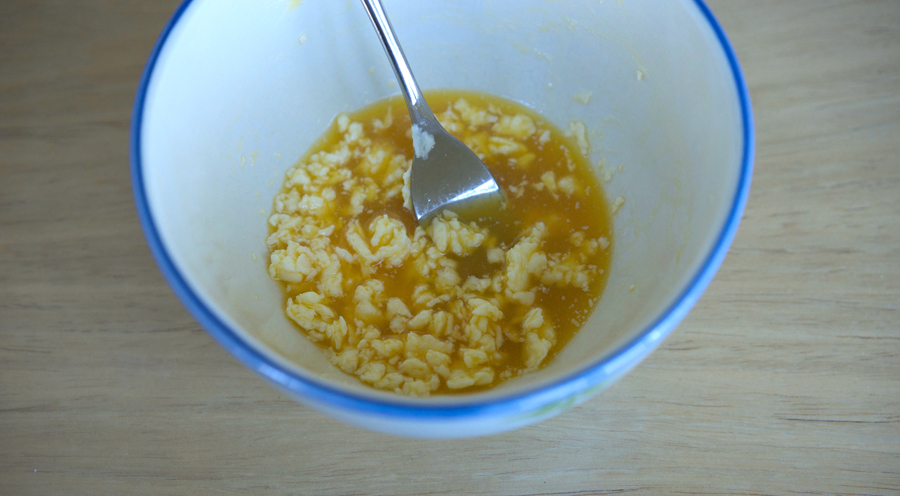
These are super easy. Start with room temperature butter, an egg, and some salt. Mix with a fork until the mixture is lumpy and looks like the photo below.

Make Dumplings Mix Egg Butter Salt

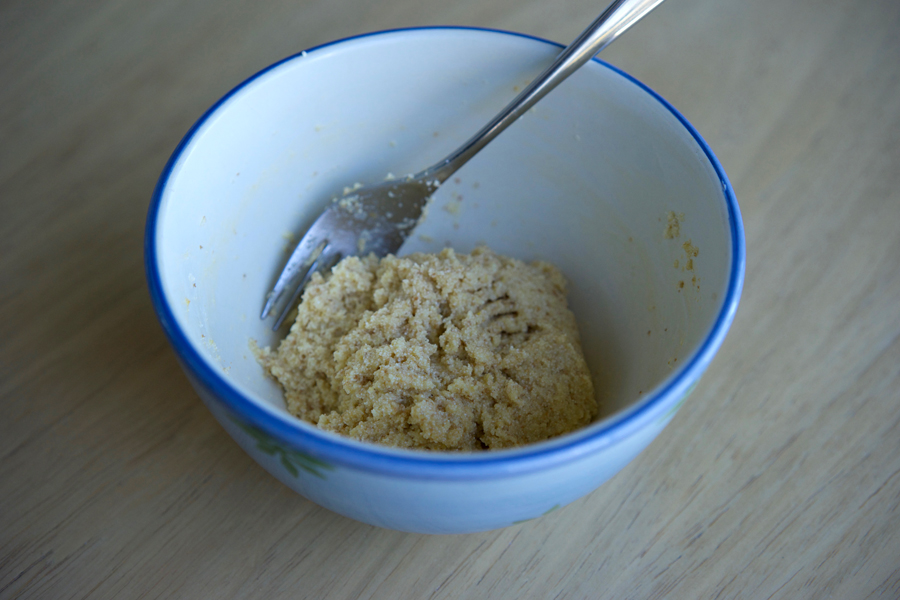
Next, add the cream of wheat and combine well with a fork, stirring and pressing for about one to two minutes. The mixture will be smooth and fairly firm. It should sit for ten minutes before you cook it. I once left it out for an hour causing it to get too soft. Then when I went to add it to the soup, it all fell apart. So don’t leave it for too long. Ten minutes is perfect. While it’s resting, heat up your beef bone broth and water. Add a bouillon cube and bring to a boil. Do a taste test for salt and flavour levels—usually I find more salt is needed. When the broth tastes right, and the dumpling batter is ready to go, it’s time to shape those dumplings!

Make Dumplings add Cream-of-wheat

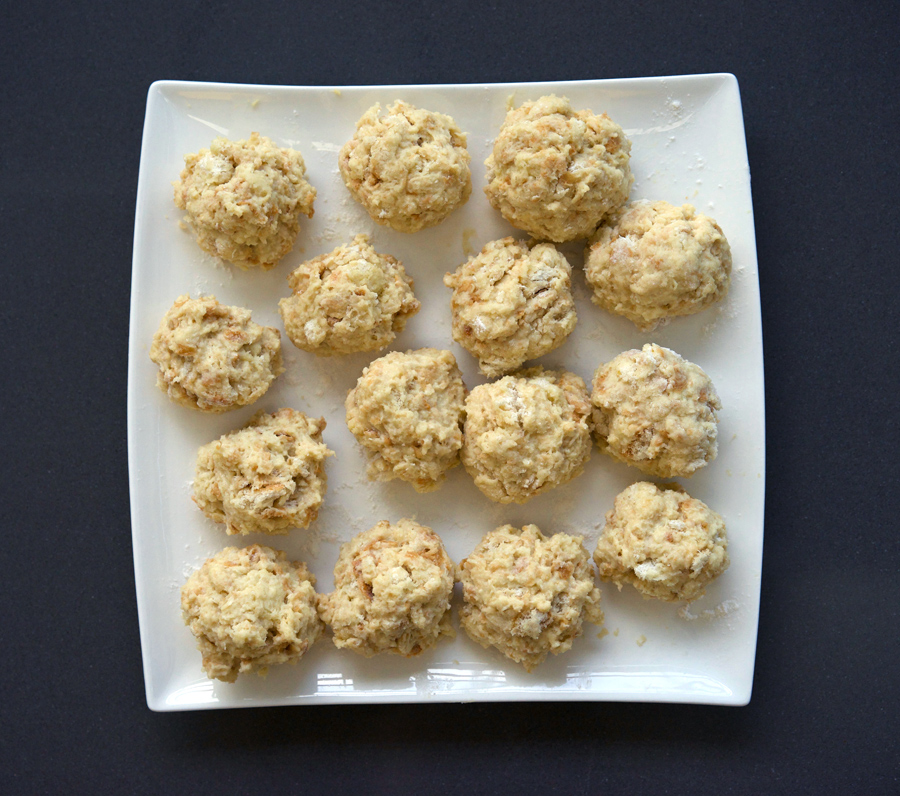
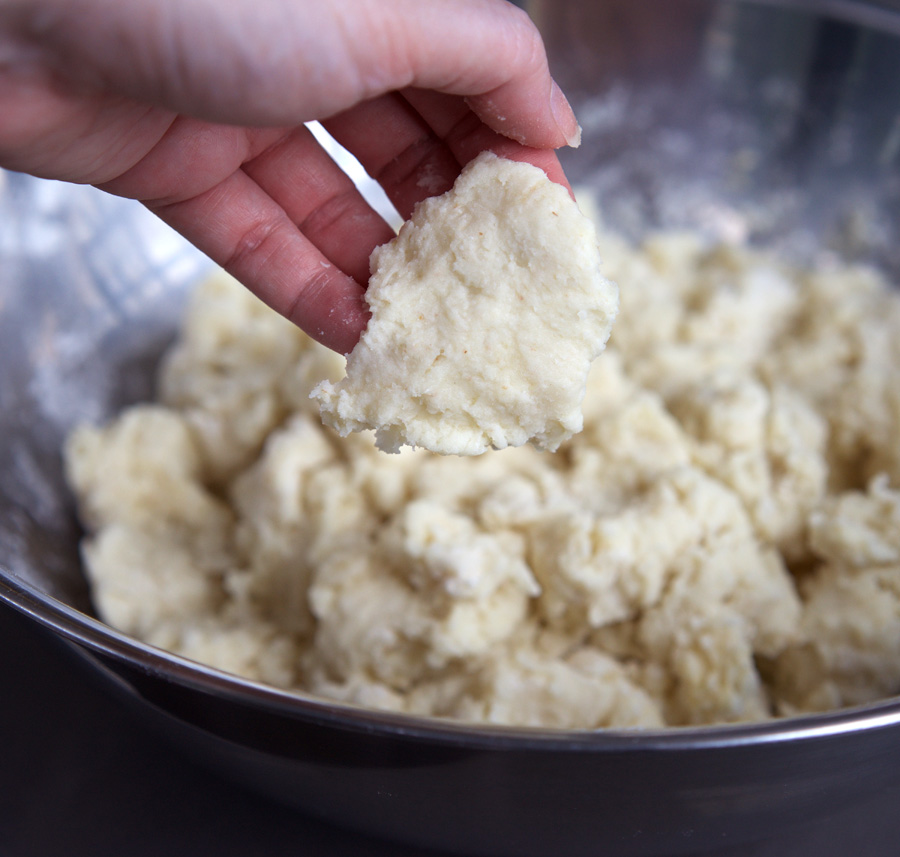
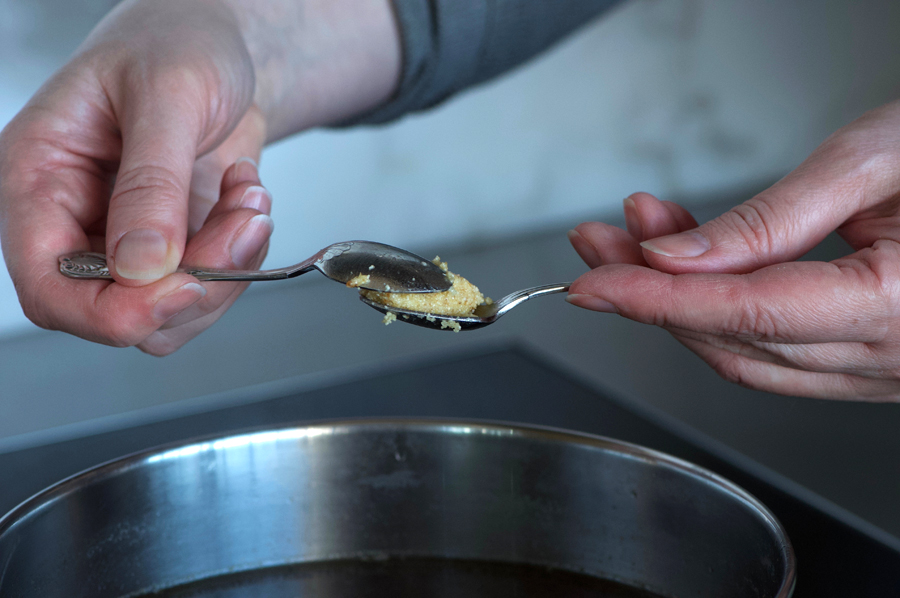
This step takes a bit of practice. Use two spoons (very small spoons, ideally, as these dumplings will easily double in size while they cook). Pick up about 1/2 teaspoon of the dumpling batter in one spoon. Use the second spoon to shape into an oval shape, pressing the dumpling together. Drop into the soup, and keep going until all of the dumplings are done.

A few notes to avoid any issues with the dumplings falling apart (which so far has only happened to me once!)

  • Use room temperature, not melted, butter for your batter
  • Allow the batter to rest for ten minutes before you start to shape the dumplings—but not much more than fifteen minutes, to avoid the batter becoming too soft.
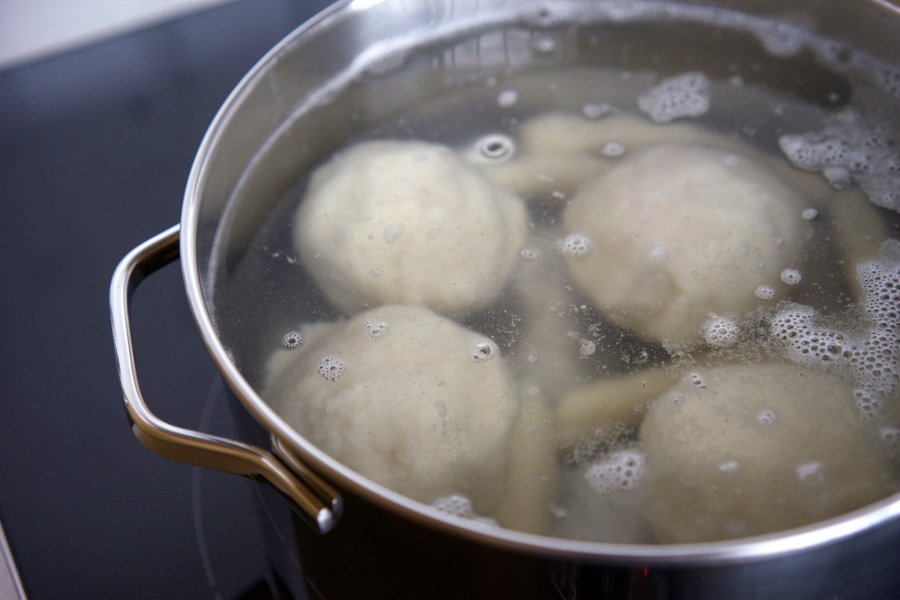
  • Don’t have the broth at a rolling boil when dropping the dumplings in, keep it at a gentle simmer.
  • Shape the dumplings fairly tightly so they hold together well. If they are too loose they might fall apart in the broth.

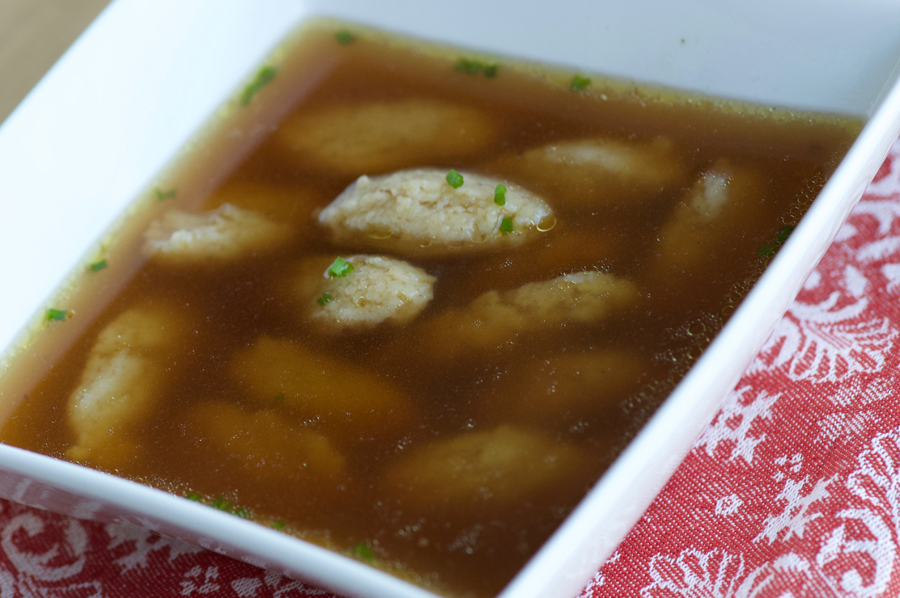
Depending on how large you made them, the dumplings usually take about ten to fifteen minutes to cook. They will float to the top when they are close to being done. Test one first, by cutting through it. The inside should be a uniform consistency. If the centre is still hard, you need to cook them a bit longer.

Use two small spoons to shape dumplings

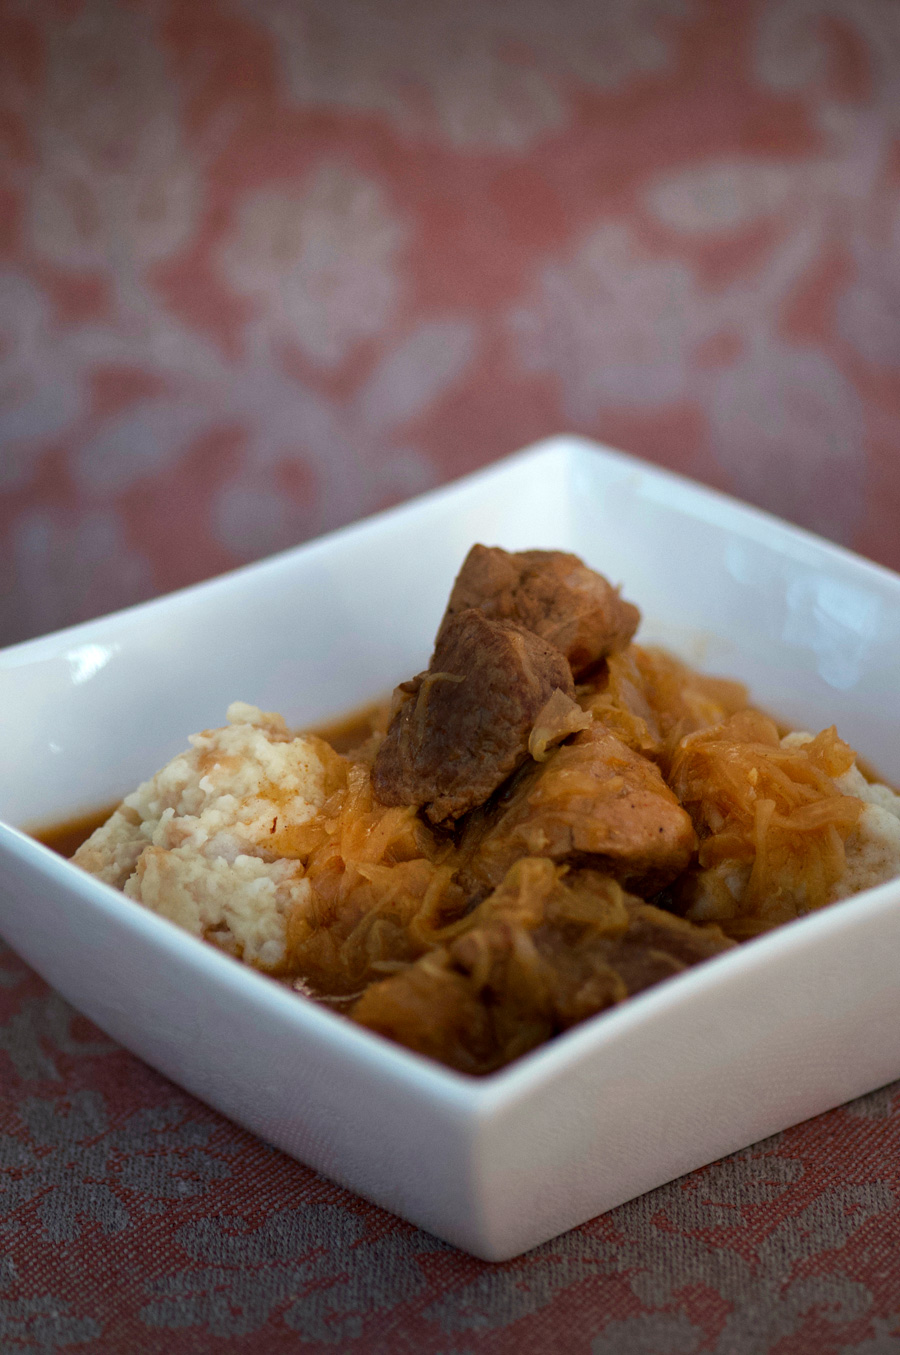
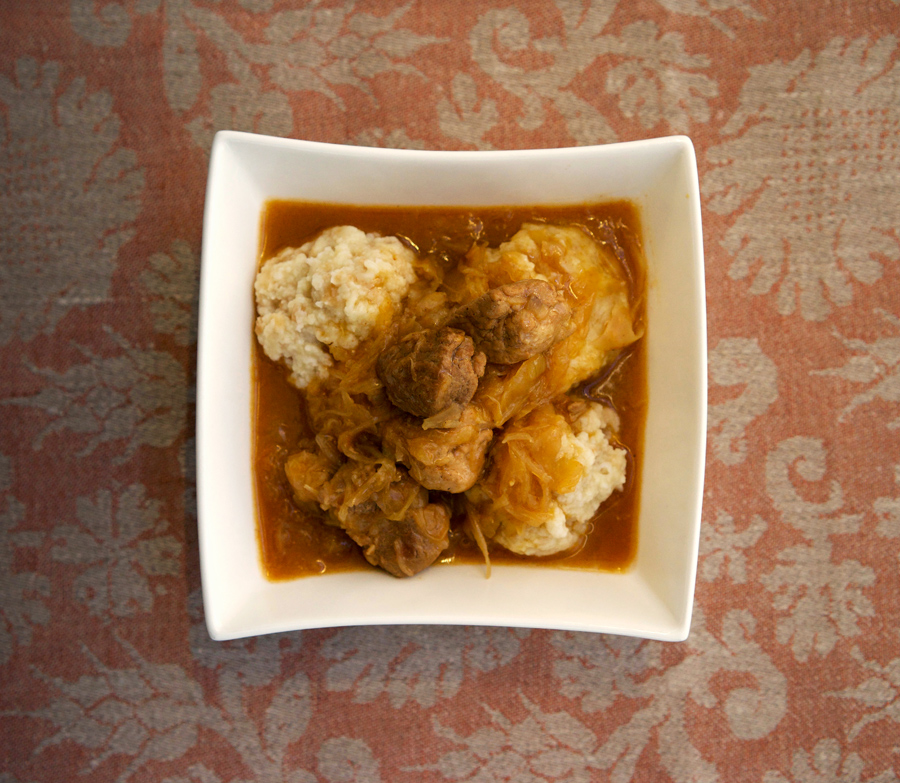
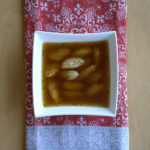
Serve sprinkled with freshly chopped chives. Some Maggi (seasoning sauce) at the table is always a good idea too in case anyone wants a bit more flavouring in their soup. A nice appetizer before a meal, or as a light lunch, this soup is both comforting and delicious!

Beef Bone-Broth Soup with Cream of Wheat Dumplings

Beef Bone Broth Soup with-Cream-of-Wheat Dumpings
4.5 from 2 votes
Print

Beef Bone-broth with Cream of Wheat Dumplings

A beautiful savoury beef broth full of natural collagens with fluffy cream of wheat dumplings. A traditional Austrian soup often served as a first course.

Course Appetizer
Cuisine Austrian
Servings 4

Ingredients

Beef Bone Broth

  • 2-3 fresh parsley sprigs
  • 2 fresh thyme sprigs
  • 1 Bay leaf
  • 5 black peppercorns
  • 4-5 lb meaty beef shanks/bones
  • 1 meaty veal shank
  • 2 onions: peels on, quartered
  • 1 large carrot, quartered
  • 2 ribs celery, quartered
  • water to cover bones
  • 1 1/2 tsp salt

Cream of Wheat Dumplings with Beef Bone Broth

  • 4 cups beef broth
  • 2 cups water
  • salt to taste
  • 1/2 beef boullion cube
  • 2 tbsp softened unsalted butter
  • 1 egg
  • 1/2 tsp salt
  • 1/2 cup cream of wheat
  • chopped chives to taste

Instructions

Beef Bone Broth

  1. Preheat oven to 450°. Spread bones, veal shank, onion and carrot in a roasting pan. Transfer to the oven and roast until dark brown in places, about one hour.

  2. Make bouquet garni: wrap herbs, Bay leaf and peppercorns in a cheesecloth and tie with kitchen twine.

  3. Transfer the roasted bones and veggies into a large stockpot. Add approximately two cups of water to the roasting pan, scraping up browned bits from the bottom. If you roasting pan is stovetop-safe, heating it on the stove may help loosen more bits. Add to stockpot with celery pieces. Top pot with water until bones are covered, and bring to a boil. Add salt. 

  4. Froth will develop at the top of the stock, especially during the first hour. Skim and discard the foam. Simmer gently uncovered for five to seven hours. Remove large bones and pieces from the pot and discard. Strain the broth through a fine sieve. Cool and refrigerate overnight to allow the fat to solidify at the top, remove. Transfer to storage containers and freeze/use as needed.

Cream of Wheat Dumplings with Beef Bone Broth

  1. Heat beef broth and water, add bouillon and taste and adjust seasoning as required. Bring to a gentle simmer.

  2. In a small to medium bowl beat egg. Add butter and salt, and combine well with a fork. Add cream of wheat and mix well with a fork, pressing to combine ingredients. Allow to rest for ten minutes.

  3. Using a very small teaspoon, take 1/2 tsp of batter and use a second spoon to shape it into an oval dumpling, pressing together. Drop into the broth. Continue with the rest of the batter. If your spoons get sticky, drop into the broth between shaping.

  4. Keeping the broth at a light simmer, cook the dumplings until they float to the top, about ten minutes. Check to see if they are done: cut one if half and see if the centre is consistent. Taste—if the middle is hard, cook for an additional five minutes or so. Serve topped with finely chopped fresh chives.

Rich and savoury beef broth with fluffy cream of wheat dumplings add up to pure comfort in a bowl.

Filed Under: Pleb Feasts, Recipe, Soup Tagged With: austrian, beef, Bone-Broth, Bones, Cream of Wheat, dumplings, German, Griessnockerl, soup

Sock-it-to-me Sauerkraut Goulash with Bread Dumplings

February 4, 2018 By Caroline 8 Comments

Spicy, fermented goodness with simple, old-country heritage, this dish dates back to the Austro-Hungarian Empire. Its actual name is Szégediner Gulasch, but growing up no one could pronounce the name properly, so it came to be known as “Sock-it-to-me Goulash.” This recipe was passed down to me from Grandma and it remains a family favourite. The stick-to-your-ribs stew is served over homemade German-style bread dumplings, also known as Semmelknoedel. A great dish to make ahead, it just gets better every time you heat it up!


Sauerkraut pork goulasch with bread dumplings

Pork shoulder is best for this dish as it will be the most tender, however I can’t always get it at the grocery store. Pork loin roast is a good substitute, even though it is lean the sauerkraut is tenderizing and it still tastes great.

Let me share a tip it took me so many years to learn the hard way: DO NOT overcrowd the pot when you brown meat! If you do, you will find the meat steaming in its own liquid instead of turning crisp and golden brown. There are a few factors at play that cause this: first, all meat has some water content. If the pot is too crowded, all of the water releases and doesn’t come into contact with the hot surface of your pot, so it will remain and build until your meat is swimming in liquid for more of a steam/braise than a browning. The second issue I believe at play is that the temperature of the pot is more difficult to maintain at the high heat needed for a good sear when overcrowded, further compromising your ability to achieve a proper sear on just the outer edges of the meat. If you allow generous spaces between the pieces as shown below, you will achieve a lovely golden brown on the meat, and also build up a nice crust on the bottom of the pan that will deglaze when you add the onions, forming the base of a flavourful sauce. It’s totally worth the effort of splitting into batches to achieve the correct level of browning.

browning pork to build flavour

A word on using lard. No one seems to speak of using it and I rarely see any recipes calling for this type of fat. Most people avoid cooking with it like the plague, thinking it to be extremely unhealthy. However, according to this article by the Huffington Post, it has “less saturated fat than butter, it’s higher in monounsaturated fats which are said to lower LDL cholesterol; and it has none of the trans fat that shortening does”. But really, the real reason I use lard is because Grandma told me under no circumstances to ever even think of substituting it with anything else. She knew instinctively that it can handle high heat without smoking, and using true rendered fat allows the onions to caramelize in a way they could not with olive oil. It gives just the right silky body to the final dish without imparting any unwanted flavours.

Sweet Paprika is a brighter red, while hot Paprika is more golden and smokey

Paprika is an essential ingredient in Hungarian kitchens. Not to be confused with Spanish Paprika which has a totally different flavour, you must use true Szeged Hungarian-style Paprika for this recipe. If I were to describe the difference, I would say Hungarian Paprika is smokey, deep and almost more chili-like, while Spanish Paprika I have had is more sweet with essence of fresh peppers. Once I tried mixing a bit of Spanish Paprika into the Goulash, thinking it would add an additional flavour dimension, but it was completely out of place and didn’t work at all. For this recipe, I like to make it a bit spicy and love to mix half sweet with half hot Hungarian Paprika. It gives the dish a some edge that compliments the sauerkraut for the best possible mash-up. However, you can adjust the mix to as much or as little heat as you like. Just don’t substitute with Spanish-style Paprika, please!

Cooking onions with Paprika

When cooking with Hungarian Paprika, it is always recommended to cook it at medium-high heat in some fat to maximize the flavour, so I recommend adding it to the onions just before returning the meat to the pot, stirring for a minute or so to bring out the spice. Then you can add the meat back in and top it off with water for a long, gentle simmer to tenderize the pork. Finally, the sauerkraut is added near the end and cooked a bit longer to further tenderize the meat. When you use good quality imported sauerkraut there is no need to drain the liquid, I put the whole can, juices and all, into the pot.

Returning Pork to Pot

While the goulash is cooking, you can make the bread dumplings. These dumplings have always fascinated me—how do regular kaiser buns turn into these awesome morsels, with a firm texture that perfectly compliments the goulash? Keep reading to find out!

Torn kaiser rolls on a baking sheet ready to be toasted

To begin, tear up the kaisers and spread onto a baking sheet. Toast in a preheated oven for under 10 minutes until they are just a bit dry and lightly toasted. Transfer them into a large bowl where you’ll mix in egg and milk and allow it to absorb (think: french toast-ish). But don’t wait too long, you need to add the flour (along with any seasonings) before the liquid fully absorbs and then mash up the whole thing until you get a sticky, dough-like consistency (see lower right pic).

Mix egg and flour with torn bread and flour

Then you just shape them into balls, before dropping them into simmering water to boil until they are cooked through, firm but fluffy. After having these, I just can’t go back to potatoes with this goulash, only bread dumplings will do!

Shape bread dumplings into balls

Kimchi might be the cool, trendy cabbage the kids are into these days, but trust me, Grandma always knew best. This goulash is savoury, spicy, fermented goodness with simple, old-country heritage that truly satisfies.

Hungarian Goulasch with Sauerkraut and Bread Dumplings

Hungarian Goulasch with Sauerkraut and Bread Dumplings
5 from 2 votes
Print

Sock-it-to-me Sauerkraut Goulash

Grandma's hearty and spicy recipe for pork goulash with sauerkraut, served with bread dumplings.

Course Main Course, Side Dish
Cuisine Austrian, German, Hungarian
Prep Time 45 minutes
Cook Time 1 hour 50 minutes
Total Time 2 hours 15 minutes
Servings 8

Ingredients

Goulash

  • 2 medium onions, chopped
  • 1 796 ml can imported mild wine German sauerkraut
  • 1/4 cup Tenderflake or other brand of lard
  • 2 1/2 lbs pork stew meat, cubed
  • 1 tbsp sweet Hungarian Paprika
  • 1 tbsp hot Hungarian Paprika
  • 1/4 tsp Cayenne pepper
  • 1 tsp salt
  • 3 tbsp cornstarch
  • 2 tbsp flour

Bread Dumplings

  • 3 large kaiser rolls, torn into pieces
  • 1/2 tsp salt
  • 2 eggs
  • 1 1/2 cups milk
  • 2 cups flour

Instructions

Goulash

  1. In a large dutch oven or heavy pot, melt lard on high heat. Add 1/3 - 1/2 of the meat, ensuring the pot is not overcrowded and there are spaces between the meat pieces to ensure effective browning. Brown meat evenly on all sides until deep golden brown in places, about 5 minutes. Transfer meat to a bowl to rest and continue with the rest of the pork until all of the meat has been well-browned and transferred into the bowl. Add onions to the pot, reduce heat to medium-high and cook until light golden, stirring to avoid burning. Scrape up the bottom of the pot to release any browned bits of meat as you stir the onions. Add Paprika and Cayenne and stir into the onions; cook about 1 minute to bring out the flavours in the spices. 

  2. Add water to cover meat. Bring to a boil and add salt. Reduce heat to medium-low and simmer until the meat is tender, about 45 minutes. Add sauerkraut and cook an additional 30 minutes.

  3. In a small bowl combine about 1/2 cup water with cornstarch and flour and stir well to dissolve. Add to pot and stir until thickened, about 5 minutes. Serve with bread dumplings.

Bread dumplings

  1. Preheat oven to 325°. Spread torn Kaiser roll pieces out on a baking sheet. Add to preheated oven and toast for 7 minutes, until bread is just lightly toasted. Remove from oven and place in a large bowl with salt.

  2. In a separate bowl, beat eggs with milk and add to bread mixture, stirring to allow the bread to soak up the liquid. Sprinkle with the flour and use a fork to shred the mixture into a dough-like consistency. The mixture will be sticky, so keep some extra flour aside that you can dip your hands into, to reduce the dough sticking to your hands. Form dough into 1.5" balls and place on a plate. Bring a large pot of water to a gentle simmer. When all of the balls are ready add them to the water to a maximum of a single layer at the bottom of the pot. Simmer for about 20 minutes—the balls will rise up to the top when they are cooked through. Remove from the water with a slotted spoon and reserve until ready to serve with the goulash.

Spicy, fermented, hearty goodness in a bowl!,

Filed Under: Main, Recipe Tagged With: bread dumplings, dumplings, Goulasch, Hearty, Paprika, Pork, Sauerkraut, Semmelknoedel, stew, Szeged, Szekelygulyas

Schvetskins (Apricot Dumplings)

August 25, 2017 By Caroline 8 Comments

Imagine your knife cutting through a soft, pillowy dumpling to reveal a juicy, fragrant, perfectly cooked apricot. You sprinkle with sugar to sweeten the fruit, and take your first bite. The crisp sugary breadcrumbs hug the dough and the sweet apricot flavour fills your mouth. This is the Schvetskin experience we enjoy as a special ritual every August when the apricots are at their peak. From humble ingredients—potatoes, breadcrumbs and apricots—you can make a delicious dessert that is hearty enough to be a light meal on its own.

While they may be officially known as Marillenknodel, we’ve always called them “Schvetskins”. You see, you can also make these with other fruits like plums or even cherries. The plum version is called Zwetschgenknoedel, which growing up sounded a lot like “Schvetskin-knoodle”—and the name stuck. So now, any fruit dumplings of this sort, we just go with “Schvetskins” which is easier for us Anglophones to remember!

dark earthy potatoes alongside brilliant apricots in a blue bowl

For many years, Schvetskins were my nemesis. I could not get them to turn out for the life of me. They would always fall apart while cooking and turn into a terrible, goopy mess. I finally figure it out, I wasn’t using enough flour. Too much potato, and your dough will be sticky and fall apart when boiling. Even with a recipe, it can vary depending on your potatoes, humidity and other factors, so this is one you need to develop a bit of a feel for. I’ve included lots of photos to show the texture you are looking for. When in doubt, just add more flour. Better a little on the firm side, than falling apart!

A sturdy potato ricer, like the one shown below, is a great tool for this recipe as it helps ensure there are no potato lumps in your dough. I used to have a cheaper one, but with the russet potatoes I prefer to use for their dryness, it didn’t hold up well and the handles would end up all bent. The one below is from Williams Sonoma and it has very sturdy handles that easily process the potatoes. Reminds me of Play Dough’s “hairdresser” salon kit (I always wanted one of those growing up!)

Potatoes are fed through a heavy-duty ricer

So once you have “riced” your cooked potatoes, you add flour, egg, salt and cream of wheat. I mix it with a fork at first, then you have to get in there with your hands and knead it.

Texture of finished dough is relatively firm and somewhat sticky

Below is a closeup of the dough to help show the consistency. It should only be a little bit sticky, and hold together into a firm shape when pressed.

The dough should hold together into a somewhat sticky but smooth piece when pressed

Once you have the dough ready, roll each whole apricot into a little bit of flour. Take a handful of dough, and flatten it into your hand so it is big enough to wrap around the apricot (smaller apricots are ideal to use here). Fit the dough around the apricot and press it together so there are no gaps—this is important as you will be boiling them later so you can’t have any water getting in. If you are finding that the dough is tearing and not forming well around the apricot, you probably need more flour. Roll it in your hands a few times to even out the dough and press out any air gaps that may have formed between the dough and the apricot. Set on a plate while you make the rest.

Once you have used all the apricots, there is usually some dough left. This is perfect for what we call “wutzels” (I don’t even have a story of where that name comes from, just go with it!) This is where you just take a small amount of dough and roll it out to the size and shape of a plump finger. Make a bunch of these and cook them with the dumplings.

Flatten a ball of dough in your hand and insert the apricot

Once they are all ready, get a large pot of water boiling on the stove. Not a rolling boil, as the dumplings are a wee bit delicate; you want a nice, steady simmer. Gently drop the dumplings (don’t forget the wutzels!) into the water.

Dumplings cook in gently simmering water

While they are cooking (usually takes about 20–25 minutes), pull out a large skillet and melt some butter. Add the breadcrumbs and white sugar, and cook on medium-high heat to toast the breadcrumbs. Be careful here, I find it tends to go very slowly at first, so I’ll walk away and ignore it for a while, only to come back to find it on the edge of burning. Once they get going, you need to stir frequently to avoid burnt crumbs on the bottom of the pan (or turn the heat way down).

When the dumplings start to float in the water, they are almost done. I give them about 5 or so minutes after they start floating, and then out they come and straight into the breadcrumbs.

Roll cooked dumplings in toasted breadcrumbs

Roll them around and your finished product will look something like this:

The finished dumpling with a golden breadcrumb crust

Dumpling from above

Many recipes call for the removal of the pit, to be replaced with a sugar cube. I find it much easier to just cook these whole, and remove the pits while eating. Adding sugar to your own taste is nice, and I find you can sprinkle it more evenly over the fruit that way.

Have you tried making Schvetskins? If so I’d love to hear what you thought of them!

Juicy apricots are lined with the thick potato dumpling

Close up shot of juicy apricots inside fluffy potato dumplings
4.5 from 2 votes
Print

Schvetskins (Apricot Potato Dumplings)

A traditional Austrian treat otherwise known as Marillenknodel.

Course Dessert, Lunch
Cuisine Austrian
Prep Time 40 minutes
Cook Time 25 minutes
Total Time 1 hour 5 minutes
Servings 6

Ingredients

  • 4 Russet baking potatoes
  • 2 eggs
  • 3 cups All purpose flour, + additional for dusting apricots
  • 2 tbsp Cream of wheat
  • 10 Apricots (fresh) smaller size preferred
  • 3 tbsp Butter
  • 1 cup Breadcrumbs
  • 1/3 cup White sugar

Instructions

  1. Boil whole potatoes with skin on until cooked through. (Leaving the skin on keeps the potatoes more dry). Remove skins and process through a potato ricer (or mash very fine until no lumps remain). Place into a large bowl.

  2. Add flour, cream of wheat and eggs. Blend with a fork until mostly combined, then knead into a dough. Texture will be slightly sticky but it should be fairly firm and able to hold together well.

  3. Rinse fruit, roll in additional flour. Pack some dough in your hand about 1/4" thick, large enough to wrap around an apricot. Fit the apricot into the dough, sealing around fruit so there are no openings or cracks. Roll around in your hands to even out the dough and eliminate any air gaps. Repeat until all dumplings have been formed. (If your hands are getting out-of-control sticky, flour them)

  4. Roll any leftover dough into "wutzels"--finger length dumplings without any fruit. 

  5. Place a large pot of water to boil on the stove. Bring to a gentle boil, and drop dumplings carefully into the water, along with the wutzels. Cook at a simmer for 20–25 minutes. When the dumplings float to the top of the pot, give them about 5 more minutes and they will be cooked through.

  6. Meanwhile, melt butter in a large skillet. Add bread crumbs and sugar. Cook until the crumbs are a nice deep golden colour. When dumplings have cooked, add them straight to the breadcrumb pan and roll them to coat. Serve immediately with sugar on the side to sprinkle on the cooked fruit.


Filed Under: Dessert, Main, Recipe Tagged With: apricots, austrian, breadcrumbs, dumplings, German, Marillenknodel, potato, Schvetskins

Primary Sidebar

Welcome to my kitchen journal, a place where I will share my favourite heritage recipes honed over the years, as well as document new evolutions and experiments along the way. Great feasts become vehicles for fond memories—the best meals are the ones someone made with love, for you. Follow me to explore traditions, document stories and experience the joy of the feast. Read More…

  • Facebook
  • Instagram
  • Pinterest
  • Twitter
  • YouTube

Don’t miss a story!

Get email updates

Copyright © 2023