• Skip to content
  • Skip to primary sidebar

Feast & Lore

Food stories featuring heritage recipes and new experiments.

  • Home
  • Recipes
  • About

potato

Italian Potato-Sausage Soup

March 11, 2018 By Caroline 5 Comments

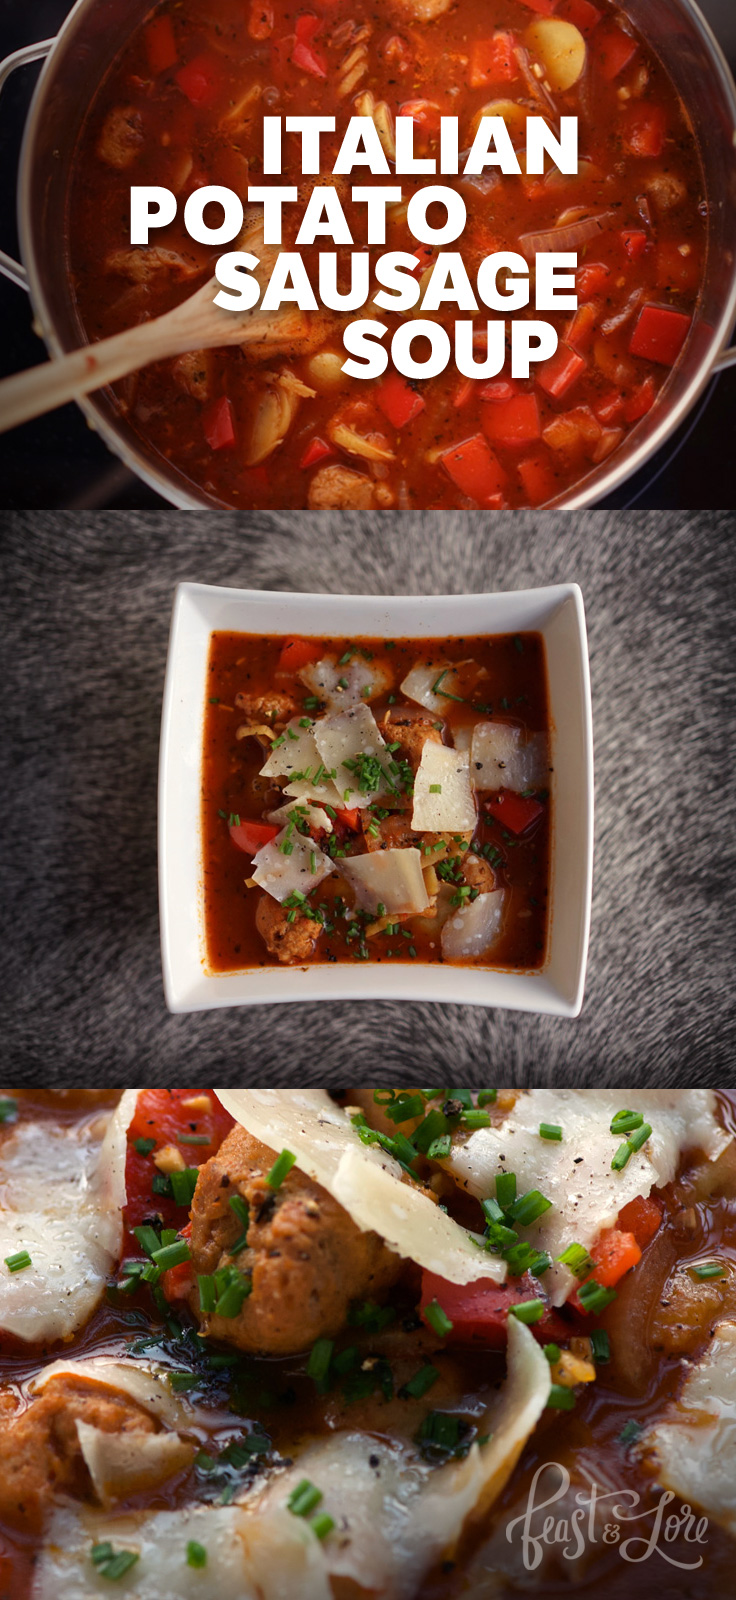
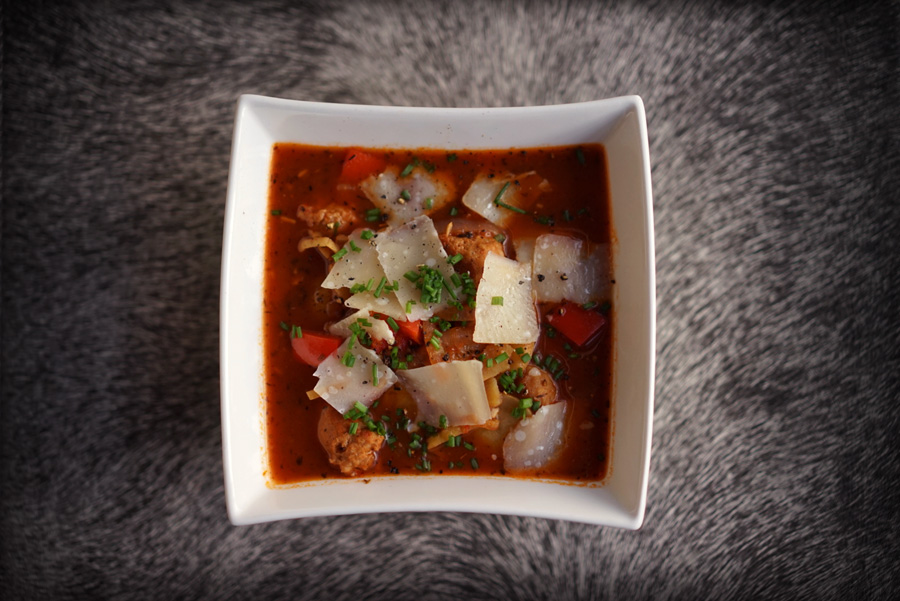
A hearty meal with a healthy dose of veggies, this Italian Potato-Sausage Soup is one of the first recipes I ever made. I remember the first time I tried it, I confused a clove of garlic with a head of garlic, so I used 2 whole heads of garlic by mistake! The result, while rather pungent, actually wasn’t half bad 🙂 I learned my lesson for next time and it’s been a favourite dish for over twenty years now! The sausages give the broth a wonderful spicy flavour complimented by the fresh red peppers. Topped with shaved Parmesan cheese and some chives, it comes together quickly for a delicious lunch or dinner.

Italian Potato Sausage Soup with Red Peppers

The original recipe came from a book I had picked up, 30-minute Meals from the Academy. An oldie but a goodie, this book has lots of simple recipes that are easy to pull together and taste great. The book put an emphasis on the mise-en-place method of prepping and cutting all of your ingredients before beginning to cook anything. This was an important lesson to learn when I first starting out—I still remember frantically trying to keep up with prepping ingredients while cooking because I hadn’t thought through how long the prep work would take (and being a newbie in the kitchen, I wasn’t exactly sous chef material!) True to the book, I still prep and chop everything for this recipe before getting started on the stove.

Mise en place - prep all your veggies in advance

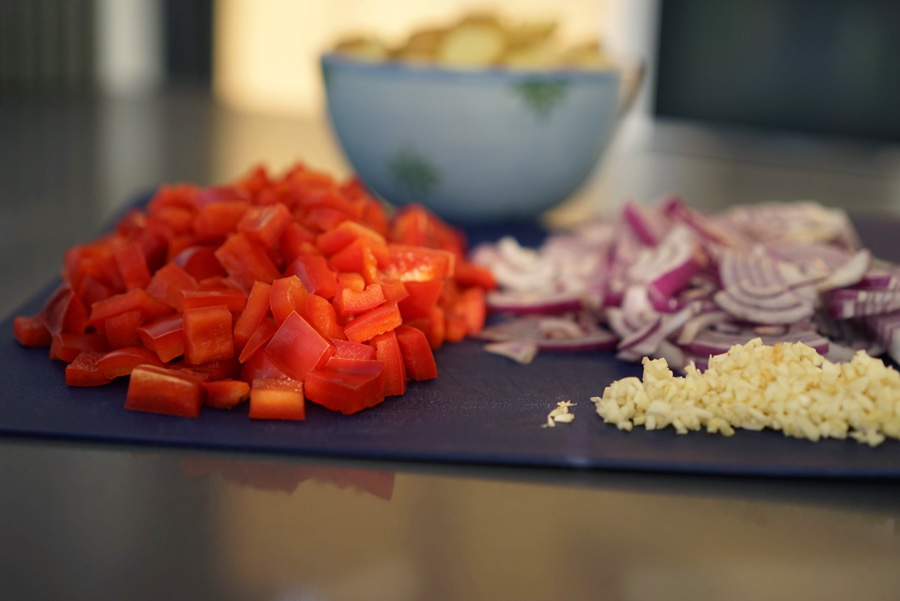
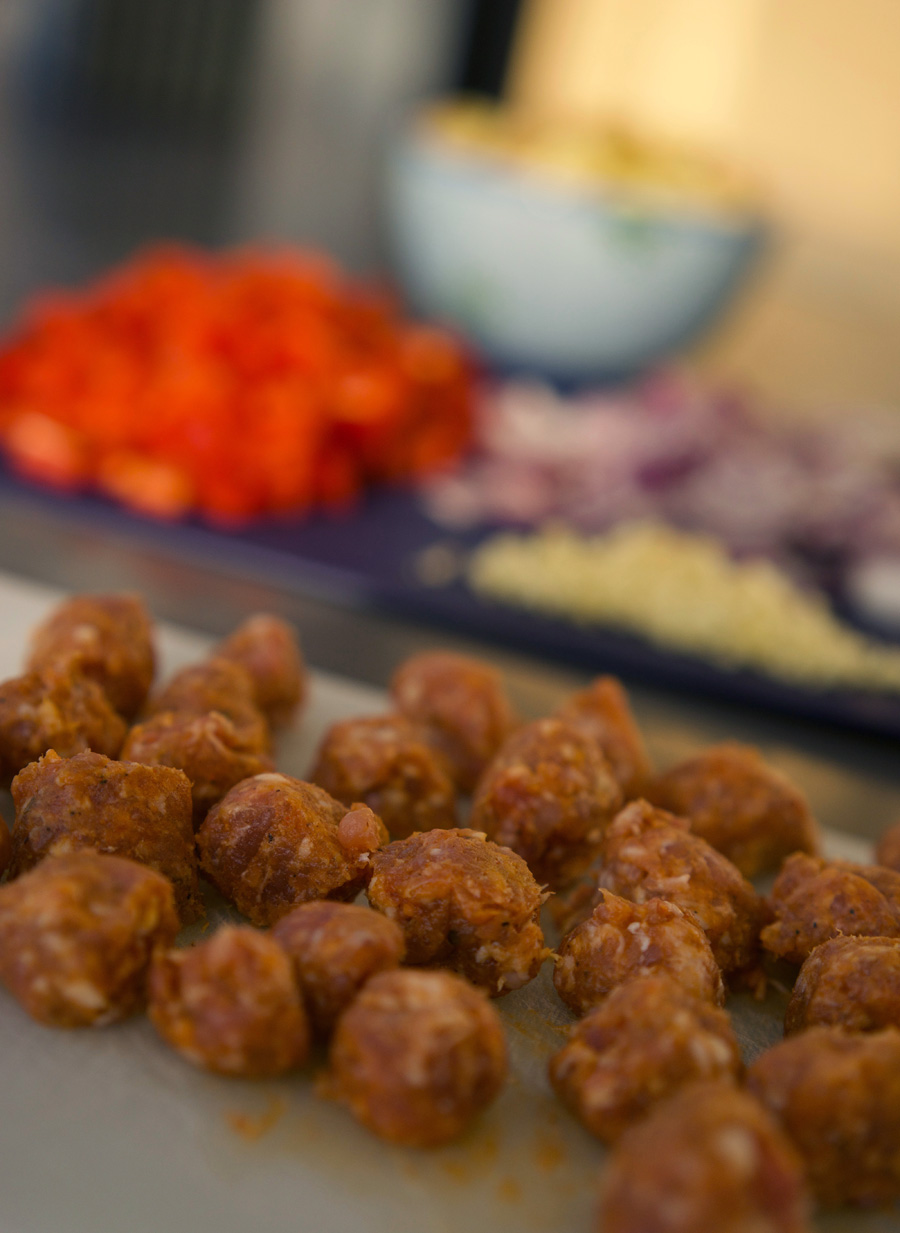
It’s worth noting that the quality of sausages you buy will greatly affect the final dish. Rather than the basic grocery store sausages that can be very fatty and overly salted, I go to a good quality butcher offering house made, smaller-batch sausages instead. I find they tend to be much leaner and the spices and overall flavour is so much better. They freeze well, so you can always buy enough for several recipes to avoid too many special trips to the meat shop. I adapted the recipe to include the extra step of removing the sausage casings. It only takes a couple of extra minutes and makes the sausage pieces more meatball like. I also found that while the larger piece sizes recommended for the veggies look quite gourmet, they are hard to manage and not very user-friendly while eating. Instead I go with bite-size pieces that fit easily into a spoon—no extra cutting/wrangling required while eating!

Remove italian sausage casings and cut into meatballs

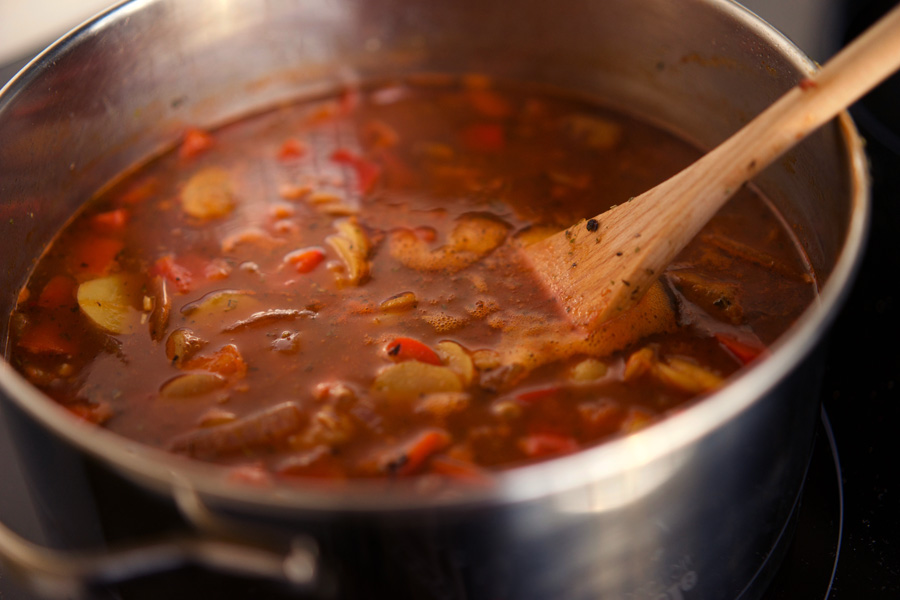
The sausages start off steaming in a small amount of water, then the water is drained and they are browned on all sides. Once brown, the sausages are removed from the pot and set aside. Olive oil is added, and the veggies are sautĂ©ed. I start with the onion, followed by garlic, seasoning and potatoes. I add the red peppers near the end as I like them to remain just a tiny bit crisp. Once the veggies are just slightly golden in places, it’s time to add the broth and tomato paste. The reserved sausages go back in, too.

Saute Garlic, Onions and Vegetables

At this point you just need to cook everything for about 15 minutes or so, until the potatoes are soft and cooked through. Do a taste check for salt and pepper, adding more if needed. A nice crusty baguette with butter on the side round this out for a tasty dinner or hearty lunch.

Add broth and tomato paste and cook soup

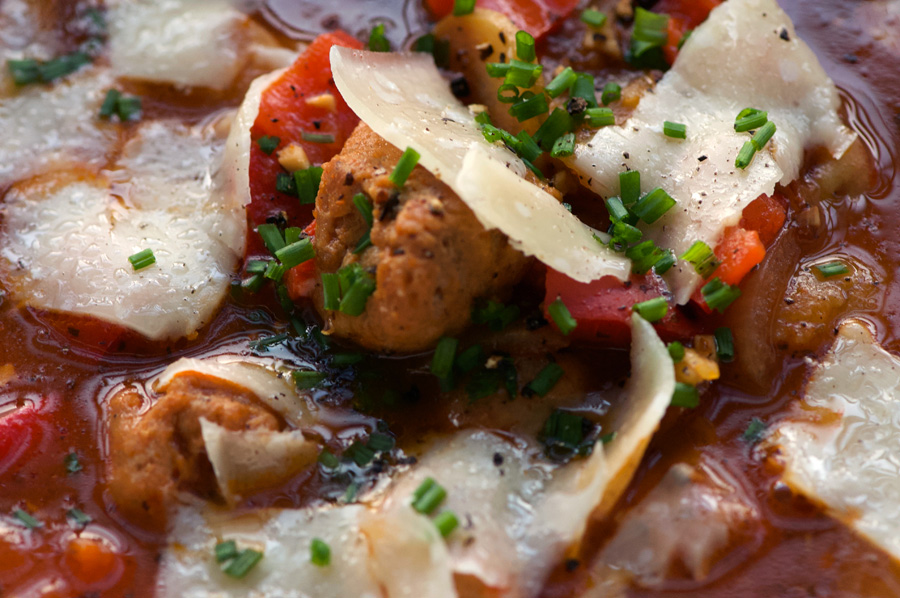
To serve, ladle into bowls and top with shaved parmesan pieces and some chives or green onions. Twenty years later, I still make this regularly and it’s a real crowd pleaser. This recipe is a keeper and I hope to make it for another twenty years.

Italian Potato Sausage Soup Topped with Parmesan Cheese

Hearty and delicious, a tomato broth with lot of fresh vegetables and sausage
5 from 1 vote
Print

Italian Potato Sausage Soup

A hearty soup loaded with bright red peppers, garlic, potatoes and sausage that is quick and easy to make.

Course Main Course
Cuisine Italian
Prep Time 20 minutes
Cook Time 20 minutes
Total Time 40 minutes
Servings 5 people

Ingredients

  • 3 Italian Sausages
  • 1/2 cup water
  • 2 tbsp olive oil
  • 1 small red onion, quartered and sliced
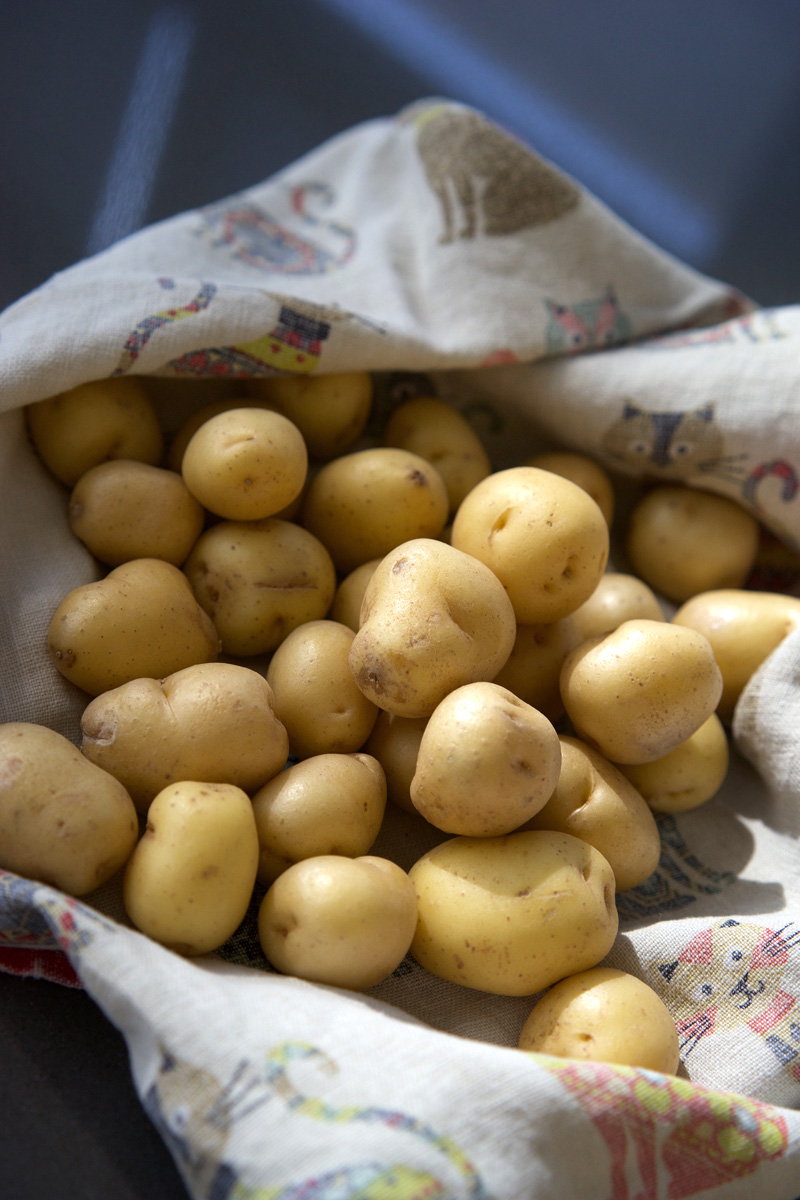
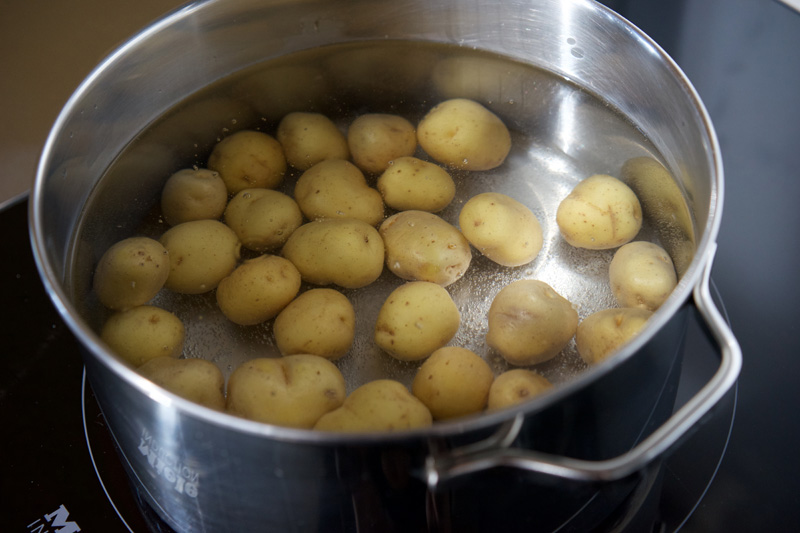
  • 550 g baby potatoes, thinly sliced
  • 3 cloves garlic, minced
  • 1 tbsp Italian Seasoning
  • 2 red peppers, cut into bite-sized pieces
  • 156 ml tomato paste (5.5 oz)
  • 900 ml chicken broth (30 oz or 4 cups)
  • salt to taste
  • freshly ground pepper to taste
  • handful of chives, diced
  • Parmesan cheese, shaved

Instructions

  1. Trim, chop and prep all ingredients. Remove casings from sausages and cut into 1" pieces, forming little sausage meatballs.

  2. In a large covered pot over medium-high heat, simmer sausages in 1/4 cup water for four minutes. Drain water, increase heat, and brown sausages on all sides (for about five minutes). Remove sausages and set aside.

  3. Heat olive oil in pot. Add onions and sauté for four minutes. Add garlic, potatoes, Italian seasoning and salt and pepper to taste. Cook for another five minutes. Add red peppers and cook for two minutes.

  4. Add tomato paste, broth and reserved sausages. Bring to a boil and simmer for fifteen minutes, until potatoes are softened and cooked through. Test for seasoning and add more salt if needed.

  5. To serve, ladle into bowls and top with shaved Parmesan, freshly ground pepper and diced chives.

Zesty tomato broth with red peppers, potatoes and sausages

Filed Under: Main, Recipe Tagged With: Garlic, Italian, Parmesan Cheese, potato, Red peppers, Sausage, soup, Tomato

Wine-Braised Beef Short Ribs with Parsnip Potato Mash

January 7, 2018 By Caroline 7 Comments

Melt-in-your-mouth, fall-off-the-bone, rich and delicious, these short ribs will warm the coldest winter night. Braised with Cabernet Franc and parsnips, the gravy develops a rich flavour with a subtle peppery depth. Even better the next day, this is a perfect make-ahead meal elegant enough to serve at a dinner party, yet equally suited to a casual family dinner.

Cabernet Franc braised shortrib with parsnip potato mash

To begin, the short-ribs need to be cut parallel to the bone, also known as “English style”, so that there is one bone per piece.  Avoid flanken “Korean style” cut ribs for this recipe, as the meat is cut much thinner and wouldn’t work as well with the long braising time. Below are the ribs straight from the butcher, I had them cut the ribs which were originally closer to 5″ long in half, into more manageable 2.5″ pieces as shown below. All together I had about 6 lbs of meaty ribs—this is pretty much the max amount my generous dutch oven would hold.

You can see from the photo below that the meat is well-marbled with fat. The braising process slowly and gently cooks this fat so that it renders down leaving silky soft meat that falls right off the bone. I highly recommend making this a day in advance so that you can easily remove all the fat from the gravy—when you chill the broth in the fridge all the fat floats to the top and hardens so that you can just lift it out in a large piece. The remaining broth will be wonderfully enhanced by natural collagens from the bones giving your gravy natural body and thickness.

Notice the generous marbling of fat in the bone-in short rib meat

To build the flavour profile of your braise, it is critical to get a good sear on the ribs. I had to do mine in two batches to avoid overcrowding. Go with high heat and make sure they sizzle when they hit the pot. You want a deep brown colour on the seared areas, and also look for some browned bits of meat to begin to stick to the bottom of the pot—you’ll scrape up all those bits later and they form the flavour base for your broth.

Browning shortrib meat in pot over high heat

Once all the ribs are well-browned, remove them to a bowl and set aside. Add the onions to the pot and cook until they start to turn golden, about 5–6 minutes. Add the parsnips for another 5–6 minutes, then add garlic and rosemary and cook some more.

Cook parsnips onions and rosemary

Once all the vegetables are golden, it’s time to add red wine and broth. A word on the type of wine: I find Cabernet Franc works really well for this dish. Generally this grape varietal is grown specifically to be blended with other grapes like Cabernet Sauvignon and Merlot. However, it has become popular in areas like Canada’s Niagara region as a varietal to enjoy on its own. It ripens a bit earlier than Cab Sauvignon so tends to fair better in the Canadian climate. I find Cab Francs tend to have a peppery quality with notes of tobacco and cassis that I really enjoy, while it goes lighter on the tannins. These qualities make it perfect to braise the short ribs and delivers a beautiful gravy when paired with the parsnip, rosemary, onion and garlic.

Braise short ribs in red wine

The pot of ribs with wine and broth is placed into a preheated 325° oven where it gently braises for 2.5 hours. Once ready, the meat will have have shrunk considerably (as much of the fat will have melted away into the broth), and if you take a fork to it, the meat will be very soft and fall away in shreds. Often some bones will come loose while it cooks; you’ll find them floating freely in the broth. Once the meat is cooked, I find it is best to remove the ribs, setting them aside in a sealable container, and then transfer the cooled broth into another container to be chilled in the fridge overnight. This way you can easily remove the fat which will harden into a single piece on top of the broth. If you can’t bring yourself to wait and want to eat these immediately (which would be totally understandable!) allow the broth to sit without stirring for 5–10 minutes; you’ll notice the fat will sit on top of the broth (but being clear it is a bit hard to discern from the actual broth). I once skimmed almost two full cups of fat, and I was doubting myself, wondering if I was being over zealous and skimming broth rather than fat. I decided to freeze it to check, and sure enough, it was all solid hardened fat!

Whether you patiently wait overnight or skim off the fat while warm from the oven, the next step is to bring the broth to a simmer and add flour mixed with butter to thicken it into a light gravy, just thick enough to coat the back of a spoon. Then the meat is added back into the sauce to be warmed up, ready for serving. Pureeing the parsnips further thickens the sauce.

Elegant wine-braised beef short rib

The short ribs are great served on your favourite mashed potato recipe, or to change things up you can make the parsnip-potato mash to compliment the sauce. Recipe for the parsnip mash is below.

Elegant wine-braised short ribs piled high on fluffy potato parsnip mash
5 from 1 vote
Print

Wine-braised beef short ribs

Melt-in-your-mouth short ribs are delicious and simple to make. Best made the day before to allow for the easiest removal of excess fat from the broth.

Course Main Course
Cuisine French
Prep Time 15 minutes
Cook Time 3 hours
Servings 8

Ingredients

Beef short ribs

  • 2 tbsp butter, divided
  • 6 lbs 2.5–3" meaty beef short ribs (about 8) "British cut"
  • salt
  • freshly ground pepper
  • 1 large red onion, chopped
  • 1 1/4 cups parsnips, cut into 1/2" pieces
  • 6 garlic cloves, chopped
  • 3 tbsp fresh rosemary, chopped
  • 750 ml Cabernet Franc (1 bottle)
  • 568 ml beef broth (2 regular size cans)
  • 1 tbsp flour

Parsnip Rosemary Potato Mash

  • 3 lbs russet potatoes, peeled and cut into 1" pieces
  • 1 lb parsnips, cut into 3/4" pieces
  • 3/4 cup milk
  • 3/4 stick butter (6 tbsp)
  • salt
  • pepper

Instructions

Short ribs

  1. Trim large fat from edges of ribs and season with salt and freshly ground pepper. Melt better in an oven-safe dutch oven pot over medium high heat. Add ribs to pot and brown well on all sides (add ribs in at least two batches to ensure proper browning). Remove browned ribs to a large bowl and set aside.

  2. Add onions to pot and cook until golden, about 5 minutes. Add parsnips and cook until golden, another 5 minutes or so. Add garlic and rosemary, cook until garlic has softened slightly.

  3. Add the bottle of red wine and the beef broth. Bring to a simmer, scraping up the browned bits from the bottom of the pot. Return ribs to the pot, cover, and place into a preheated 325° oven. Braise in the oven for 2 1/2 hours.

  4. Remove pot from oven, and transfer the ribs to a bowl. Check for any loose bones that may have come loose and are drifting in the broth, and remove. Using a slotted spoon, remove most of the parsnip pieces and reserve in a bowl. Ideally place the broth, parsnip pieces and meat in separate containers and refrigerate until the next day. 

  5. When ready to serve, remove the layer of fat from the broth and discard. Take about 1/4 cup of the broth and add to a small blender with the parsnip pieces, blend until smooth. Add parsnip puree into the broth, and bring the broth to a simmer. Mix 1 tablespoon of butter with the flour and blend into a paste. Add to the simmering pot to thicken the broth into a light gravy. Return meaty ribs to the pot and simmer over low heat until they are warmed through. Plate and serve with mashed potatoes.

Parsnip Rosemary Potato Mash

  1. Fill a large pot with water and add parsnips, potatoes and a generous pinch of salt. Bring to a boil and cook for 15–20 minutes, until the potatoes and parsnips are very soft. Drain.

  2. Meanwhile, in a small bowl or glass measuring cup, microwave milk and butter until the butter has melted and the milk is warm. Add to the cooked, drained potatoes and mash. Test for flavour and add salt if needed. Serve with short ribs and gravy.

Cabernet Franc braised beef short ribs

This recipe was based on Zinfandel-Braised Short Ribs over at Epicurious.

Filed Under: Main, Recipe Tagged With: beef, braise, cabernet franc, mash, parsnip, potato, red wine, rosemary, short rib, shortrib, slow food, stew, winter

Schvetskins (Apricot Dumplings)

August 25, 2017 By Caroline 8 Comments

Imagine your knife cutting through a soft, pillowy dumpling to reveal a juicy, fragrant, perfectly cooked apricot. You sprinkle with sugar to sweeten the fruit, and take your first bite. The crisp sugary breadcrumbs hug the dough and the sweet apricot flavour fills your mouth. This is the Schvetskin experience we enjoy as a special ritual every August when the apricots are at their peak. From humble ingredients—potatoes, breadcrumbs and apricots—you can make a delicious dessert that is hearty enough to be a light meal on its own.

While they may be officially known as Marillenknodel, we’ve always called them “Schvetskins”. You see, you can also make these with other fruits like plums or even cherries. The plum version is called Zwetschgenknoedel, which growing up sounded a lot like “Schvetskin-knoodle”—and the name stuck. So now, any fruit dumplings of this sort, we just go with “Schvetskins” which is easier for us Anglophones to remember!

dark earthy potatoes alongside brilliant apricots in a blue bowl

For many years, Schvetskins were my nemesis. I could not get them to turn out for the life of me. They would always fall apart while cooking and turn into a terrible, goopy mess. I finally figure it out, I wasn’t using enough flour. Too much potato, and your dough will be sticky and fall apart when boiling. Even with a recipe, it can vary depending on your potatoes, humidity and other factors, so this is one you need to develop a bit of a feel for. I’ve included lots of photos to show the texture you are looking for. When in doubt, just add more flour. Better a little on the firm side, than falling apart!

A sturdy potato ricer, like the one shown below, is a great tool for this recipe as it helps ensure there are no potato lumps in your dough. I used to have a cheaper one, but with the russet potatoes I prefer to use for their dryness, it didn’t hold up well and the handles would end up all bent. The one below is from Williams Sonoma and it has very sturdy handles that easily process the potatoes. Reminds me of Play Dough’s “hairdresser” salon kit (I always wanted one of those growing up!)

Potatoes are fed through a heavy-duty ricer

So once you have “riced” your cooked potatoes, you add flour, egg, salt and cream of wheat. I mix it with a fork at first, then you have to get in there with your hands and knead it.

Texture of finished dough is relatively firm and somewhat sticky

Below is a closeup of the dough to help show the consistency. It should only be a little bit sticky, and hold together into a firm shape when pressed.

The dough should hold together into a somewhat sticky but smooth piece when pressed

Once you have the dough ready, roll each whole apricot into a little bit of flour. Take a handful of dough, and flatten it into your hand so it is big enough to wrap around the apricot (smaller apricots are ideal to use here). Fit the dough around the apricot and press it together so there are no gaps—this is important as you will be boiling them later so you can’t have any water getting in. If you are finding that the dough is tearing and not forming well around the apricot, you probably need more flour. Roll it in your hands a few times to even out the dough and press out any air gaps that may have formed between the dough and the apricot. Set on a plate while you make the rest.

Once you have used all the apricots, there is usually some dough left. This is perfect for what we call “wutzels” (I don’t even have a story of where that name comes from, just go with it!) This is where you just take a small amount of dough and roll it out to the size and shape of a plump finger. Make a bunch of these and cook them with the dumplings.

Flatten a ball of dough in your hand and insert the apricot

Once they are all ready, get a large pot of water boiling on the stove. Not a rolling boil, as the dumplings are a wee bit delicate; you want a nice, steady simmer. Gently drop the dumplings (don’t forget the wutzels!) into the water.

Dumplings cook in gently simmering water

While they are cooking (usually takes about 20–25 minutes), pull out a large skillet and melt some butter. Add the breadcrumbs and white sugar, and cook on medium-high heat to toast the breadcrumbs. Be careful here, I find it tends to go very slowly at first, so I’ll walk away and ignore it for a while, only to come back to find it on the edge of burning. Once they get going, you need to stir frequently to avoid burnt crumbs on the bottom of the pan (or turn the heat way down).

When the dumplings start to float in the water, they are almost done. I give them about 5 or so minutes after they start floating, and then out they come and straight into the breadcrumbs.

Roll cooked dumplings in toasted breadcrumbs

Roll them around and your finished product will look something like this:

The finished dumpling with a golden breadcrumb crust

Dumpling from above

Many recipes call for the removal of the pit, to be replaced with a sugar cube. I find it much easier to just cook these whole, and remove the pits while eating. Adding sugar to your own taste is nice, and I find you can sprinkle it more evenly over the fruit that way.

Have you tried making Schvetskins? If so I’d love to hear what you thought of them!

Juicy apricots are lined with the thick potato dumpling

Close up shot of juicy apricots inside fluffy potato dumplings
4.5 from 2 votes
Print

Schvetskins (Apricot Potato Dumplings)

A traditional Austrian treat otherwise known as Marillenknodel.

Course Dessert, Lunch
Cuisine Austrian
Prep Time 40 minutes
Cook Time 25 minutes
Total Time 1 hour 5 minutes
Servings 6

Ingredients

  • 4 Russet baking potatoes
  • 2 eggs
  • 3 cups All purpose flour, + additional for dusting apricots
  • 2 tbsp Cream of wheat
  • 10 Apricots (fresh) smaller size preferred
  • 3 tbsp Butter
  • 1 cup Breadcrumbs
  • 1/3 cup White sugar

Instructions

  1. Boil whole potatoes with skin on until cooked through. (Leaving the skin on keeps the potatoes more dry). Remove skins and process through a potato ricer (or mash very fine until no lumps remain). Place into a large bowl.

  2. Add flour, cream of wheat and eggs. Blend with a fork until mostly combined, then knead into a dough. Texture will be slightly sticky but it should be fairly firm and able to hold together well.

  3. Rinse fruit, roll in additional flour. Pack some dough in your hand about 1/4" thick, large enough to wrap around an apricot. Fit the apricot into the dough, sealing around fruit so there are no openings or cracks. Roll around in your hands to even out the dough and eliminate any air gaps. Repeat until all dumplings have been formed. (If your hands are getting out-of-control sticky, flour them)

  4. Roll any leftover dough into "wutzels"--finger length dumplings without any fruit. 

  5. Place a large pot of water to boil on the stove. Bring to a gentle boil, and drop dumplings carefully into the water, along with the wutzels. Cook at a simmer for 20–25 minutes. When the dumplings float to the top of the pot, give them about 5 more minutes and they will be cooked through.

  6. Meanwhile, melt butter in a large skillet. Add bread crumbs and sugar. Cook until the crumbs are a nice deep golden colour. When dumplings have cooked, add them straight to the breadcrumb pan and roll them to coat. Serve immediately with sugar on the side to sprinkle on the cooked fruit.


Filed Under: Dessert, Main, Recipe Tagged With: apricots, austrian, breadcrumbs, dumplings, German, Marillenknodel, potato, Schvetskins

Simple Summer Sides: Grilled Baby Potatoes

July 12, 2017 By Caroline Leave a Comment

Summer is all about taking it easy, recharging outside and soaking up the long days of sunshine. The last thing you want to do is spend all day in the kitchen. What you want are simple, delicious meals that are perfect enjoyed on a patio with a glass of wine. These potatoes deliver. Crisp, flavourful young potato skins pop with hits of coarse kosher salt that brings out the natural sweetness of the creamy potatoes. Rosemary adds just a hint of colour and delicate flavour.

Sprigs of Rosemary, freshly cut resting on a wood table

I grow the Rosemary right on my patio. I love rubbing a leaf between my fingers and taking in the scent. You just need a few sprigs, finely chopped, as your seasoning along with the kosher salt. I really prefer the coarse texture of kosher salt for these potatoes, to deliver a hit of flavour on the skins.

Potatoes in the pot

To start with, par-boil the potatoes for 8–10 minutes until they are starting to soften, but not fully cooked through. Don’t overcook them or your final product off the grill will be mushy.

Seasoned potatoes in a green bowl

Drain the potatoes and transfer to a bowl. Add the olive oil, salt and rosemary. Stir to combine.

Seasoned baby potatoes roast on the upper rack of the BBQ grill.

Next, toss the potatoes on the grill. I find the top rack works well to get a nice golden skin and soft, perfectly cooked insides. Once ready, transfer from the grill into the same bowl you seasoned them in, and toss them around in the olive oil and seasoning that’s left to give them a nice finish. Enjoy (careful, they get pretty hot right off the grill—cut one open to test before popping a whole one into your mouth) you’ve been warned!

The finished potatoes, grilled to perfection


The finished potatoes, grilled to perfection
Print

Grilled baby potatoes

Simple perfection, just four ingredients to bring out the natural sweetness and beautiful texture of new baby potatoes.

Course Side Dish
Cuisine American
Prep Time 3 minutes
Cook Time 20 minutes
Total Time 23 minutes
Servings 4

Ingredients

  • 1.5 lb Baby Potatoes (680 g)
  • 2 tbsp olive oil
  • 3 sprigs Fresh rosemary finely chopped
  • Kosher Salt

Instructions

  1. Scrub potatoes and set into a large pot filled with cold water. Bring to boil over high heat and cook for 8–10 minutes until they are partially cooked. (Overcooking here leads to a "mushy" texture after they are grilled. You are looking for a softened, but still firm, cook on the potatoes)

  2. Drain potatoes and transfer to a bowl. Drizzle with olive oil. Add rosemary, and sprinkle with kosher salt to taste. Stir.

  3. Add potatoes to hot grill (400°). Grill until golden and skins are crisp, approximately 10 minutes. Test to ensure the potatoes are soft and fully cooked through—insert a sharp knife to the centre to ensure they are soft.

  4. Remove from grill back into the bowl, and stir to coat with a touch of olive oil and rosemary remaining in the bowl. Serve.

Filed Under: Recipe, Side Tagged With: baby potatoes, Easy, Grill, kosher salt, potato, rosemary, summer, summer side

Primary Sidebar

Welcome to my kitchen journal, a place where I will share my favourite heritage recipes honed over the years, as well as document new evolutions and experiments along the way. Great feasts become vehicles for fond memories—the best meals are the ones someone made with love, for you. Follow me to explore traditions, document stories and experience the joy of the feast. Read More…

  • Facebook
  • Instagram
  • Pinterest
  • Twitter
  • YouTube

Don’t miss a story!

Get email updates

Copyright © 2023