• Skip to content
  • Skip to primary sidebar

Feast & Lore

Food stories featuring heritage recipes and new experiments.

  • Home
  • Recipes
  • About

Caroline

Peach Raspberry Pie

September 5, 2017 By Caroline 2 Comments

It’s hard to believe the CNE is over, the Labour Day weekend has just passed, and everyone is “back to school”. But don’t fret, technically summer is still here until September 22, peaches are still plentiful, and now is the perfect time to bake up the best pie you’ll ever eat! So many people are afraid to make their own pie crust, and I have to admit it is almost magical how butter and flour can turn into something so flaky and delicious. But honestly, it’s not hard and the ingredients are so simple. You can totally do this, I have all the instructions and even some video to show you how it’s done.

One key thing to remember is the importance of keeping your pastry cold. The butter has to be cold right from the start, and you can’t skip the various stages of putting the dough in the fridge when directed.

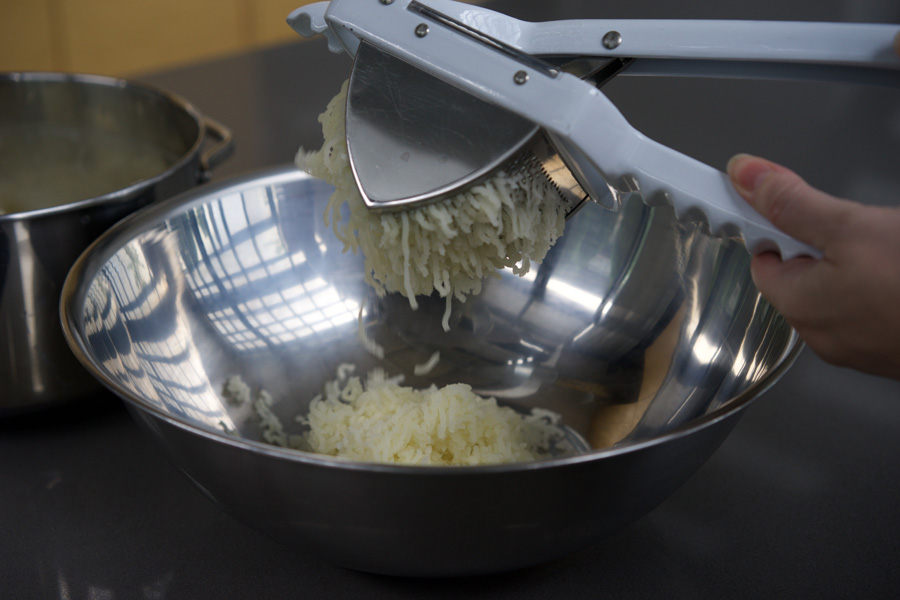
To begin, combine flour, sugar and salt in a large bowl. Cut up two sticks of butter (keep them in the fridge right until you are ready to cut them) into cubes and cut the butter into the flour mixture. I like to use a pastry cutter, shown below, as it does a quick job of working the butter in. You can also use two knives. Some people use a food processor for this step, but I don’t actually own one that’s big enough, and I’d rather not clean all the food processor parts afterwards anyways 🙂


Cubed butter is about to be cut into flour with a pastry cutter.

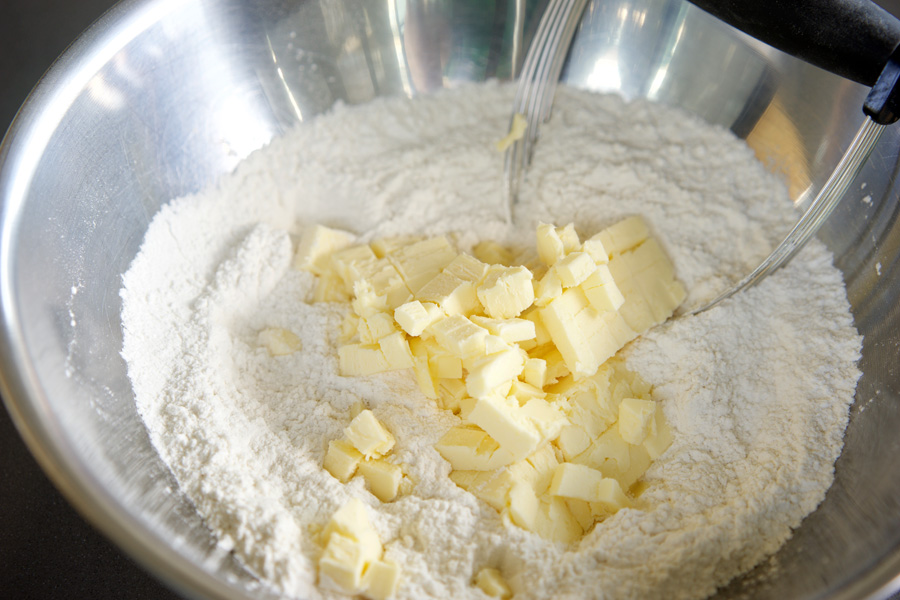
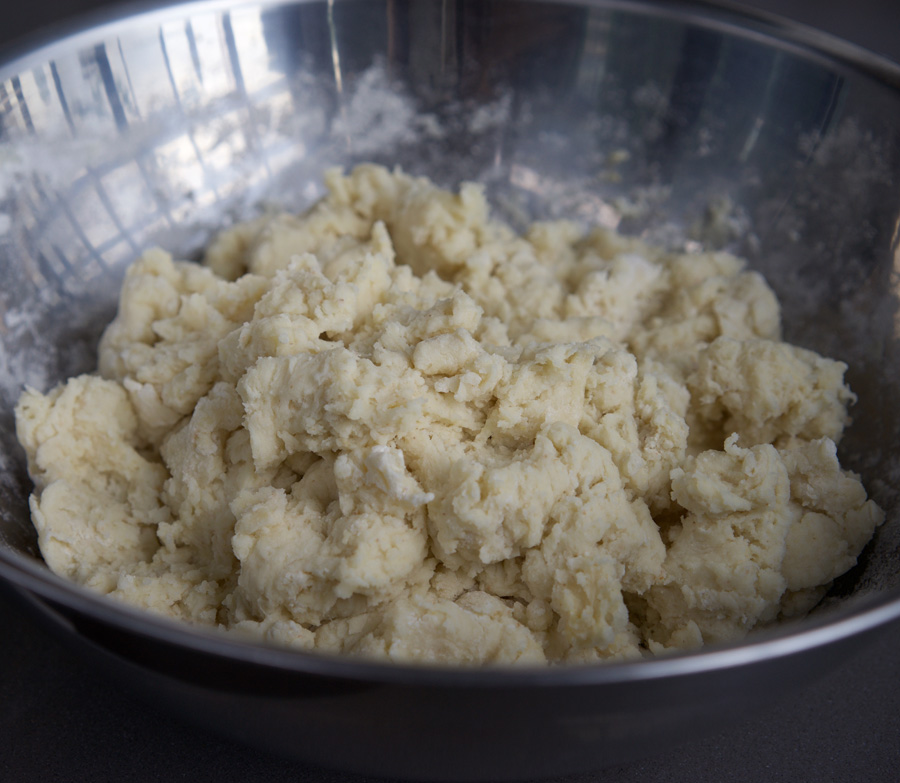
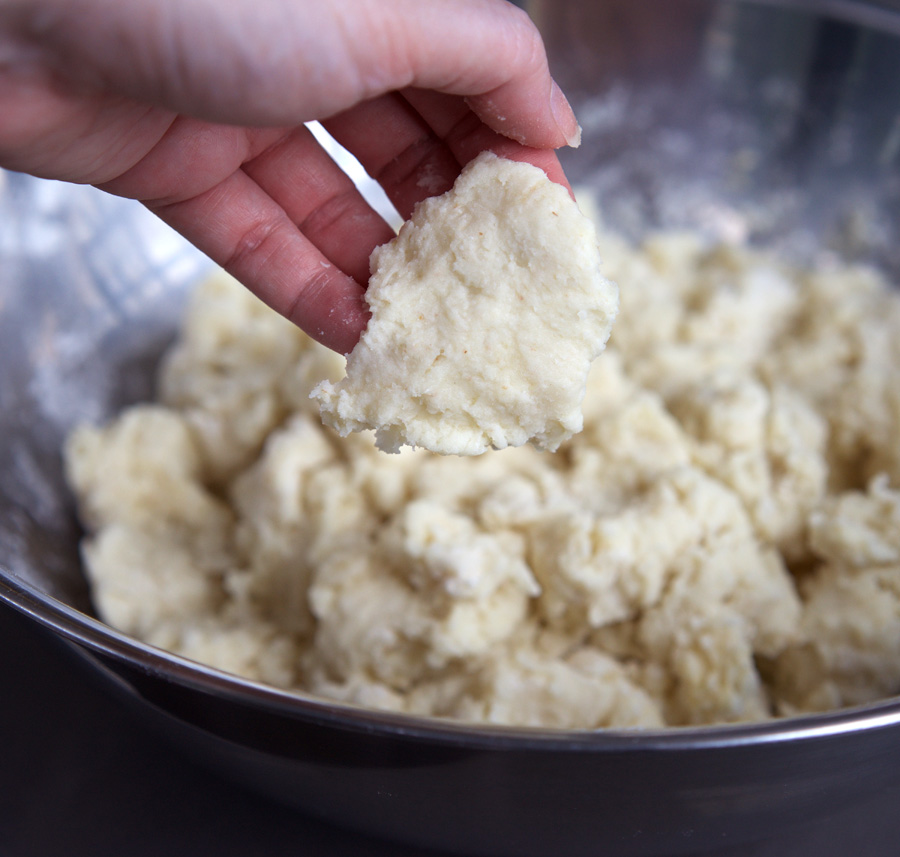
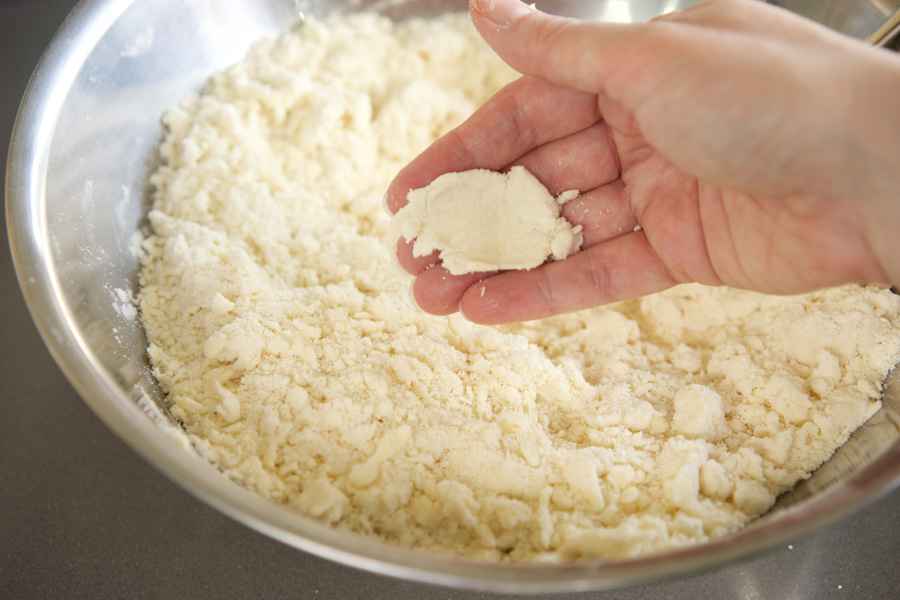
Keep working the butter into the dough until the texture is a coarse, crumbly mix with even, peppercorn sized lumps of butter throughout. Add ice water (again, very cold water is key, I set aside a small bowl with cold water and add ice cubes, and measure out from there), a little at a time, mixing with a fork and adding only what you need for the dough to hold together. When you think it’s ready, take some in your hand and press it together. If it holds together and looks roughly like the photo below, it’s ready to be kneaded together.

Hand holding a pressed piece of dough that is holding together well

Knead the dough together until all of the crumbs are well combined into a nice, smooth (but somewhat craiggy) ball. While you don’t want to over-work the dough here and risk the butter getting too warm, you also don’t want to under-do it and end up with crumbly dough that won’t roll out nicely. I usually knead until it’s holding together well, then knead a few more times just to really combine everything well.


Ball of dough has been cut into two hunks

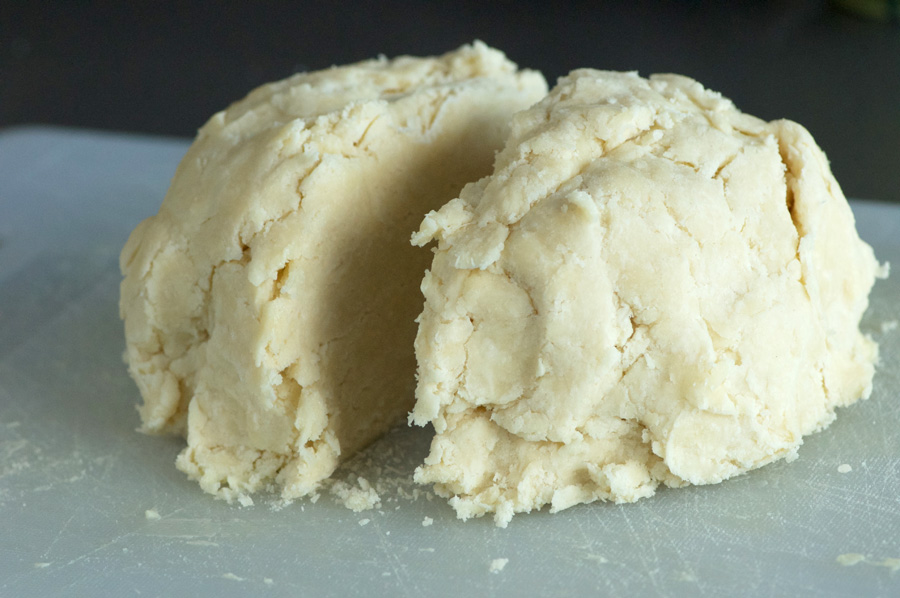
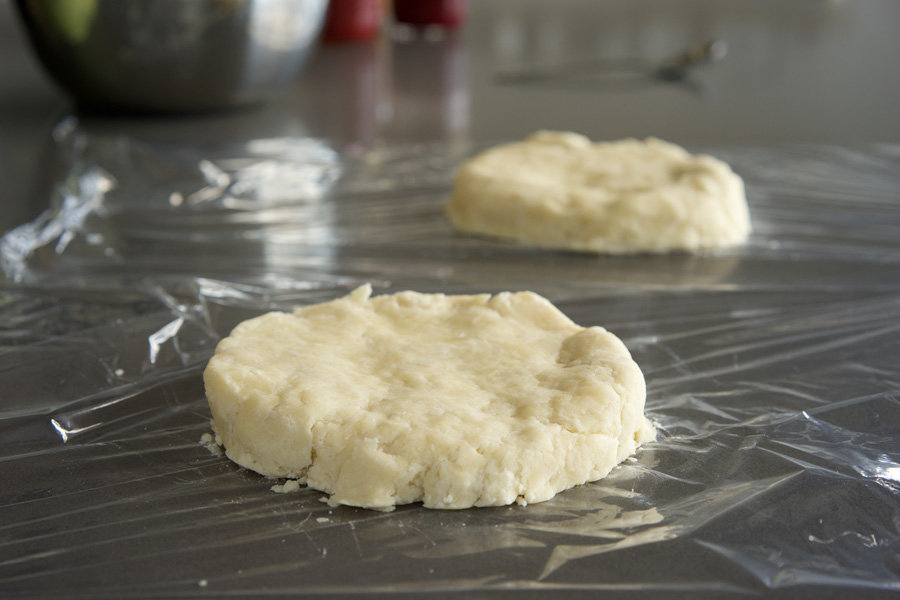
Divide your ball of dough in half, and then press each half onto a sheet of plastic wrap, forming each into a flattened disk about 1″ thick. I press them out with my palm and press the sides in to shape them as shown below. Then wrap them up and place into the fridge for about 50 minutes.

Dough is flattened and placed onto plastic wrap.

Meanwhile you can work on your filling. Peel and slice your peaches (fastest method: cut around the circumference of your peach to the pit, twist peach in half. Then slice peach into quarters. Hold a peach quarter in your hand, peach skin facing you. Slide your knife under the top corner of the skin, and in a single motion pull the skin off from top to bottom using the knife.) Another real time saver is to use frozen peaches (if you can find them—I get mine at MacMillan Orchards in Ajax) as they come already peeled and sliced. (Also this allows you to enjoy this pie all year round!) Mix the peaches with sugar and flour, and then add the raspberries.

Close up of fruit filling with sugar and flour

By now your pie crusts should be done chilling. Prepare your work area with flour and roll out the bottom crust. Once you’ve draped it over the pie plate, get it back in the fridge for a good 30 minutes. During this time you can make your Egg Wash and cut up the final two tablespoons of butter.

Here’s a video covering the next few steps:

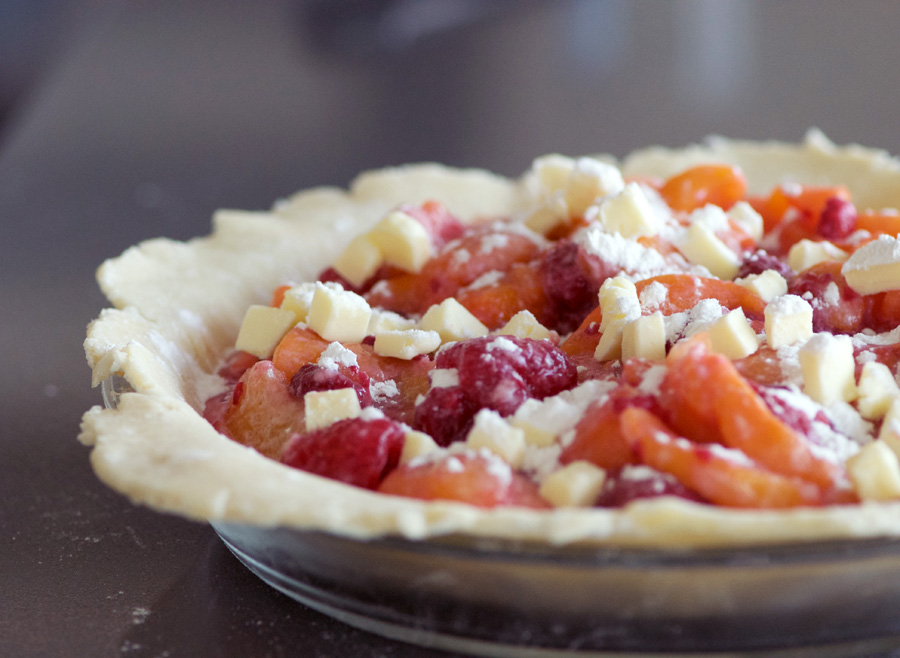
Next roll out your top pie crust, and then add the filling to your lower crust. Dot with that butter, and brush the pastry edges with Egg Wash. Roll your top crust onto the bottom and trim the excess pastry from the edges of the pie plate. Crimp the edges together, and back in the fridge it goes for another 20 minutes or so, to allow the top crust to chill.

Pie bottom with filling and dots of butter

Finally, cut vents into the top crust, brush with Egg Wash all over, and sprinkle with coarse sugar. I love to get decorative with my pie crusts and make leaf shaped vents, and add extra leaves on top (“glued” with egg wash) to make the prettiest pie. You just can’t buy a pie that looks like this at the store (and the crusts on those don’t even come close to the flakiness level of this one!) Bake at high heat to brown the crust, then turn down the heat for the final phase to finish the pie and bake the fruit. I love to serve with vanilla ice cream on the side. Once you’ve had homemade pie like this, you’ll never want to go back to store-bought!

Golden and dripping with fruit juices, the pie is ready to eat!

Pie fresh out of the oven, photographed from above. Crust has vents shaped like leaves, with additional dough leaves creating a circular pattern on the crust.
5 from 1 vote
Print

Peach Raspberry Pie

My favourite pie, hands down, is this peach raspberry double-crust.

Course Dessert
Cuisine American
Prep Time 30 minutes
Cook Time 45 minutes
Total Time 1 hour 15 minutes
Servings 8

Ingredients

Pie Crust

  • 2 1/2 cups All-purpose flour
  • 1 tsp Salt
  • 1 tsp Sugar
  • 2 sticks Cold , unsalted butter (1 cup)
  • 5–7 tbsp Ice water

Filling

  • 4 lbs Peaches (about 8 medium) Peeled and sliced
  • 1/2 pint Raspberries
  • 1/2 cup Sugar
  • 1/4 cup All-purpose flour
  • 2 tbsp Cold, unsalted butter cut into pieces

Egg Wash

  • 1 egg
  • 2–3 tbsp milk

Instructions

  1. Make pie crust: Place flour, sugar and salt in a large bowl; stir to combine. Cut butter into small cubes and add to the flour mixture. Cut butter into flour using a pastry cutter or two knives, until the butter is broken down into tiny but discernible lumps with the flour.

  2. Mix in ice water with a fork until dough just comes together. Press some of the dough between your fingers to check the consistency, it should hold together well. Lightly knead the dough until all crumbs are incorporated into a craggy ball of dough. Don't over-knead at this point, but under-kneading will make fora  crumbly dough when you go to roll it out, so aim for fairly smooth ball.

  3. Divide the ball of dough into two, and press each half into a flat disk onto a piece of plastic wrap. Chill in the fridge for about 50 minutes. (If you forget it in there for longer than that, you'll just need to let it rest a bit when you remove it from the fridge before rolling it out)

  4. Lightly flour your work surface, and roll out your first dough half to approximately 1/8" thick. I always take my pie plate and hold it over the dough to see if it's been rolled out large enough. Use the rolling pin to lift the dough by gently rolling the dough onto the pin, starting from one of the edges. Drape the pastry over the pie plate, adjust to fit evenly over the dish and resist the temptation to fuss with it or press it down into the dish. Transfer to the fridge to chill for 30 minutes.

  5. Make the filling: Combine the peaches, sugar and flour, stir to combine. Add the raspberries last and combine gently to keep them intact as much as possible.

  6. Make Egg Wash: beat egg and milk together in a small bowl. Have a small brush ready. Cut up the final two tablespoons of butter and set aside. Roll out your second pie crust.

  7. Grab the bottom crust out of the fridge and add the fruit filling—if the mixture is looking really juicy sprinkle with a few more tablespoons of flour. Dot with butter. Grab the reserved Egg Wash and brush it onto the edges of the bottom pie crust. Use your rolling pin to pick up the top crust and place on top. Using a knife, trim the excess dough from the sides of the pie dish. Go around the edges of the dough crimping the top and bottom crust together by placing your index finger under the crust and pushing up while pressing down on either side with your other index finger and thumb. Chill in the fridge for 20 minutes or so.

  8. Heat oven to 425°

  9. Remove pie from fridge and cut vents in the top crust. You can either cut simple slits on top of your crust or get creative with them. I like to cut out leaf shapes in the centre. Then I take some of the extra dough, cut it into more leaves as needed, and use Egg Wash to "glue" the pastry leaves onto the top crust to make a decorative pattern. 

  10. Last step before baking: brush the entire top crust and edges with Egg Wash, and sprinkle with coarse sugar. Bake at 425° for 20 minutes. Reduce heat to 350°, and bake for 30 – 40 minutes more until the fruit is bubbling and the crust is golden. Resist slicing the pie for about 20 minutes or so to allow the filling time to thicken up slightly. I like to serve with some vanilla bean ice cream on the side.

Filed Under: Dessert, Recipe Tagged With: butter, crust, double crust pie, Peach, pie, pie crust, raspberry

Schvetskins (Apricot Dumplings)

August 25, 2017 By Caroline 8 Comments

Imagine your knife cutting through a soft, pillowy dumpling to reveal a juicy, fragrant, perfectly cooked apricot. You sprinkle with sugar to sweeten the fruit, and take your first bite. The crisp sugary breadcrumbs hug the dough and the sweet apricot flavour fills your mouth. This is the Schvetskin experience we enjoy as a special ritual every August when the apricots are at their peak. From humble ingredients—potatoes, breadcrumbs and apricots—you can make a delicious dessert that is hearty enough to be a light meal on its own.

While they may be officially known as Marillenknodel, we’ve always called them “Schvetskins”. You see, you can also make these with other fruits like plums or even cherries. The plum version is called Zwetschgenknoedel, which growing up sounded a lot like “Schvetskin-knoodle”—and the name stuck. So now, any fruit dumplings of this sort, we just go with “Schvetskins” which is easier for us Anglophones to remember!

dark earthy potatoes alongside brilliant apricots in a blue bowl

For many years, Schvetskins were my nemesis. I could not get them to turn out for the life of me. They would always fall apart while cooking and turn into a terrible, goopy mess. I finally figure it out, I wasn’t using enough flour. Too much potato, and your dough will be sticky and fall apart when boiling. Even with a recipe, it can vary depending on your potatoes, humidity and other factors, so this is one you need to develop a bit of a feel for. I’ve included lots of photos to show the texture you are looking for. When in doubt, just add more flour. Better a little on the firm side, than falling apart!

A sturdy potato ricer, like the one shown below, is a great tool for this recipe as it helps ensure there are no potato lumps in your dough. I used to have a cheaper one, but with the russet potatoes I prefer to use for their dryness, it didn’t hold up well and the handles would end up all bent. The one below is from Williams Sonoma and it has very sturdy handles that easily process the potatoes. Reminds me of Play Dough’s “hairdresser” salon kit (I always wanted one of those growing up!)

Potatoes are fed through a heavy-duty ricer

So once you have “riced” your cooked potatoes, you add flour, egg, salt and cream of wheat. I mix it with a fork at first, then you have to get in there with your hands and knead it.

Texture of finished dough is relatively firm and somewhat sticky

Below is a closeup of the dough to help show the consistency. It should only be a little bit sticky, and hold together into a firm shape when pressed.

The dough should hold together into a somewhat sticky but smooth piece when pressed

Once you have the dough ready, roll each whole apricot into a little bit of flour. Take a handful of dough, and flatten it into your hand so it is big enough to wrap around the apricot (smaller apricots are ideal to use here). Fit the dough around the apricot and press it together so there are no gaps—this is important as you will be boiling them later so you can’t have any water getting in. If you are finding that the dough is tearing and not forming well around the apricot, you probably need more flour. Roll it in your hands a few times to even out the dough and press out any air gaps that may have formed between the dough and the apricot. Set on a plate while you make the rest.

Once you have used all the apricots, there is usually some dough left. This is perfect for what we call “wutzels” (I don’t even have a story of where that name comes from, just go with it!) This is where you just take a small amount of dough and roll it out to the size and shape of a plump finger. Make a bunch of these and cook them with the dumplings.

Flatten a ball of dough in your hand and insert the apricot

Once they are all ready, get a large pot of water boiling on the stove. Not a rolling boil, as the dumplings are a wee bit delicate; you want a nice, steady simmer. Gently drop the dumplings (don’t forget the wutzels!) into the water.

Dumplings cook in gently simmering water

While they are cooking (usually takes about 20–25 minutes), pull out a large skillet and melt some butter. Add the breadcrumbs and white sugar, and cook on medium-high heat to toast the breadcrumbs. Be careful here, I find it tends to go very slowly at first, so I’ll walk away and ignore it for a while, only to come back to find it on the edge of burning. Once they get going, you need to stir frequently to avoid burnt crumbs on the bottom of the pan (or turn the heat way down).

When the dumplings start to float in the water, they are almost done. I give them about 5 or so minutes after they start floating, and then out they come and straight into the breadcrumbs.

Roll cooked dumplings in toasted breadcrumbs

Roll them around and your finished product will look something like this:

The finished dumpling with a golden breadcrumb crust

Dumpling from above

Many recipes call for the removal of the pit, to be replaced with a sugar cube. I find it much easier to just cook these whole, and remove the pits while eating. Adding sugar to your own taste is nice, and I find you can sprinkle it more evenly over the fruit that way.

Have you tried making Schvetskins? If so I’d love to hear what you thought of them!

Juicy apricots are lined with the thick potato dumpling

Close up shot of juicy apricots inside fluffy potato dumplings
4.5 from 2 votes
Print

Schvetskins (Apricot Potato Dumplings)

A traditional Austrian treat otherwise known as Marillenknodel.

Course Dessert, Lunch
Cuisine Austrian
Prep Time 40 minutes
Cook Time 25 minutes
Total Time 1 hour 5 minutes
Servings 6

Ingredients

  • 4 Russet baking potatoes
  • 2 eggs
  • 3 cups All purpose flour, + additional for dusting apricots
  • 2 tbsp Cream of wheat
  • 10 Apricots (fresh) smaller size preferred
  • 3 tbsp Butter
  • 1 cup Breadcrumbs
  • 1/3 cup White sugar

Instructions

  1. Boil whole potatoes with skin on until cooked through. (Leaving the skin on keeps the potatoes more dry). Remove skins and process through a potato ricer (or mash very fine until no lumps remain). Place into a large bowl.

  2. Add flour, cream of wheat and eggs. Blend with a fork until mostly combined, then knead into a dough. Texture will be slightly sticky but it should be fairly firm and able to hold together well.

  3. Rinse fruit, roll in additional flour. Pack some dough in your hand about 1/4" thick, large enough to wrap around an apricot. Fit the apricot into the dough, sealing around fruit so there are no openings or cracks. Roll around in your hands to even out the dough and eliminate any air gaps. Repeat until all dumplings have been formed. (If your hands are getting out-of-control sticky, flour them)

  4. Roll any leftover dough into "wutzels"--finger length dumplings without any fruit. 

  5. Place a large pot of water to boil on the stove. Bring to a gentle boil, and drop dumplings carefully into the water, along with the wutzels. Cook at a simmer for 20–25 minutes. When the dumplings float to the top of the pot, give them about 5 more minutes and they will be cooked through.

  6. Meanwhile, melt butter in a large skillet. Add bread crumbs and sugar. Cook until the crumbs are a nice deep golden colour. When dumplings have cooked, add them straight to the breadcrumb pan and roll them to coat. Serve immediately with sugar on the side to sprinkle on the cooked fruit.


Filed Under: Dessert, Main, Recipe Tagged With: apricots, austrian, breadcrumbs, dumplings, German, Marillenknodel, potato, Schvetskins

Summer Salad of Peach and Fig

August 15, 2017 By Caroline Leave a Comment

Ahhh, peaches, your time has finally come! Niagara peaches in their prime are ideal for this gourmet salad. This recipe focuses on top notch ingredients from the sweetest, juiciest peaches, to beautiful fresh figs, blackberries and good quality balsamic vinegar, olive oil, salt and honey. Add some goat cheese, Prosciutto, pistachios and arugula, and you’ve got a showstopper that couldn’t be any simpler to make. Don’t worry about being precise with the measurements, adjust to suit your taste and you really can’t go wrong.

Close up of fuzzy Niagara peaches

I used a good quality Italian balsamic vinegar, Malden sea salt flakes and Savannah Bee Company’s Sourwood honey, but any good quality versions of these would be fantastic.

Fresh basil sprig, bottle of Aceto Balsamico Di Modena I.G.P., Malden sea salt and Savannah Bee Company raw Sourwood honey

To create this salad, start by tossing the arugula with some olive oil. Toss to combine, and lay it out on a plate. With my square plates I found using a diagonal line made for a pretty arrangement. Next, place your sliced peaches and figs on top. Add some blackberries in between. Then twist a few strands of Prosciutto and weave into the salad. Cut a few pieces of Prosciutto in half and twirl into roses and place around the salad to complete the design. Add soft goat cheese in dabs. Finally, sprinkle with balsamic, toss on some freshly roasted pistachios, drizzle honey all over and season with a pinch of sea salt flakes.

Sweeping arrangement of salad ingredients on a white square plate

The end result is almost too beautiful to eat! I promise, it tastes as good as it looks.

Salad ingredients all put together in a pretty arrangement showcasing the peaches, figs, blackberries, arugula, pistachios and honey drizzle.

Peach fig proscuitto salad closeup
Print

Summer Salad of Peach and Fig

A beautiful salad that elevates amazing summer produce into a show stopping and delicious dish.

Course Lunch, Salad
Prep Time 15 minutes
Servings 2

Ingredients

  • 2 cups Arugula
  • 1/2 tbsp Olive oil
  • 2 Peaches
  • 6 Black mission figs
  • 10 Blackberries
  • 6 slices Prosciutto
  • 2 oz soft goat cheese
  • Balsamic vinegar
  • Honey
  • Pistachios a handful, toasted
  • Malden sea salt

Instructions

  1. Toss Arugula with olive oil. Divide between 2 plates.

  2. Core and slice peaches into 6–8 pieces each. Slice figs in half vertically. Place peaches, figs and berries evenly over the arugula to create a balanced arrangement.

  3. Twist two slices of Prosciutto and weave into salad on one of the plates. Cut a third piece in half and twist each into a rosette and place onto the salad. Repeat on the second plate.

  4. Drop crumbled pieces of goat cheese evenly between the two plates. Drizzle with balsamic vinegar and honey. Add pistachios and a pinch of sea salt flakes. Serve immediately.


Filed Under: Recipe, Side Tagged With: Arugula, Fig, Goat Cheese, Gorgeous, Niagara Peach, Peach, Proscuitto, Salad

Pistachio Parsley Mint Pesto (with Flank Steak)

August 1, 2017 By Caroline 1 Comment

My favourite pesto ever, spooned onto lovely grilled flank steak.

It all started with the parsley. I came back from vacation and my herb pots were practically exploding with the most perfect, ready to eat parsley. But what to do with it all? I searched out a few options and decided to make a pesto. I whipped up this recipe from Serious Eats, and I have to say, the pesto is so beyond spectacular that I renamed the recipe to put the pesto first. Don’t get me wrong, it goes great with the flank steak, but it would be amazing with pasta, vegetables, on bread, and just straight up with a spoon!

You start with the amazing ingredients above. I used raw, unsalted pistachios, and toasted them for 10 minutes at 350° to bring out their full aroma and flavour. This is an important step not noted in the original recipe, although it did call for roasted nuts. Personally I think roasting them just before blending makes for deeper flavours.

Close up of the finished pesto. The parsley and mint get a nice lift from the lemon juice, and then the Parmesan just takes it all up a notch adding a nuanced nutty flavour that compliments the toasted pistachios so well.

bowl with marinade on a textured black background

Next, on to prepping the marinade for the steak (actually do this first, as you want to marinate the flank steak at least 4 hours before grilling). It’s pretty quick to chop everything up to prep this. I ran out of large ziplock bags, so I spread the steak out on a plate, and spread the marinade all over it, before folding it into a glass baking dish and popping it into the fridge. Another note: I like to score my flank steaks lightly on the diagonal, to help the marinade soak in. It also makes for nice looking lines after it has been grilled as the lines will show nice and golden. Do this just before you coat the steak with the marinade.

Steak folded into a glass dish to marinate

Close up of grilled steak showing score lines in all their glory

The way the juices gather in the score lines—drool inducing!

Juicy steak with pesto, plated with asparagus and baby potatoes

The final product—remember to slice the meat against the grain. You will want to dip everything on your plate into that pesto (and lick the plate). Get the recipe here.

Filed Under: Main, Recipe, Side Tagged With: bbq, flank steak, Grill, mint, parmesan, parsley, pesto, pistachio, steak, summer

Roasted Chicken & Veg Penne

July 19, 2017 By Caroline 2 Comments

vegetables, pasta and chicken are prepped

Roasted vegetables, balsamic chicken and penne make for a great pasta salad you can enjoy hot or cold. A favorite I make often over the summer, it makes four generous lunch servings that taste great cold the next day. Or, if you’re looking for a quick weeknight dinner, grill and enjoy immediately.

Refillable cooking mist spray bottle with olive oil

A big timesaver when it comes to grilling is using an olive oil spray bottle—I prefer to buy the bottle and fill it with my own olive oil so I know exactly what’s in there. I fill it up with just a regular olive oil (saving the extra-virgin for drizzling or making dressings where you can savour the difference). The bottle I have has a pump in the lid so you can remove the air, allowing it to spray into a fine mist perfect for lightly coating the vegetables in this recipe.

Mustard dressing mixed in a bowl

I used to toss this pasta salad with a pesto, and that works out ok, but I’ve come to prefer this grainy mustard dressing. It coats the pasta and lightly dresses the vegetables without overpowering the dish.

Roasted vegetables ready to be chopped up

I have a love-hate relationship with roasted red peppers. It took me years to figure out how to roast them to get the skins off. Unless you really, really blacken the skins like the pepper lid top right, it’s pretty tough to remove the skins. So, depending on my mood (and whether I forgot about the peppers and left them on the grill too long!), I either just under-roast the peppers a bit and leave the skins on (remove them before they get papery), or really blister them for deeper roasted peppers where the skins come off. Or sort of go half-and-half, like the peppers shown above, removing the blackened bits that come off easily.

Chicken on the grill

Marinating the chicken briefly in balsamic vinegar and olive oil gives a great flavour and depth of colour when grilled. I separate the tenders and slice the chicken breasts to flatten them, so that the thickness is more even. that way they cook through quickly and won’t dry out. You’ll want to pull the tenders off earlier as they will cook more quickly than the larger pieces.

Penne with balsamic chicken and roasted zucchini and red peppers with feta

The final plated pasta topped with fresh ground pepper and some crumbled feta. You can always mix it up with this recipe: try it with mushrooms, goat cheese, asparagus or toss in some spinach while the pasta is hot to wilt it.

Four lunch containers with pasta and veg ready to go

Lunch feasts packed up and ready to go. A great and healthy way to fuel your week at work.

Print

Roasted Chicken & Veg Penne

Pasta, peppers, zucchini and mustard dressing come together for a quick and healthy meal.

Course Lunch, Main Course
Cuisine American
Prep Time 20 minutes
Cook Time 20 minutes
Total Time 40 minutes
Servings 4

Ingredients

Pasta

  • 3 cups whole wheat penne
  • 2 chicken breasts, boneless, skinless
  • 1/3 cup balsamic vinegar
  • 1/3 cup olive oil + additional for veggies
  • salt
  • freshly ground pepper
  • 2 red peppers tops cut off, seeds & ribs removed
  • 2 zucchini sliced in half lengthwise
  • 3 green onions
  • 100 g crumbled feta cheese (about 1/2 cup)

Grainy Mustard Dressing

  • 1 1/2 tbsp grainy mustard (medium hot)
  • 4 tbsp extra virgin olive oil
  • 2 tbsp white wine vinegar
  • salt
  • pepper, freshly ground

Instructions

  1. Combine olive oil and balsamic vinegar in a dish large enough for the chicken. Prep chicken breasts: remove the tenders, and slice into the thickest part of the breast, opening it up like a book. Set chicken breasts and tenders into the prepared dish and marinate for 15–30 minutes.

  2. Heat grill to 400°. Prep vegetables: spray lightly with olive oil and season with salt and freshly ground pepper to taste. 

  3. In a small bowl, combine the grainy mustard dressing ingredients.

  4. Cook penne according to directions, drain and place into your final serving bowl. Add a few tbsp of the dressing to keep it from sticking while you prep the remaining ingredients.

  5. Grill vegetables to desired tenderness. If you're in a hurry, grill the red peppers lightly so you can leave the skins on and simple dice and serve. If you have a bit more time and prefer to roast them fully, blister the skin so that you can more easily remove it before chopping and adding to the pasta. When the vegetables are cooked, chop them up and add them to the pasta. (Discard the green onion ends, and just adding the chopped roasted bulbs)

  6. Lightly oil the grill; place the balsamic chicken breasts and tenders onto the hot grill. After 2 minutes, reduce heat to 350°. The tenders will cook more quickly, check them after about 8 minutes and remove when cooked through. Continue cooking the breasts an additional 5–6 minutes until cooked. Remove to a cutting board and chop, adding to the pasta bowl.

  7. Add remaining dressing to the pasta bowl, season with additional salt and freshly ground pepper to taste if needed. Divide among serving plates, and top with crumbled feta.

Filed Under: Main, Pleb Feasts, Recipe Tagged With: balsamic chicken, chicken breast, grainy mustard, Grill, grilled red peppers, grilled zucchini, olive oil spray, penne, Red peppers, roasted red peppers, Veg, Vegetables, zucchini

  • « Previous Page
  • Page 1
  • …
  • Page 4
  • Page 5
  • Page 6
  • Page 7
  • Page 8
  • Next Page »

Primary Sidebar

Welcome to my kitchen journal, a place where I will share my favourite heritage recipes honed over the years, as well as document new evolutions and experiments along the way. Great feasts become vehicles for fond memories—the best meals are the ones someone made with love, for you. Follow me to explore traditions, document stories and experience the joy of the feast. Read More…

  • Facebook
  • Instagram
  • Pinterest
  • Twitter
  • YouTube

Don’t miss a story!

Get email updates

Copyright © 2025